
Installation Sheet

Installation Instructions A422
Amulet Pendant 161170 Page 1 of 2
Hand-Forged, Vermont-Made Lighting and Accessories
154 Route 30 South, Castleton, Vermont 05735 33746
(Figure 1)
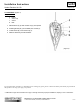
To Install the Fixture (Figure 1&2)
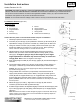
Component Parts
A Crossbar
B Ground Screw
C Cupped Washer
D Canopy
E #8 Screws (2)
F Fixture
G Canopy Gripper
H Supply/Support Cable
L Canopy Plate
M Screws w/Lock Washer (2)
Caution: Be sure power is off at the main breaker box prior to installation
1. Carefully unpack the fixture from the carton.
2. Crossbar (A) and canopy (D) ship attached. Remove (2) #8 screws (E) to
separate the canopy (D) from the crossbar (A). Retain parts for later use.
3. Using two machine screws (not provided), fasten the crossbar (A) to the
electric box. Note: A new electric box comes with screws. When replacing a
fixture, retain the existing screws for use with the new fixture.
4. Height of fixture can be set before attaching the fixture to the ceiling.
Remove the (2) screws w/lock washers (M) and canopy plate (L) from
canopy (D). If height is going to stay at max length or just a slight
height adjustment is needed it may not be necessary to remove the
canopy plate. Note: Fixture is shipped at max height.
5. Push supply/support cable (H) into canopy gripper (G) until desired height is
reached.
6. Coil supply/support cable (H) in canopy (D) and place canopy plate (L) in
canopy (D). Install the (2) screws w/lock washers (M) to secure plate.
Caution: Be sure not to pinch the supply/support cable (H) in between the canopy
(D) and the canopy plate (L).
7. Using suitable wire connectors (not provided) connect fixture wires to
supply wires (white to white, black to black). Using the crossbar ground
screw (B) and the cupped washer (C) run a pigtail lead to the junction box
and connect all ground wires (bare copper or green to bare copper or
green). Caution: Make sure wire connectors are twisted on securely, and no bare
wire is exposed.
8. Raise canopy (D) to ceiling. Align holes in canopy (D) with holes in
crossbar (A) and secure with (2) #8 screws (E).
9. If fixture height needs to be adjusted slightly to achieve desired height, push
up on canopy gripper (G) and gently pull down/push up on supply/support
cable (H).
Note: Excessive movement of cable through the gripper could cause cable to fray
slightly. Usage of the cable gripper is not recommended to frequently adjust the
fixture up and down in height.
(continued)
(Figure 2)
CAUTION: FAILURE TO INSTALL THIS FIXTURE PROPERLY MAY RESULT IN SERIOUS PERSONAL
INJURY OR DEATH AND PROPERTY DAMAGE. We recommend installation by a licensed electrician.
This product must be installed in accordance with applicable installation code(s), by a person familiar with the
construction and operation of the product and the hazards involved.*
Caution: Do not exceed maximum wattage noted on fixture. Use only recommended bulbs with fixture.