
Installation Instructions

3511B 06152020
72-00655
™
PRELIMINARY
MOUNTING
• Installed directly into a standard gang box us-
ing a standard decora faceplate (not included)
• Can be installed using the provided 3M Com-
mand™ Strip and Hubbell Controls custom
faceplate
• Can be installed next to an existing standard
gang box using the provided 3M Command™
Strip and multiple station decora faceplate
(not included)
• Built in level to ensure device is installed
perfectly
ELECTRICAL
Input:
• Class 2 Low Voltage
• 3VDC. 5.4mA
• Powered using CR2032 Battery Only
OPERATING ENVIRONMENT
• Rated for Indoor Use ONLY
• Operating temperature: 32° to 104°F
(0° to 40°C)
• Relative humidity (non-condensing):
0% to 90%
CERTIFICATIONS
• Conforms with UL STD 916 and CSA C22.2
No. 205
• FCC Part 15.247
• Contains Transmitter Module FCC ID:
YH9NXSWWRS
• •Bluetooth® Version 4.1
WARRANTY
• 5 year limited warranty
• See HLI Standard Warranty for additional
information
DESCRIPTION
Hubbell Control Solutions’ NX Wireless Wall Station provides wireless manual control of the NX System. The NX Wireless Wall Station provides
simple ON, RAISE, LOWER, and OFF functionality for NX Devices and NX Enabled Luminaires. The NX Wireless Wall Station can be congured via the
controlHUBB mobile application and can be utilized in either stand alone or networked applications with other NX Room Control or NX Network
devices.
SPECIFICATIONS
BAT TERY INSTALL ATIO N
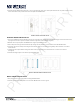
1. Before using the NX Wireless Rocker Wall Station you will need to rst remove the battery tab.
2. Pull the plastic tab out from the back of the product and discard (See Figure 1).
3. The NX Wall Station is now powered and can be installed using one of the three approved methods listed below :
WALL MOUNT INSTALLATION
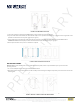
1. To mount your NX Wireless Rocker Wall Station directly onto a wall, rst thoroughly clean the wall’s surface with isopropyl alcohol to remove any
dirt or dust (Do not mount to applications where wallpaper is applied).
2. Remove the plastic backing to the 3M Command™ Strip and align the strip with the recessed area on the back of the NX Wall Station (See Figure 2).
3. Peel o the opposite side of the plastic backing and ensure that the product is level before pressing rmly to the wall. Hold for 30 seconds to
ensure adhesion (See Figure 2).
FIGURE 1: REMOVAL OF BATTERY TAB
11
USING FOR THE FIRST TIME
REMOVE BATTERY PULL TAB
BeforeusingtheiDevicesInstantSwitchforthersttime,youwill
need to remove the battery tab. Pull the plastic tab out from the
back of the product and discard.
Once the battery tab is removed, the Instant Switch will
automatically enter pairing mode for 30 minutes.
NOTE: If 30 minutes have elapsed and you have not setup the
Instant Switch, you will need to press the Pairing Reset button
7
to
re-enter pairing mode.
Next, launch the iDevices Connected
app. The app will guide you through
setup and placement of the Instant
Switch in your home.
Once the in-app setup is complete,
follow the steps on page 12 to
complete the installation.
701 Millennium Blvd. | Greenville, SC 29607 | (864) 678-1000 | www.hubbellcontrolsolutions.com
Copyright © 2020 Hubbell Control Solutions, a division of Hubbell Lighting, Inc. All rights reserved. All product and company names, logos and product
identiers are trademarks ™ or registered trademarks ® of Hubbell Lighting, Inc. or their respective owners. Use of them does not necessarily imply any
aliation with or endorsement by such respective owners.