
Installation Instructions

3511B 06152020
72-00655
™
PRELIMINARY
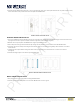
4. Install the magnetic NX Wall Station faceplate, or a decora style faceplate of your choice. If a faceplate other than the one provided requires screws,
use the shorter 6mm screws provided to anchor the faceplate to the NX Wall Station.
FIGURE 2: WALL MOUNT INSTALLATION
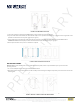
FIGURE 3: ADJACENT GANG BOX INSTALLATION
ADJACENT GANG BOX INSTALLATION
1. To mount your NX Wireless Rocker Wall Station directly onto a wall adjacent to a standard gang box, rst thoroughly clean the wall’s surface with
isopropyl alcohol to remove any dirt or dust (Do not mount to applications where wallpaper is applied).
2. Mount the decora style faceplate to the NX Wall Station using the provided 6mm screws.
3. Remove the plastic backing to the 3M Command™ Strip and align the strip with the recessed area on the back of the NX Wall Station.
4. Peel o the opposite side of the plastic backing and ensure that the product is level before pressing rmly to the wall. Hold for 30 seconds to
ensure adhesion.
5. Carefully align the faceplate with the existing wall switches before pressing rmly to the wall. Hold for 30 seconds to ensure adhesion
(See Figure 3).
6. Install the remaining faceplate screws into the adjacent wall switch(es).
DIRECT GANG BOX INSTALLATION
1. Turn power OFF at the service panel before installing the NX Wall Station.
2. Install the ground wire assembly on the access door of the NX Wall Station as seen in Figure 4.
15
INSTALLATION
INSTALL ON A WALL
•TomountyourInstantSwitchdirectlyontoawall,rstthoroughly
clean the wall’s surface with isopropyl alcohol to remove any dirt or dust.
• Remove the plastic backing to the Command™ Strip and align the
strip with the recessed area on the back of the Instant Switch.
• Peel off the other side of the plastic backing and ensure that the
productislevelbeforepressingrmlytothewall.Holdfor
30 seconds.
• Install the magnetic iDevices faceplate, or a rocker style faceplate
of your choice. If the faceplate you choose requires screws, use the
shorter, 6mm screws provided to anchor the faceplate to the
Instant Switch.
17
INSTALL NEXT TO GANG BOX
• Install the 3M Command™ Strip onto the back of the
Instant Switch.
• Mount the faceplate onto the Instant Switch using the provided
6mm screws.
• Peel off the plastic backing of the 3M Command™ Strip.
• Carefully line up your faceplate with the existing wall switches and
press to the wall for 30 seconds.
• Install the remaining faceplate screws into the adjacent
wall switch(es).
701 Millennium Blvd. | Greenville, SC 29607 | (864) 678-1000 | www.hubbellcontrolsolutions.com
Copyright © 2020 Hubbell Control Solutions, a division of Hubbell Lighting, Inc. All rights reserved. All product and company names, logos and product
identiers are trademarks ™ or registered trademarks ® of Hubbell Lighting, Inc. or their respective owners. Use of them does not necessarily imply any
aliation with or endorsement by such respective owners.