
Installation Instructions

3511B 06152020
72-00655
™
PRELIMINARY
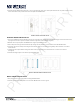
3. After the module assembly has been removed turn the device over to reveal the battery located on the back.
4. Remove the battery by inserting your nger in the notch and pulling it toward you as seen in Figure 6.
5. When replacing the battery, be sure to install with the positive (+) side facing out so it is visible.
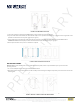
6. To replace the module line up the tabs on the bottom of the module assembly with the arrows on the bottom of the mounting plate as seen in
Figure 7.
27
REPLACING THE MODULE ASSEMBLY
• Line up the tabs on the bottom of the module assembly with the
arrows on the bottom of the mounting plate.
•Tiltthetopofthemoduleassemblyupandpressitrmlyuntilit
clicks into place.
CAUTION: Risk of explosion if battery is replaced by an incorrect type. Dispose of used
batteries according to the instructions.
FIGURE 7: REINSTALLING THE MODULE ASSEMBLY
7. Tilt the top of the module assembly up and press it rmly until it clicks into place.
8. Reinstall the faceplate.
PROGRAMMING INSTRUCTIONS
1. To discover the NX Wireless Rocker Wall Station you must rst place the device into the discovery mode.
2. Press the top button of the NX Wireless Rocker Wall Station you are attempting to discover and hold for 3 seconds.
3. Once the LED at the bottom of the device begins to blink it is now discoverable via the controlHUBB mobile app.
4. Go to the controlHUBB mobile app and locate the devices unique ID and select the device.
5. Once you select the device you can now congure the wall station settings.
701 Millennium Blvd. | Greenville, SC 29607 | (864) 678-1000 | www.hubbellcontrolsolutions.com
Copyright © 2020 Hubbell Control Solutions, a division of Hubbell Lighting, Inc. All rights reserved. All product and company names, logos and product
identiers are trademarks ™ or registered trademarks ® of Hubbell Lighting, Inc. or their respective owners. Use of them does not necessarily imply any
aliation with or endorsement by such respective owners.