USER’S GUIDE 5" Smart Baby Monitor with Night Light Nursery Pal Shimmer The features described in this user’s guide are subject to modifications without prior notice.
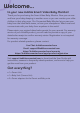
Welcome... to your new Hubble Smart Video Baby Monitor! Thank you for purchasing the Smart Video Baby Monitor. Now you can see and hear your baby sleeping in another room or you can monitor your older children in their play room. Our Connected Baby Monitor let you see your baby from the hand-held viewer, or from your smartphone. Watch over and communicate with your baby from anywhere in the world. Please retain your original dated sales receipt for your records.
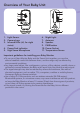
Overview of Your Baby Unit 7 1 8 2 3 9 4 10 5 6 11 1. 2. 3. 4. 5. Light Sensor Camera Lens Infrared LEDs (x8, for night vision) Power/Link indicatior High Sense Microphone 6. 7. 8. 9. 10. 11. Night Light Antenna Speaker PAIR button Power Socket Temperature Sensor Important guidelines for installing your Baby Monitor • To use your Video Monitor Baby and the Parent Unit together, you must be able to establish a radio link between them, and the range may be affected by environmental conditions.
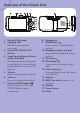
Overview of the Parent Unit 1 2 3 4 5 6 7 14 8 9 10 15 11 16 17 12 18 13 1. 2. 3. 4. 5. 6. 7. Display (LCD screen) Charging LED RED when mains power connected. Parent Unit ON/OFF LED (Green) Sound Level indicators (Green, Amber, Red, Red) Show the sound level detected by the Baby Unit - the louder of sound detected, the more LEDs light up. Volume Press to decrease Volume level. Volume + Press to increase Volume level.
Overview of the Parent Unit Signal Level (4 Levels) Night Vision Mode (Video also changes to Black/White). Indicates the screen off timer is set. Volume Level Control (5 Levels). No Baby Unit detected. Battery Level Indication (4 Levels). Zoom Level Control (1X, 2X). Night Light LCD Brightness Level Control (5 Levels). Alarm Setting (2h, 3h, 4h, 5h or 6h) On status bar, indicates alarm set, and when flashing, that alarm time has been reached or missed.
Table of contents 1. Safety Instructions................................................................................ 8 2. Getting Started.................................................................................... 11 2.1 Connecting the power supply for the Baby Unit..............................11 2.2 Connecting the Power Supply of the Parent Unit............................11 2.3 Desktop Stand of the Parent Unit ....................................................12 3. Using the Baby Monitor..
4.1 4.2 4.3 4.4 Minimum System Requirements.......................................................18 Getting started - Connecting Devices..............................................18 Setup.................................................................................................19 User Account and Camera Setup on Android™ Devices or iPhone®/ iPad®................................................................................................19 4.4.1 Power ON and Connect the Camera.................
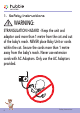
1. Safety Instructions WARNING: STRANGULATION HAZARD - Keep the unit and adaptor cord more than 1 metre from the cot and out of the baby’s reach. NEVER place Baby Unit or cords within the cot. Secure the cords more than 1 metre away from the baby’s reach. Never use extension cords with AC Adaptors. Only use the AC Adaptors provided.
• • • English BABY UNIT SET UP & USE: Determine a location for the BABY UNIT that will provide the best view of your baby in his/her cot. Place the BABY UNIT on a flat surface, such as a dresser, bureau, or shelf or mount the Unit to a wall securely using the keyhole slots under the stand. NEVER place the Baby Unit or cords within the cot. WARNING This Baby Monitor is compliant with all relevant standards regarding electromagnetic fields and is, when handled as described in the User’s Guide, safe to use.
WARNING: There is a risk of explosion if the battery is replaced by an incorrect type. Dispose of used batteries according to their instructions. To reduce risk of fire or burns. - Do not attempt to disassemble, or service the battery pack. Do not crush, puncture, short external contacts, or dispose of in fire or water. Do not heat above 60oC (140oF). Use specific charger only. Replace only with the battery pack designated for this product.
2.1 English 2. Getting Started Connecting the power supply for the Baby Unit • • • Insert the DC plug of the power adaptor into the DC socket on the back of the Baby Unit. Connect the other end of the power adaptor to mains power. The Green power indicator lights when the baby unit is on. Note: Only use the power adaptor (5VDC, 1000mA) provided. 2.2 Connecting the Power Supply of the Parent Unit The parent unit contains a rechargeable battery (Lithium ion 2100mAh).
• Connect the small plug of the power adapter to the parent unit and the other end to mains power. Only use the enclosed adapter (5VDC/1000mA). • Press and hold the 0 button to turn the Parent unit on, the Parent unit and Baby unit are automatically linked and ready to use.
Please read these instructions carefully, and be aware that this baby monitor is only intended as an aid. It is not a substitute for responsible, correct parental supervision. Note: Do not place the Baby Unit within the baby’s reach! If there is interference with the picture or sound, try moving the units to different locations, and ensure they are not close to other electrical equipment. 3.1 Power on or off the Parent Unit Press and hold 0 to turn on the Parent Unit.
3.5 Adjust the speaker volume for Parent Unit You can adjust the speaker volume from Volume 1 to Volume 5, or turn it off. Press + or on the Parent Unit when it is in camera viewing mode. When the speaker volume is set to off, the screen displays . 3.6 Zoom You can zoom in or out while viewing the image from Baby Unit. 1. Press > to zoom in. 2. Press and hold <, > , or + or to move the zoomed image left, right, up or down correspondingly. 3. Press < to zoom out. 3.
Set the alarm on the Parent Unit You can use the Parent Unit to set the alarm as a reminder for you to take care of your baby. Turn on and set the alarm when it is currently off: 1. Press when the Parent Unit is in camera viewing mode. 2. Press < or > to scroll to and press button. 3. Press + or to choose (On), then press button. 4. Press + or to choose 2h, 3h, 4h, 5h or 6h. (The default setting is Alarm OFF.) 5. Press button to confirm your selection. 6.
3.11 Set the screen off time of the Parent Unit You can set the screen off time of the Parent Unit after being in idle mode for a particular time interval. 1. Press when the Parent Unit is in camera viewing mode. 2. Press < or > to scroll to and press button. 3. Press + or to select 60m, 30m, 5m or OFF for the parent unit video to turn off after 5 mins, 30 mins or 60 mins if no buttons have been pressed. 4. Press button to confirm your selection. 5.
3.13 Delete a Baby Unit English You can choose to remove a paired Baby Unit from the Parent Unit. 1. Press when the Parent Unit is in camera viewing mode. . 2. Press < or > to scroll to or to select the desired Baby Unit (Cam1, 2, 3 or 4). 3. Press + 4. Press button, then < or > to choose YES ( ) or NO (X). 5. Press button to confirm your selection. Note: You cannot delete a Baby Unit if it is the only one paired. 3.
4. Wi-Fi® Internet Viewing 4.1 Minimum System Requirements Android™ System • Version 8.0 or above iPhone®/iPad® iOS • Version 12.0 or above High Speed (Wi-Fi®) Internet • At least 0.6 Mbps upload bandwidth per camera (you can test your internet speed on this site: http://www.speedtest.net) 4.
Setup Connect the Wi-Fi® Camera to the Power Adaptor, then plug into mains power. The Camera must be within range of the Wi-Fi® router with which you want to connect. Make sure the password of the router is available for entering during the in-app setup process. Status of LED Indication: Pair / Setup state: LED is Flashing Green. Unconnected state: LED is Flashing Red. Connected state: LED is Solid Green. Note: You can only setup via a compatible smartphone or tablet only. 4.
4.4.3 • • • Sign up with Hubble on your smart device Ensure that your smart device is connected to your Wi-Fi® router. Run HubbleClub by Hubble Connected App, tap Create Account with Hubble (fig.1), read through the Privacy Policy, Terms and Conditions, by signing up you agree to our terms of service, tap Done (fig.2). fig.1 fig.2 Follow the steps to enter your account information and sign up with Hubble (fig.3-6). fig.3 fig.4 fig.5 fig.
• • • • Add the Camera to your account Log in your Hubble Account by entering “User Name” and “Password” (fig.7). Tap Add Your Device on the screen of your device to add new Camera (fig.8) fig.7 fig.8 To select your device for setting up by tapping Baby Moniotor (fig.9). Tap Nursery Pal Shimmer to add the new camera (fig.10) . fig.9 Wi-Fi® Internet Viewing fig.10 21 English 4.4.
• • • The following setup instructions will appear on the screen, select your Wi-Fi network and enter “Password” (fig.11). Power on your camera and wait for the LED to flash Red on the camera. Press and hold the PAIR button on the side of Camera, you will hear a voice prompt “Ready for Pairing” then tap Next (fig.12, fig.13) fig.11 fig.12 fig.13 Tap Generate QR code on your device and hold the QR code 15 to 30cm in front of Camera until you hear confirmation message “Scanning Success” from your device.
• • Tap Continue, it will take a few minutes for the Camera to connect to the Wi-Fi® network before showing the connection status (fig.16). The Camera has been successfully connected, name your Camera (fig.17). Tap Finish to complete the camera setup with Hubble. fig.16 fig.17 Note: If connection fails, please tap Retry and repeat the steps starting from 4.4.4. • Add your baby’s profile to track your baby growth by tapping Create New Profile (fig.18).
5. Disposal of the Device (environment) At the end of the product life cycle, you should not dispose of this product with normal household waste. Take this product to a collection point for the recycling of electrical and electronic equipment. The symbol on the product, user’s guide and/or box indicates this. Some of the product materials can be re-used if you take them to a recycling point.
Display No display • Try recharging the battery pack. • Reset the Units. Unplug both the Units' electrical power, then plug them back in. • Is the Unit switched on? • Press and hold the ON/OFF button 0 on the Parent Unit for 3 seconds to switch it ON. • Is the correct camera selected? Change the camera number, if necessary. • Is the video display turned on? Press the VIDEO ON/OFF button V to turn it ON.
• Make sure that the Baby and Parent Units are not near other electrical equipment, such as a television, computer or cordless/mobile telephone. Move the Baby Unit or Parent Unit 3 feet away from other electrical equipment. • Use of other 2.4 GHz products, such as wireless networks (Wi-Fi® routers), Bluetooth™ systems, or microwave ovens, may cause interference with this product.
Category Problem Description / Error Solution App Cannot find my product model at “Add Camera” There are more than one Hubble App. Check if you download correct App “HubbleClub By Hubble Connected” Account I am unable to login even after registration. Please check your user name and password. Account I receive an error message saying: “Email ID is not registered”. Please ensure that you have registered with us. Tap Create Account to create an account.
Connectivity I get a message: We 1. Issues are having problems accessing your camera. This could be due to lack of internet 2. connection. Please wait and try again later. 3. Please try again in a few minutes.This could be because of any issue with your internet connection. If the problem remains, please restart your Camera to check if this fixes the problem. Please restart your WIFI Router. Viewing Camera When I am in “remote mode”, the video stops after 5 minutes.
What is the significance of the camera LED? Pair / Setup state: LED is Flashing Green. Unconnected state: LED is Flashing Red. Connected state: LED is Solid Green. Green: The camera is live streaming. LED Off - Power off / User turn off by Camera App setting. Connectivity I am not able to issues access my Camera. Please check if the Camera is within Wi-Fi® range. Please try to move the Camera closer to the router for better Wi-Fi® connectivity and try again.
Camera When I try to view the Camera, I get a prompt for Camera firmware upgrade. What should I do? Please upgrade your firmware. This takes around 5 minutes. We push upgrades from time to time to improve the Camera features. General Which platforms are supported for accessing my Camera? Minimum requirement: Android™ 8.0 iPhone®/iPad® iOS version 12.0 General I do not hear any sound when I am accessing a remote Camera. You can tap on the speaker icon in the video stream screen to hear audio.
How do I download Android™: the App for Android™ – Open the Google Play Store on and iOS devices? your Android™ device.
8. General Information If your product is not working properly, read this User Guide. Contact Customer Service: Live Chat: hubbleconnected.com Email: support@hubbleconnected.com https://hubbleconnected.com/warranty https://hubbleconnected.com/apps/product-registration Consumer Products and Accessories Limited Warranty (“Warranty”) Thank you for purchasing this Hubble Smart Nursery branded product manufactured by Hubble Baby (HK) Limited ("HUBBLE").
English • Damage caused by or resulting from modifications, alterations, tampering, improper installation, or repairs by someone other than Hubble connected or their authorized representatives; • Defects, damages, or the failure of Products or Accessories due to any communication service or signal you may subscribe to or use with the Products or Accessories; and, • Periodic maintenance, repair and replacement of parts due to normal wear and tear.
THE PRODUCTS OR ACCESSORIES. ALL DISCLAIMERS, LIMITATIONS OF LIABILITY AND MODIFICAITONS OF WARRANTIES STILL APPLY EVEN IF THE LIMITED REMEDY OF REPAIR AND REPLACEMENT FAILS OF ITS ESSENTIAL PURPOSE. Some jurisdictions do not allow the limitation or exclusion of incidental or consequential damages, so the above limitations or exclusions may not apply to you. This Limited Warranty gives you specific legal rights, and you may have other rights that vary from one jurisdiction to another.
FCC and IC regulations (FCC Part 15) Note: This device complies with Part 15 of the FCC Rules and Industry Canada licence-exempt RSS standard(s). Operation is subject to the following two conditions: (1) this device may not cause harmful interference, and (2) this device must accept any interference received, including interference that may cause undesired operation.
1) Caution: The user is cautioned that changes or modifications not expressly approved by the party responsible for compliance could void the user's authority to operate the equipment. 2) Radiation Exposure Statement: The baby unit complies with FCC/ISED radiation exposure limits set forth for an uncontrolled environment. The baby unit should be installed and operated with minimum distance 20cm between the radiator& your body. The parent unit has been tested and comply with FCC and ISED SAR limits.
2402 MHz to 2477 MHz Display 5” diagonal LCD Brightness Control 8 steps Volume Control 8 steps Operating Temperature 410F - 1040F Power Adapter: Input 100-240V AC, 50/60Hz, 300mA; Output 5.0V DC, 1000mA English Parent Unit Frequency WARNING Use only with provided power supply. Battery (built-in) TMB i9300 3.8V, 2100mAh Lithium-Ion, re-chargeable battery pack WARNING Do not attempt to replace the battery, but contact customer Service if it needs replacing.
Manufactured, distributed and sold by Hubble Baby (HK) Limited. Apple logo is trademark of Apple Inc., registered in the U.S. and other countries. App Store is a service mark of Apple Inc. Google Play and Android are trademarks of Google Inc. Wi-Fi is a trademark of the Wi-Fi Alliance. All rights reserved. US_EN Version 1.