
User's Guide
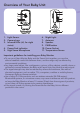
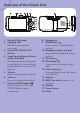
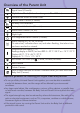
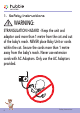
Table Of Contents
- _bookmark2
- 1. Safety Instructions
- 2. Getting Started
- 3. Using the Baby Monitor
- 3.1 Power on or off the Parent Unit
- 3.2 Turn off the Parent Unit screen
- 3.3 Night Vision Mode
- 3.4 Talk Mode
- 3.5 Adjust the speaker volume for Parent Unit
- 3.6 Zoom
- 3.7 Set Night Light
- 3.8 Adjust the LCD brightness of the Parent Unit
- 3.9 Set the alarm on the Parent Unit
- 3.10 Temperature Setting
- 3.11 Set the screen off time of the Parent Unit
- 3.12 Pair and replace extra new Baby Unit
- 3.13 Delete a Baby Unit
- 3.14 Multi-Camera Use
- 4. Wi-Fi® Internet Viewing
- 5. Disposal of the Device (environment)
- 6. Cleaning
- 7. Help
- 8. General Information
- 9. Technical Specifications

Overview of Your Baby Unit
Important guidelines for installing your Baby Monitor
• To use your Video Monitor Baby and the Parent Unit together, you must be
able to establish a radio link between them, and the range may be affected by
environmental conditions.
• Any large metal object, like a refrigerator, a mirror, a ling cabinet, metallic doors or
reinforced concrete between the Baby and Parent Units may block the radio signal.
• The signal strength may also be reduced by other solid structures, like walls or
electrical equipment, such as radios, TVs, computers, cordless or mobile phones,
uorescent lights or dimmer switches.
• Use of other 2.4 GHz products, such as wireless networks (Wi-Fi® routers),
Bluetooth® systems, or microwave ovens, may cause interference with this product,
so keep the Baby Monitor at least 1.5 metres (5 feet) from these types of products,
or turn them off if they appear to be causing interference.
• If the signal is weak, try moving the Parent and/or the Baby Unit to different
positions in the rooms.
1
2
6
4
3
5
8
9
10
7
11
1. Light Sensor
2. Camera Lens
3. Infrared LEDs (x8, for night
vision)
4. Power/Link indicatior
5. High Sense Microphone
6. Night Light
7. Antenna
8. Speaker
9. PAIR button
10. Power Socket
11. Temperature Sensor