
User's Guide
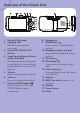
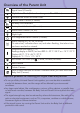
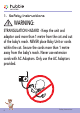
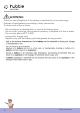
Table Of Contents
- _bookmark2
- 1. Safety Instructions
- 2. Getting Started
- 3. Using the Baby Monitor
- 3.1 Power on or off the Parent Unit
- 3.2 Turn off the Parent Unit screen
- 3.3 Night Vision Mode
- 3.4 Talk Mode
- 3.5 Adjust the speaker volume for Parent Unit
- 3.6 Zoom
- 3.7 Set Night Light
- 3.8 Adjust the LCD brightness of the Parent Unit
- 3.9 Set the alarm on the Parent Unit
- 3.10 Temperature Setting
- 3.11 Set the screen off time of the Parent Unit
- 3.12 Pair and replace extra new Baby Unit
- 3.13 Delete a Baby Unit
- 3.14 Multi-Camera Use
- 4. Wi-Fi® Internet Viewing
- 5. Disposal of the Device (environment)
- 6. Cleaning
- 7. Help
- 8. General Information
- 9. Technical Specifications

Overview of the Parent Unit
2 43
8
10
9
5 6
11
12
13
7
16
17
18
15
14
1
1. Display (LCD screen)
2. Charging LED
RED when mains power
connected.
3. Parent Unit ON/OFF LED
(Green)
4. Sound Level indicators (Green,
Amber, Red, Red)
Show the sound level detected
by the Baby Unit - the louder of
sound detected, the more LEDs
light up.
5. Volume -
Press to decrease Volume level.
6. Volume +
Press to increase Volume level.
7. Display ON/OFF button
Press to turn the LCD screen
ON/OFF (Note: audio is
maintained.)
8. Microphone
9. MENU button
Press to open / close the Menu
options.
10. Navigation button
+ - < >
Move Up/Down/Right/Left menu
options.
11. OK button
12. TALK button
T
Press and hold to speak to your
baby.
13. Power button
0
Press and Hold to turn the Parent
Unit ON/OFF.
14. Antenna
15. RESET pin hole (recessed - use
small pin)
16. Speaker
17. Power Socket
18. Stand