
User's Guide


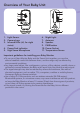
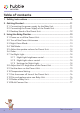
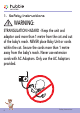
Table Of Contents
- _bookmark2
- 1. Safety Instructions
- 2. Getting Started
- 3. Using the Baby Monitor
- 3.1 Power on or off the Parent Unit
- 3.2 Turn off the Parent Unit screen
- 3.3 Night Vision Mode
- 3.4 Talk Mode
- 3.5 Adjust the speaker volume for Parent Unit
- 3.6 Zoom
- 3.7 Set Night Light
- 3.8 Adjust the LCD brightness of the Parent Unit
- 3.9 Set the alarm on the Parent Unit
- 3.10 Temperature Setting
- 3.11 Set the screen off time of the Parent Unit
- 3.12 Pair and replace extra new Baby Unit
- 3.13 Delete a Baby Unit
- 3.14 Multi-Camera Use
- 4. Wi-Fi® Internet Viewing
- 5. Disposal of the Device (environment)
- 6. Cleaning
- 7. Help
- 8. General Information
- 9. Technical Specifications

9
Safety Instructions
English
BABY UNIT SET UP & USE:
• Determine a location for the BABY UNIT that will provide the best view
of your baby in his/her cot.
• Place the BABY UNIT on a flat surface, such as a dresser, bureau, or
shelf or mount the Unit to a wall securely using the keyhole slots under
the stand.
• NEVER place the Baby Unit or cords within the cot.
WARNING
• Adult assembly required. Keep small parts away from children when
assembling.
• This product is not a toy. Do not allow children to play with it.
• This Baby Monitor is not a substitute for responsible adult supervision.
• Keep this user’s guide for future reference.
• Keep the cords out of reach of children.
• Do not cover the Baby Monitor with a towel or blanket.
• Test this monitor and all its functions so that you are familiar with it prior
to actual use.
• Do not use the Baby Monitor in damp areas or close to water.
• Do not install the Baby Monitor in extreme cold or heat, direct sunlight,
or close to a heat source.
• Only use the chargers and power adaptors provided. Do not use other
chargers or power adaptors as this may damage the device and battery
pack.
• Only insert a battery pack of the same type.
• Do not touch the plug contacts with sharp or metal objects.
• Connect the power adaptors to easily accessible electrical sockets.