® H122D X4 RACING DRONE 《H122D Quick Start Guide》 Version 1.
The first flight configuration: Aircraft + HT015 Transmitter Step 1 Binding the aircraft and transmitter 1. Pull and hold the throttle to its lowest position. 2.Hold down the Photo key and power the transmitter on. The transmitter’s status LED will flash red; please do not press or touch any other keys, buttons or sticks while this process is ongoing. Users may let go of the Photo key and throttle. Connect the aircraft to its battery and allow it to bind to the transmitter.
plane during flight. When this happens, land the aircraft and disarm its motors. Follow the below steps to do a horizontal/gyro calibration. 1) Place the aircraft on a completely flat surface and then follow the below calibration procedure. Hold the left stick to the right side of its socket. Rapidly and continuously wiggle the right stick left and right until the rear red LEDS flash alternately. 2) Calibration is complete when the LED indicators stop flashing.
Step 3 Takeoff Simultaneously pull the transmitter joysticks diagonally down-out to arm the motors (as shown in the below figure). Pull the left joystick (throttle) upwards to take off. Landing Slowly and gently pull the throttle joystick down until the copter has completed its descent on the ground. Simultaneously pull the transmitter joysticks diagonally down-out to disarm the motors (as shown in the below figure).
The second flight configuration: Aircraft + HS001+ HT015 Transmitter+HV002 Video glasses Step 1 Binding the aircraft and transmitter 1. Pull and hold the throttle to its lowest position. Hold down the Photo key and power the transmitter on; allow the transmitter to enter binding mode. All illustrations are shown in Mode 2 (American hand) 2. Power the HS001 on by pushing the power switch up. Long press the display’s binding button (shown below) to allow the HS001 to enter binding mode.
3. Connect the drone to its battery. While all units are in either binding or pairing modes, please do not touch, press or move any of the transmitter joysticks, buttons or keys. Doing so will cause the aircraft to drift or perform unstably during flight. After binding is successful, the transmitter’s binding status LED will be a solid blue. Step 2 Horizontal calibration (also known as Gyro calibration) Horizontal calibration is required when the aircraft drifts on the horizontal plane during flight.
When using the horizontal calibration, please ensure that the aircraft is on a completely flat surface. Aircraft motors should be completely disarmed. Do not move the aircraft during calibration or calibrate on an uneven/tilted surface, or there will be errors. Step 3 Installing the HS001 display Option 1: Secure the HS001 display to the HT015’s mobile device bracket. Option 2 (with the HV002 video goggles): Press the release key on the HV002 goggles to release its face panel.
Step 4 Takeoff Simultaneously pull the transmitter joysticks diagonally down-out to arm the motors (as shown in the below figure). Pull the left joystick (throttle) upwards to take off. Landing Slowly and gently pull the throttle joystick down until the copter has completed its descent on the ground. Simultaneously pull the transmitter joysticks diagonally down-out to disarm the motors (as shown in the below figure). After flight, please completely shut off the aircraft, transmitter and external display.
Getting to know your H122D Thank you for purchasing a HUBSAN product. The H122D is an easy to fly racing aircraft, paired with a multifunctional remote control. 5.
Getting to know your HT015 Battery compartment Photo key Video key Aileron trim Mobile Device frame Joystick Joystick Power button Headlight power toggle Clear Screen key Transmitter status LED HT015 low power status LED Binding status LED Getting to know your HS001 Micro-SD TF card slot charging port 09 Power switch
5.
Installing and removing propellers Propeller B Propeller A Propeller A Propeller B Installation: Before installing propellers for the first time, please check that each Propeller A is matched with motor A and each Propeller B is matched with motor B. Align the "I" with the flat side of the "D" shaped motor shaft. Then use the provided screws and screwdriver to secure each propeller. Propeller A’s are paired with black propeller screws and are tightened counterclockwise.
“D” Shaft Removal Installation Counterclockwise to install Clockwise to remove Clockwise to install Counterclockwise to remove Note: Mind the differing colors of the A and B propeller screws! 12
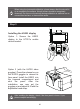
Charging and Installing the Aircraft battery The H122D aircraft is paired with a rechargeable 7.6v, 710mAh Li-Po. Be sure to use the provided Hubsan dedicated charger for charging. Fully charge the battery before flight. Connect the charger’s USB adapter to a PC terminal and then the battery to the charger. Charging time is approximately 130 min; recommended flight time is 6.5 minutes. Be sure to charge the battery before each flight.
Frequently Asked Questions 1. Aircraft and remote control are not pairing (1) Check that the aircraft and remote control are both powered on. (2) Turn off both the aircraft and remote control. Rebind the aircraft to the remote control by following the rebind directions on page 1 of this guide. 2. No video on the screen or user is experiencing strong video feed interference (1) Check whether there are strong sources of wireless interference (i.e. WIFI, electricity, radio tower frequencies, etc).
Disclaimer & Warning All users must read product operating instructions as well as this liability disclaimer before using any Hubsan product. By using a Hubsan product(s), users are accepting the terms and conditions of Hubsan liability and operational guidelines. This product is not suitable for minors under 14 years of age.
poor eyesight or is otherwise unsuited for operating Hubsan products. 10. Aircraft use in or exposure to bad weather, such as a rain, wind, snow, hail, lighting, tornadoes and hurricanes. 11. Products are involved in/exposed to collisions, fire, explosions, floods, tsunamis, manmade and/or natural structure collapses, ice, avalanches, debris, landslides, earthquakes, etc. 12.
will not occur in a particular installation. If this equipment does cause harmful interference to radio or television reception (which can be determined by turning the equipment off and on) the user is encouraged to try to correct the interference with one or more of the following measures: ·√ Reorient or relocate the receiving antenna. ·√ Increase the distance between the aircraft and transmitter. ·√ Consult the product dealer or an experienced radio/TV technician for help. 2.
Instructions Some product flight functions are restricted in certain areas. Once you use this product, you are deemed to have read carefully the relevant ICAO regulations, local airspace control provisions and the regulations governing UAVs. You assume all liability for any non-compliance with the foregoing, are responsible for the consequences for your actions as well as any indirect and/or direct liability that arises as a result of these limitations.
Notice:Read the instruction manual carefully before use. Propellers may cause injury; caution! Do not leave the quadcopter charging unattended. Always Warning: disconnect the quadcopter from the charger immediately after charging is complete. This is not a toy and is not suitable for children under 14. www.HUB S A N . co m Product Name:X4 STORM Company:Shenzhen Hubsan Technology Co., Ltd. Address:13th Floor, Block 1, Tower C, Software Industry Base, Xuefu Road, Nanshan District, Shenzhen, China.