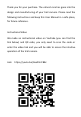
Thank you for your purchase. The utmost care has gone into the design and manufacturing of your trail camera. Please read the following instructions and keep this User Manual in a safe place, for future reference. Instructional Video We made an instructional video on YouTube (you can find the link below) and QR code; you only need to scan the code or enter the video link and you will be able to access the intuitive operation of the trail camera. Link: https://youtu.
Contents Important Notice............................................................1 Structure........................................................................2 Operation.......................................................................4 Menu..............................................................................7 Installation.....................................................................14 WIFI Connecting...........................................................
Important Notice Introduction THANK YOU for the purchase of your TC4-WIFI Trail Camera. In order that you can master the operation of the product as soon as possible,we offer the detailed use manual for you, please read this manual carefully before using it, in particular, the safety instructions. Contents of box Please carefully open the box and check that all of the following components are contained in the box: 1.Wildlife Camera 2.Mounting Belt 3.USB Type-C Cable 4.AV Cable 5.32GB TF Card 6.
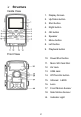
Structure Inside View 1. Display Screen 2. Up/Video button 3. Shot button 4. Right button 5. OK button 6. Speaker 7. Menu button 8. Left button 9. Playback button Front View 10. Down/Shot button 11. Micro SD Card Slot 12. AV Jack 13. USB Jack 14. Off-Test-On button 15. Infrared LEDS 16. Lens 17. Front Motion Sensor 18. Side Motion Sensor 19.
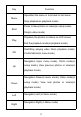
Key Menu Shot Play Function Open/Exit the menu or turn back to last menu Stop playback(in playback mode) Press to take photos or videos(in setup mode) Stop(in video mode) Playback the photos or videos on LCD screen Exit the playback mode(in playback mode) Start/Stop playing video file(in playback mode); OK Confirm/Enter(in menu mode) Navigation Up(in menu mode); Photo mode(in Up setup mode); View previous photos or videos(in playback mode) Navigation Down(in menu mode); Video mode(in Down setup mo
Operation Power Supply 1.Internal Supply Open the camera case and remove the battery cover. Install 8 pieces of 1.5V AA batteries. Please make sure the electrode is correct. 2.External Supply 2.1. If the camera is in low power, please connect the camera to a power adapter(not provide) for power supply (The specification of the adapter is DC6.0V/1.5A). 2.2.
5. If the capacity of memory card is full,the camera will stop recording automatically and the LEDS will go out. 6. Press the edge of the card gently to pop-up the TF card. Basic Operation 1. “Off-Test-On” Button 1.1. Switch the Mode Button to“On”to turn on the camera. 1.2. Switch the Mode Button to“Off”to turn off the camera. 1.3. Switch the Mode Button to“Test”to set the system parameters,you also can take photos, record video manually.
3.Playback “Reply” Enter/Exit the replay interface. “Up/Down” “Menu” “OK” Scan photos or videos. Stop. Play videos /Pause. NOTE: Replay Menu 1. Delete current file: Options:【Cancel】/【Delete】. 2. Delete all files: Options:【Cancel】/【Delete】. 3. Activate slide show: Replay the photos in slide way. Each photo display 3 seconds. Press “OK” button to stop playing. 4. Write protect: Lock the file and avoid accident deletion.
Menu Photos/ Mode You can choose working mode of TC4. Videos/ Photos&videos 20MP(5200x3900P)/ 16MP(4608x3456P)/ Photo You can choose 12MP(4000x3000P)/ Resolution different photo 8MP(3264x2448P)/ resolutions. 5MP(2592x1944P)/ 3MP(2048x1536P)/ 1MP(1280x960P) 1 photo/ Photo Series You can set the photo 2 photos in series/ number of continuous 3 photos in series/ shooting.
3840x2160P/ 2688x1520P 20fps/ 1920x1080P/ Video You can choose Resolution different video resolutions. 1280x720P/ 1280x720P 60fps/ 848x480P/ 720x480P/ 640x480P/ 320x240P 5200x3900P/ 4608x3456P/ 4416x3312P/ 4000x3000P/ TL(1) Video You can set resolutions Resolution of Time Lapse video.
Video You can set the Length duration of recording a 3s~10min video clip. Audio Recording You can open record On audio. Off Shot You can set the time of Lag delay shooting. 5s~60min You can open side On motion sensors. Off You can adjust Low/ sensitivity of motion Middle/ Side Motion Sensors Sensitivity(2) Motion Sensors sensors. High Target Recording Time You can set the camera to work in the stated time slot.
English/ German/ Danish/ Finnish/ Swedish/ Spanish/ French/ Italian/ Language You can select different languages. Dutch/ Portuguese/ Japanese/ Simplified Chinese/ Traditional Chinese Endless Capture You can set the camera On to record video in loop. Off Set time&date/ Time&Date Photo Stamp You can set the date and time of camera. Time format/ Date format You can stamp the Time&date/ date&time on the Date/ photos.
1. You can set the power-on password of Password the camera. Protection 2. The password is four digits, each digit 0-9 A-Z ranges from 0 to 9 or A to Z. WIFI You can set and SSID change the WIFI name. WIFI You can set and Password change the WIFI password. Beep You can open/close the YES Sound button sound. NO Decision with caution! Format Memory Card You will lose all of the data in the memory card if you decide to format it.
1. You can set the unique serial number for the camera. Serial NO. 2. The number is four digits, each digit On Off ranges from 0 to 9 or A to Z. You can restore the Reset Settings camera to factory default settings Yes including password, No serial number and so on. Version You can look up the Firmware information of the camera. (1) Time Lapse (TL)has three operations: [Normal]/ [TL Video]/ [Off].
will take a photo each hour. If the camera works for 24 hours,there will be 24 photos. These photos will be converted into a video. NOTE: In order to use the “Target Recording Time” function, please make sure that you have already turn off the “Time Lapse” function and set up the length of the lapse between each photo. If you turn on the “Time Lapse” and turn off the “Target Recording Time”, the camera will take photos until the memory card is full.
Installation Components 1. Tripod screw 2. Lock nut 3. Pivot bolts 4. Drill holes 5. Hexagonal screw 6. Wall plugs 7. Screws Mounting the wall bracket 1. Required Tools 1.1. Drill 1.2. 6mm masonry/concrete drill bit 1.3. Phillips head screwdriver 2. Install Steps 2.1. Holding the foot of the wall bracket (about 1 meter from the ground). 2.2. Mark the drill holes positions. 2.3. Use 6 mm drill bit to drill the required holes. 2.4. Insert the wall plugs,make sure that plugs are level with the wall.
2.7. Turn the camera in the desired direction and lock it with the lock nut. 2.8. Undo the two pivot bolts a little and move the camera into its final position. 2.9 Tighten the two pivot bolts again. NOTE: 1. Ensure that all screws are tightened. 2. Ensure that there are no electric lines, water or heating pipes installed at the proposed drilling location. 3. The supplied wall plugs are only suitable for mounting on concrete and stone.
Connect of Camera and Tablet/Smartphone via WIFI 1.Turn on the Bluetooth and WIFI on the mobile phone. 2.Switch the camera button from "OFF" to "ON" and then wait the end of 15s countdown. 3.Open the “Trail Cam Pro”APP and click the“Connect Bluetooth”. 4.Click “Step One Bluetooth On WIFI” . 5.Click the option in the Bluetooth list. The APP will automatically jump to the settings of “Trail Cam Pro”. 6.Click the “Settings” and select the “WLAN” . 7.
NOTE: 1.If the camera is already under working mode, you can ignore second step. 2.If you could not see this hotpot,please wait or refresh. 3.Please make sure that the camera is under working mode before connecting to WIFI. Tips: 1. The distance between the phone and the camera is closer, the effect of WIFI will be better. 2. After the operation of the APP, it is suggested that click the Power- off button in the upper right corner to shut down the APP.
“Edit” on the top right corner, then you can choose the picture or video to download or delete the files. 2.“Setting”button Click “Setting” button, user will see below interface shown the setup menu list of camera, then you can set parameters of camera on APP.
3.“Information”button Click“ Information ”button, user will see below interface shown the information of camera storage number of files and battery and current image viewed by camera. Click the “refresh”icon, you can refresh image and store the current image in the phone album.
4.Phone Album User can review the photos and videos downloaded in the pad or smartphone album( image, playback, choose delete and share files. ) NOTE: After the settings are completed in APP, you should turn back to the APP main interface. Click the power-off icon on the top right corner to exit the APP. The camera will enter sleep working mode. Connecting To TV The camera can transfer the video signal to an external monitor or a television. Please follow below instructions to operate.
Download Files To The Computer Use Card Reader 1. Pop-up the memory card from the camera and insert it into a card reader of computer. 1. Open [My Computer] or [Windows Explorer] and double-click the removable disk icon that represents the memory card. 2. Copy files from the memory card to your computer. Use Supplied USB Cable. 1. Connect the camera to the computer via USB cable.Turn on the camera,the screen will display”MSDC“. 2. Open [My Computer] or [Windows Explorer].
I can’t connect WIFI 1. Please check if the camera is under working mode. 2. Please adjust the distance between the camera and phone or pad.( the close the distance,the better the effect) Stop working after several use 1. Use an external power adapter to power it up to see if can be turned on or not. 2. Make sure the energy of the batteries is enough. We recommend using the rechargeable batteries of high-quality. 3.