Date Code Label Here H-QD-Plush EN 09-05-19 m0666 Plush Battery Ride-on EN Owner’s Manual © Copyright Huffy Corporation 2019 * Styles may vary NOTE: After un-boxing toy, some re-shaping/fluffing may be necessary. This manual contains important safety, assembly, operation and maintenance information. Please read and fully understand this manual before operation. Save this manual for future reference. Always wear approved helmet and safety equipment when using this product.
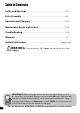
Table of Contents Safety and Warnings.....................................................................................................2-5 Parts/Assembly.................................................................................................................6-9 Operation and Charging........................................................................................ 10-11 Maintenance Repair and Service.................................................................... 12-16 Troubleshooting..
Here are basic, common sense safe riding practices you should read aloud to your child and anyone who may use the vehicle. It is the responsibility of the adult to educate the child, determine if they are fit to operate the vehicle, and supervise use. To avoid serious injury or death follow these safety rules and guidelines: • Adult assembly required. Choking hazard to children under the age of 3 years - contains small parts. Keep small children away when assembling. Keep poly bags away from child.
Warnings and Safety WARNING - TO AVOID SERIOUS INJURY: • • • • • • • • • • • • • fine gravel. This may result in unexpected action such as tip over and skidding. Using the vehicle in loose dirt, mud, sand, or fine gravel may damage the electronics and gear box inside the vehicle. • Do not overload the vehicle. Do not drive in very hot weather, components may overheat. Do not allow water or other liquids to come in contact with the battery or other electric components.
The following safety hazards may result in serious injury or death to the user of the vehicle: • Battery Charger for Indoor use only. • Use of a battery or charger other than the supplied rechargeable battery and charger may cause a fire or explosion. Only use the supplied rechargeable battery (or lead-acid or lithium suitable replacement) and charger with the vehicle. • Using the rechargeable battery and charger for any other product may result in overheating, fire or explosion.
Parts Assembly Parts Assembly 1 6 5 10 2 3 4 # Description 1 Handlebar Assembly 2 Foot Rest (left and right) 3 Foot Switch 4 Battery Door and attaching hardware.
This Owner’s Manual may be made for several different style products. • Some illustrations may vary slightly from the actual product. • Follow instructions completely. • If the product has any parts that are not described in this manual, look for separate “Special Instructions” that are supplied with the unit. • All features, components and accessories are not included on all models. • Use the Index page to locate specific sections of this manual.
Assembly Attaching Tilt Guards: B A STEPS: NOTE: Turn unit up-side down before starting and remove screws B if pre-installed. 1. 2. 3. 8 A Rotate each Tilt Guard BACKWARDS as shown so that rear Screw holes line up. Install Two Screws through Tilt Guards and into Body. Tighten securely - Do not over-tighten: This can strip out the screws which may come loose.
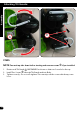
Connecting Drive Battery: B Assembly A STEPS: NOTE: Turn unit up-side down before starting. 1. 2. A Fully un-Zip plush Cover . Remove Screw and Open Battery Compartment . 3. Turn unit on its SIDE for easy Battery removal. 4. Pull out Battery far enough to: • Remove RED terminal from Clip . • Firmly connect RED battery terminal to RED terminal on battery. 5. Fully re-insert Battery making sure not to pinch or bind any wires. 6. Reinstall Battery Door and Screw . 7. Close Cover Zipper .
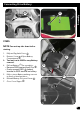
Operation Operation - General: C A B STEPS: 1. 2. 3. On Left Foot Rest, turn on Switch for Sounds - Note: I = ON and II = OFF. While fully seated and holding firmly onto handlebars, press Foot Switch to move forward. Releasing Foot Switch will gradually stop unit with motor friction. A B B NOTE: Charging Port C.
IMPORTANT! Before using the unit for the first time the battery needs to be charged for at least 8 to 12 hours - no more than 20 hours. Once battery is depleted, recharge for 8 to 12 hours - no more than 20 hours. IMPORTANT! Check the drive battery and charger (supply cord, connector) for wear and damage before charging. Do not charge the battery if damage has occurred. Only replace with the same type and voltage rechargeable battery and charger supplied by the manufacturer.
Maintenance Maintenance Repair and Service GENERAL: The vehicle should be checked • Check the tightness of the wheels: for damage, missing or badly worn parts NOTE: If the drive wheel is not tight, it will not before each use. If any part of the product does not operate properly – discontinue use. • Check the tightness of the fasteners before each use. Replace any fasteners that are damaged. • Inspect the product frequently.
Replace Drive Battery: B Maintenance A STEPS: NOTE: Turn unit up-side down before starting. 1. 2. 3. 4. 5. 6. 7. 8. 9. A Fully unZip plush Cover . Remove Screw and Open Battery Compartment . Pull out Battery far enough to disconnect the Red and Black Battery Terminals. Place the old battery in a plastic bag. Install a replacement battery (same as original equipment) Reconnect the Battery Terminals - Red to Red, Black to Black. Reinstall Battery Compartment Cover and Screw .
Remove Plush Cover: A Maintenance B F TO REMOVE PLUSH COVER (see images this page and next): • At Handlebars , gently pull Plush Cover aside and remove Screw • Rotate Handlebar/Grip UP and remove Left Grip Screw and Grip. • Pull Handlebar out to the RIGHT. F B A. TURN UNIT UP-SIDE-DOWN: • Loosen hook and loop straps on all for legs . • Fully un-zip Zipper and gently pull over side foot rests C D E. TURN UNIT RIGHT-SIDE-UP: • Gently pull Plush Cover around and off handlebars F.
Maintenance Remove Plush Cover: C E D 15
Maintenance Drive Motor Battery Only an adult who has read and understands the safety warnings should handle, charge or recharge the battery. Failure to comply with all safety warnings may result in serious injury or death. Battery Fuse The drive motor circuit features a thermal fuse that will automatically trip and cut all power to the vehicle if the motor, electric system or battery is overloaded. The fuse will reset and power will be restored after a short time.
The following are examples of potential problems. Completely read through this manual and the troubleshooting guide table before calling. If you still need help resolving the problem please contact Customer Service. NOTE: Vehicle should be turned off and fully changed before doing troubleshooting.
Troubleshooting Guide - continued Troubleshooting BEFORE YOU CALL SUPPORT: 1. 2. 3. 4. 5. 6. 7.
General: Part or model specifications are subject to change without notice. This Limited Warranty is the only warranty for the product. ALL WARRANTIES OTHER THAN STATED HEREIN ARE DISCLAIMED INCLUDING IMPLIED WARRANTIES OF MERCHANTABILITY AND FITNESS FOR A PARTICULAR PURPOSE, TO THE EXTENT ALLOWABLE BY APPLICABLE LAW. ALL LIABILITY FOR INCIDENTAL, PUNITIVE, SPECIAL, OR CONSEQUENTIAL DAMAGES ARE EXPRESSLY DISCLAIMED, TO THE EXTENT ALLOWABLE BY APPLICABLE LAW.
[ In the US and Canada] PLEASE BEFORE RETURNING TO STORE: Contact Huffy Customer Service. We are glad to assist you with any parts or assembly problems you might have! ~ VEUILLEZ NOTER : AVANT DE RETOURNER AU MAGASIN : Communiquez avec le service à la clientèle de Huffy. Nous vous aiderons [ MÉXICO ] ANTES DE DEVOLVER EL PRODUCTO A LA TIENDA: Comuníquese Con Servicio Al Cliente De Huffy.