
Instructions / Assembly


10
Handlebar and Stem Installation
WARNING: To prevent steering system damage and possible loss of control,
the “MIN-IN” (minimum insertion) mark (A) on the stem must be below the top of the
Locknut (B).
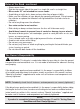
NOTE: Remove plastic Cap (E) from the
end of the Stem (6).
NOTE: Some models do not have Handle-
bar Clamp Nut/Screw (D).
1. Insert the Stem (6) into the fork (fi g 07).
2. Point the Stem towards the front of the
bike.
3. Tighten the Stem Bolt (C) just enough to
hold it in position.
4. If necessary, loosen the Handlebar
Clamp Nut/Screw (D) and rotate Han-
dlebar (3) into a comfortable riding posi-
tion (fi g 08/08a).
5. Tighten Handlebar Clamp Nut/Screws
(D) just enough to hold it in position (fi g
08/08a).
6. Align the stem with the front tire and
tighten the Stem Bolt (C) securely (fi g
07).
6
A
A
B
E
B
C
g 07
WARNING: Do not over tighten the stem bolt. Over tightening the stem bolt
can damage the steering system and cause loss of control.
Four Bolt Clamp (fi g 08a):
• If necessary, re-adjust Handlebar (3).
• Tighten Clamp Screws (D) evenly ac-
cording to pattern.
NOTE: Do not over tighten. Torque to 17
ft-lbs.
WARNING: If the handlebar clamp
in not tight enough, the handlebar can slip
in the stem. This can cause damage to the
handlebar or stem, and can cause loss of
control.
3 1
2 4
D
3
g 08a
Bicycle Assembly