
Instructions / Assembly


25
Accessories
Bell and Handlebar Features (various models)
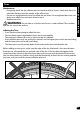
Plaques Installation (various models)
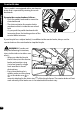
VIEW 1: Bracket Mount:
• Attach Plaque
A
to Handlebar Cross Brace
B
using supplied Clamps
C
and Screws
D
.
• Tighten Screws so that the Plaque does not
move.
• Do not over-tighten Screws. This may dam-
age the Plaque.
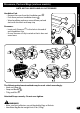
VIEW 2: Zip-Tie Mount:
• Position Plaque against Handlebar.
• Attached with supplied Zip-Ties. Do not
over tighten, this can break the Zip-Ties.
NOTE: Plaques may mount with 2 or more
Zip-Ties.
VIEW 3: Hook and Loop Mount:
• Open the straps on the Plaque and wrap
them around the Handlebar or Brace
B
.
• If Handlebar Pad is in place, wrap straps
around the Handlebar Pad.
• Make sure the straps are secure.
WARNING:
• Ensure Plaque does not interfere with child’s
visibility or ability to control the product.
• Make sure front Re ectors are not blocked
by Plaque.
A
B
B
C
D
1
2
3
B
A
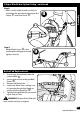
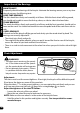
Bells and Features:
• If the mounting Screw
A
is factory in-
stalled, remove it and set aside.
• Open the Clamp
B
just enough to t on
the handlebar.
• Position the Bell / Accessory so that is
level and positioned as shown.
• Tighten Screw securely. Do not over-
tighten. This can damage the Clamp.