www.hughes-and-kettner.com BEDIENUNGSANLEITUNG ENGLISH DEUTSCH 100 WATT TUBE AMPLIFIER 1.
TRIAMP MK II - MANUAL IMPORTANT: Before powering up please read the Important Safety Instructions on page 29 - 31! WICHTIG: Bitte lesen Sie vor der Inbetriebnahme unbedingt die Sicherheitshinweise auf Seite 29 - 31! 2
TRIAMP MK II - MANUAL THANK YOU FOR CHOOSING THE TRIAMP® MK II ! Then the engineers at Hughes & Kettner® decided to play matchmaker, marrying the qualities of this milestone to the latest innovations in tube amp technology. They named the progeny of this union TriAmp® MK II. The findings of modern research flowed into the revamped six fundamental sounds. By the same token, the power amp circuit was redesigned from the bottom up, resulting in an even bigger, even more open sound.
TRIAMP MK II - MANUAL CONTENTS ® 1.0 TRIAMP MK II: THE THREE AMPS . . . . . . . . . . . 4 2.0 CONNECTIONS AND CONTROL FEATURES . . . 6 2.1 AC POWER AND THE GLOBAL CURRENT ADAPTER . . . . . . . . . . . . . . . . . . . . . 6 2.2 OVERVIEW OF CONTROL FEATURES . . . . . . . . 7 3.0 STANDARD SETUP/CABLE CONNECTIONS . . . . 9 4.0 TRIAMP® MK II OPERATION . . . . . . . . . . . . . . . 9 4.1 CHANNEL SELECTION . . . . . . . . . . . . . . . . . . . 9 4.2 TRIAMP® MK II AND SIGNAL PROCESSORS . . . 9 4.
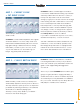
TRIAMP MK II - MANUAL The first amp is dedicated to delivering classic clean sounds. CHANNEL A sounds full and expansive in the great American tradition. It’s forte is classy clean tone that remains unadulterated by distortion even at high gain settings. It delivers the kind of twang that makes you want to put cow horns on the Toyota. This channel’s low end is like a good burger - big, beefy and served up hot.
TRIAMP MK II - MANUAL AMP 3 – MODERN GAIN CHANNEL A is based on the Hughes & Kettner® 'Truth in distortion' is a major consideration when buying an amp. An absolute prerequisite for any top amp is that it preserves the guitar's own characteristic sound - rather than making all guitars sound more or less alike - and the tone must remain well defined no matter how high you set the gain. Only a handful of amps make the grade, and AMP 3 is certainly a leading member of this elite club.
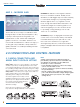
TRIAMP MK II - MANUAL 2.2 OVERVIEW OF CONTROL FEATURES FRONT INPUT: Input jack for guitars. PREAMP SECTION: The three preamps’ controls are largely comparable. The functions of their knobs are explained in the following using AMP 1 as an example. CHANNEL BUTTON: Push these to select the desired fundamental sound (channel A or B) directly. The buttons also serve as indicator LEDs, illuminating to call attention to the active channel. MASTER SECTION FX ON SWITCH: Turns TriAmp® MK II's FX LOOP on or off.
TRIAMP MK II - MANUAL REAR FX LOOP MAINS IN: Socket for the included Euromains power cable. Before plugging into the wall socket, make certain the amp's voltage rating as displayed in the VOLTAGE SELECTOR window matches your local AC voltage rating. VOLTAGE SELECTOR: If you need to change TriAmp® MK II's voltage to your local AC voltage rating, pull out this cartridge and see Section 2.1 for further details.
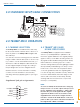
TRIAMP MK II - MANUAL 3.0 STANDARD SETUP/CABLE CONNECTIONS 4.0 TRIAMP MK II OPERATION The TriAmp® MK II’s six fundamental sounds may be accessed via the channel selector buttons on the front panel or the TriAmp® MK II Stageboard are called up. You can also execute switching functions via MIDI using the MSM 1 MIDI Module (refer to Section 4.4).
TRIAMP MK II - MANUAL Connecting signal processors: • Connect the device's INPUT to the FX LOOP SEND jack and its OUTPUT to the RETURN jack. • Activate the FX LOOP via the FX ON button on the front panel or the Stageboard. • Adapt the FX loop level to the signal processor's level, if necessary. Press the FX SEND LEVEL button for effects devices like stomp boxes that are designed for guitar signals.
TRIAMP MK II - MANUAL 4.4 TRIAMP® MK II AND MIDI With the MSM-1 MIDI Module installed, you can use your multieffects processor to select TriAmp® MK II channels and turn the FX LOOP on or off via MIDI. MSM-1 socket and indicator notch. • Insert the MSM-1 into the module port, and affix it in place using the same four screws you just removed a moment ago. Make sure the writing on the MSM-1 reads in the same direction as that on the rest of the chassis back. Location of the sockets.
TRIAMP MK II - MANUAL 5.0 REPLACING TUBES, SERVICE AND PREVENTIVE MAINTENANCE The TriAmp® MK II ships with EL34 and 12AX7 tubes. Once they’ve been burned in (initial continuous operation under a load), these undergo an indepth selection process where their electrical values and mechanical status (microphonics) are checked. Beyond that, they’re installed in a finished amp and their sound is auditioned in a listening benchtest.
TRIAMP MK II - MANUAL If, on the other hand, you install a new set with characteristics that deviate from the old set, you definitely should re-bias the amp. Again, biasing an amp is not a DIY task. It takes experience and a extensive working knowledge in measuring techniques, which is why this job should be carried out exclusively by qualified technicians with tube amp tuning experience. • A hum adjustment must be made every time tubes are replaced.
TRIAMP MK II - MANUAL 6.0 TROUBLESHOOTING TriAmp ® MK II is not getting any power: • Check the mains cable to see if it is connected properly. • The mains fuse is defective. Replace the fuse with another identical fuse. TriAmp ® MK II is connected properly, but no sound is audible: • The amp is set to STANDBY. • One or several GAIN and MASTER controls are turned all the way down. Dial in a higher setting. • The anode fuse is blown.
TRIAMP MK II - MANUAL WIR FREUEN UNS, DASS SIE SICH FÜR DEN TRIAMP MK II ENTSCHIEDEN HABEN. Mit dem TriAmp® MK II haben die Hughes & Kettner® Ingenieure die Qualitäten dieses Meilensteins in die Moderne übertragen. Die sechs Grundsounds wurden überarbeitet auf den neuesten Stand gebracht. Ebenso wurde die Endstufenschaltung völlig neu designed - mit dem Resultat eines noch offeneren Sounds.
TRIAMP MK II - MANUAL INHALT 1.0 DREIZEHN RÖHREN FÜR DEN GUTEN TON . . . 16 2.0 ANSCHLÜSSE UND BEDIENELEMENTE . . . . . . . 18 2.1 NETZANSCHLUSS UND WELTSPANNUNGSADAPTION . . . . . . . . 18 2.2 ÜBERSICHT DER BEDIENELEMENTE . . . . . . . . . 19 3.0 STANDARD SET UP/VERKABELUNG . . . . . . . . 21 4.0 BEDIENUNG DES TriAmp® MK II . . . . . . . . . . . 21 4.1 DAS ANWÄHLEN DER KANÄLE . . . . . . . . . . . 21 4.2 DER TRIAMP® MK II MIT EFFEKTGERÄTEN . . . . 21 4.3 RED BOX® DI OUT VOLLRÖHRE AM MISCHPULT . . . . . .
TRIAMP MK II - MANUAL AMP 1 – CHUNKY CLEAN + FAT DRIVE CLEAN Klassische Cleansounds sind die Hauptaufgabe des ersten Amps. CHANNEL A klingt voll und rund in bester amerikanischer Manier. Er übersteuert auch bei hohen Gain Einstellungen kaum und bietet den begehrten „Twang“ in Vollendung. In der Basswiedergabe zeichnet sich dieser Kanal durch enormen Druck und Wärme aus.
TRIAMP MK II - MANUAL AMP 3 – MODERN GAIN CHANNEL A ist an den Overdrive Kanal des Hughes & Kettner® DUOTONE angelehnt. Er ist sehr ehrlich und direkt. Dynamisch reagiert er auf Anschlagstärke und Volumenpoti der Gitarre. Ein exzellenter Solokanal, selbst bei hohen GAINEinstellungen und gleichzeitig optimal für druckvolle Powerchords mit “Brett”. 110% Rock ´n Roll! Präzise Distortionsounds spielen bei der Entscheidung für einen Verstärker eine besonders große Rolle.
TRIAMP MK II - MANUAL 2.2 ÜBERSICHT DER BEDIENELEMENTE VORDERSEITE: INPUT: Eingang zum Anschluss der Gitarre. MASTER SEKTION: PREAMP SEKTION: FX ON SCHALTER: Aktiviert den Effektweg des TriAmp® MK II. Soll diese Schaltfunktion via Stageboard oder MIDI erfolgen, ist der Schalter in Position “aus” zu bringen. KANAL SCHALTER: Wählt direkt den gewünschten Grundsound (Kanal A oder B) an. Die Schalter fungieren gleichzeitig als Indikator LED´s. Sie zeigen den aktiven Kanal an.
TRIAMP MK II - MANUAL RÜCKSEITE: FX LOOP MAINS IN: Netzbuchse für das mitgelieferte Euronetzkabel. Bevor der Netzstecker eingesteckt wird, vergewissern Sie sich bitte, dass die vorhandene Netzspannung mit dem im Fenster des VOLTAGE SELECTORS angegebenem Wert übereinstimmt. FX SERIAL/PARALLEL: Eine Innovation am TriAmp® MK II. Der Effektweg kann auf Knopfdruck parallel oder seriell geschaltet werden. Die Umschaltung ist bei Verwendung des optionalen MSM-1 MIDI Moduls auch per MIDI speicher- und schaltbar.
TRIAMP MK II - MANUAL 3.0 STANDARD SET UP/VERKABELUNG 4.0 BEDIENUNG DES TRIAMP® MK II Die sechs Grundsounds des TriAmp® MK II können mit den Kanal Schaltern auf der Frontplatte oder am TriAmp® MK II Stageboard abgerufen werden. Weiterhin besteht die Möglichkeit, die Soundumschaltung vom MSM-1 MIDI Modul ausführen zu lassen (siehe dazu auch Kapitel 4.4!).
TRIAMP MK II - MANUAL ANSCHLUSS DES EFFEKTGERÄTES: • Verbinden Sie die SEND Buchse mit dem INPUT und die RETURN Buchse mit dem OUTPUT des Effektgerätes. • Aktivieren Sie den Effektweg mittels des FX ON Schalters auf der Frontplatte oder dem Stageboard. • Passen Sie den Effektweg auf den Eingangspegel des Effektgerätes an. Für Effektgeräte, deren Eingang auf Gitarrenpegel ausgelegt ist, sollte der FX SEND LEVEL Schalter gedrückt sein.
TRIAMP MK II - MANUAL 4.4 DER TRIAMP® UND MIDI Ist das MSM-1 Modul eingebaut, können die Grundsounds des TriAmp® MK II und der Effektweg (auch die Umschaltung von Seriell- auf ParallelBetrieb) via MIDI geschaltet werden. Das somit mögliche gleichzeitige Umschalten von TriAmp® MK II und Multieffektgeräten bedeutet bestmöglichen Spielkomfort.
TRIAMP MK II - MANUAL 5.0 RÖHRENTAUSCH, WARTUNG UND PFLEGE Der TriAmp® MK II ist ab Werk mit EL34 und 12AX7 Röhren von. Sie werden nach dem „Burn-In“ (ein erster Dauerlauf unter Last) in aufwendigen Selektionsverfahren auf ihre elektrischen Werte, mechanische Beschaffenheit (Mikrofonie), und darüber hinaus im akustischen Test am fertigen Gerät auf ihr Soundverhalten geprüft.
TRIAMP MK II - MANUAL Im akustischen Test ist eine besonders mikrofoniearme und brummstabile Eingangsröhre zu selektieren. Wird ein Satz abgeglichener Endstufenröhren verwendet, ist ein Biasabgleich nicht zwingend notwendig. Dieser setzt umfangreiche Messkenntnisse voraus und ist ausschliesslich von im Röhrenampbereich qualifizierten Technikern vorzunehmen.
TRIAMP MK II - MANUAL 6.0 FEHLERBESEITIGUNG/TROUBLESHOOTING Der TriAmp ® MK II lässt sich nicht einschalten: • Es liegt keine Netzspannung an. Überprüfen Sie den korrekten Anschluss des Netzkabels. • Die Netzsicherung ist defekt. Achten Sie auf den für die Netzspannung vorgesehenen Sicherungswert für den Ersatz. die Phasenlage des Direktsignals beim parallelen Zusammenmischen im TriAmp® MK II zu Phasenauslöschungen führen.
TRIAMP MK II - MANUAL 7.0 TECHNICAL SPECIFICATIONS TUBES Preamp: Power amp: INPUTS Instrument: Power Amp In: 8 x 12AX7A 1 x 12AX7A, 4 x EL34 FX -Return: -26 dB/1 MΩ +2 dB (AMP 1B + AMP 3)/1 MΩ +9 dB (AMP 1A + AMP 2)/1 MΩ -10 dB or -20 dB/48 kΩ OUTPUTS Preamp Out: FX - Send: Red Box® DI out: +6 dB/47 Ω +9 dB or +19 dB/2,2 kΩ -26 to -10 dB/220 Ω 7.
TRIAMP MK II - MANUAL This is to certify that Für das folgend bezeichnete Erzeugnis HUGHES & KETTNER TRIAMP MK II HUGHES & KETTNER TRIAMP MK II complies with the provisions of the Directive of the Council of the European Communities on the approximation of the laws of the Member States relating to electromagnetic compatibility (EMC Directive 89/336/EEC) and the low voltage Directive (73/23/EEC).
united states deutsch IMPORTANT SAFETY INSTRUCTIONS BEFORE CONNECTING, READ INSTRUCTIONS • • • • • Read all of these instructions! Save these instructions for later use! Follow all warnings and instructions marked on the product! Do not use this product near water, i.e. bathtub, sink, swimming pool, wet basement, etc. Do not place this product on an unstable cart, stand or table.
english francais IMPORTANT ADVICE ON SAFETY! PLEASE READ BEFORE USE AND KEEP FOR LATER USE! • The unit has been built by Hughes & Kettner in accordance with IEC 60065 and left the factory in safe working order. To maintain this condition and ensure non-risk operation, the user must follow the advice and warning comments found in the operating instructions. The unit conforms to Protection Class 1 (protectively earthed).
italiano español IMPORTANTI AVVERTIMENTI DI SICUREZZA! LEGGERE ATTENTAMENTE PRIMA DELL’USO E CONSERVARE PER UN UTILIZZO SUCCESSIVO ¡INDICACIONES DE SEGURIDAD IMPORTANTES! ¡LÉANSE ANTES DE UTILIZAR EL APARATO Y GUARDENSE PARA SU USO POSTERIOR! • L’apparecchio è stato costruito dalla Hughes & Kettner secondo la normativa europea IEC 60065 ed ha lasciato il nostro stabilimento in stato ineccepibile.
To find a local distributor please visit: MS D-1488 01/2006 www.hughes-and-kettner.com Hughes & Kettner ® • Postfach 1509 • 66595 St. Wendel • Tel. 0 68 51 - 905 0 • FAX 0 68 51 - 905 103 International Inquiries: Fax +49 - 68 51 - 905 200 • E-Mail: international@musicandsales.com Technische Änderungen vorbehalten Details subject to change without notice Copyright 2006 Music & Sales P.E.