
Installation Instructions
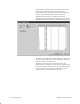
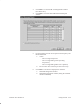

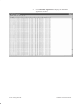

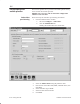

Table Of Contents
- Title page
- Contents
- About this manual
- Safety information
- Ch 1 - Introduction
- Ch 2 - Adding cards to the Controller
- Unpacking the System Controller
- Unpacking the picocells
- System Controller card configuration
- Adding cards to the System Controller (first steps)
- Jumper and DIP switch settings
- Attaching bus cables
- Adding cards to the System Controller (final steps)
- Configuring Controller cards
- Verifying the card configuration
- Ch 3 - Installing the Controller
- Ch 4 - Verifying the Controller configuration
- Ch 5 - Configuring the router
- Ch 6 - Testing picocells
- Ch 7 - Installing picocells
- Ch 8 - Connecting to external equipment
- Ch 9 - System testing
- Ch 10 - Installation inspection
- Ch 11 - Provisioning
- Ch 12 - Remote Client
- Ch 13 - Troubleshooting
- Ch 14 - Maintaining Quad T1 cards
- App A - Specifications
- App B - Standards compliance information
- App C - Part numbers
- App D - Updates and backups
- Index

1026209–0001 Revision B
Testing picocells 6–15
3. Click Next to see the DCCH Scanning Results window
(not shown here).
4. Click Next to access the Select Measurements Reports
window.
5. For the scanning picocell used to perform the frequency and
DCCH band scan:
a. Check:
- Use to Assign Frequencies
- Use to Assign POFs (private operating
frequencies)
- Use to Assign PSPs (public service profiles)
b. Do not check “Use results of previous tests if any.”
6. Click Next in succession to display these windows:
a. Initial PSP assignment window
b. Initial POF Assignment window (listing the available
channels and POFs)