
Installation Instructions
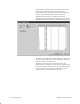
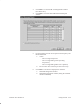


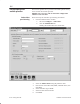

Table Of Contents
- Title page
- Contents
- About this manual
- Safety information
- Ch 1 - Introduction
- Ch 2 - Adding cards to the Controller
- Unpacking the System Controller
- Unpacking the picocells
- System Controller card configuration
- Adding cards to the System Controller (first steps)
- Jumper and DIP switch settings
- Attaching bus cables
- Adding cards to the System Controller (final steps)
- Configuring Controller cards
- Verifying the card configuration
- Ch 3 - Installing the Controller
- Ch 4 - Verifying the Controller configuration
- Ch 5 - Configuring the router
- Ch 6 - Testing picocells
- Ch 7 - Installing picocells
- Ch 8 - Connecting to external equipment
- Ch 9 - System testing
- Ch 10 - Installation inspection
- Ch 11 - Provisioning
- Ch 12 - Remote Client
- Ch 13 - Troubleshooting
- Ch 14 - Maintaining Quad T1 cards
- App A - Specifications
- App B - Standards compliance information
- App C - Part numbers
- App D - Updates and backups
- Index

1026209–0001 Revision B
Testing picocells 6–23
To register the test mobile phones on the AIReach OS, follow the
steps below.
Prerequisites:
• The test phone must be provisioned, with the correct MIN
and ESN (Section 6.6).
• The phone must be in field test mode (Section 6.7).
Registration procedure:
These instructions are for Nokia 6120 and 6160 mobile phones.
1. Power the phone off, then on.
2. Make sure the phone is on the correct band:
The phone must be on the correct band before you initiate
registration. When the phone is in field test mode, the band
is displayed on the third line of window 01. A lowercase a
or b represent the two 850 MHz cellular bands, and
uppercase A through F represents the 1900 MHz PCS
bands. If the phone camps on an incorrect band, power
cycle the phone while shielding the antenna. The phone
should begin to search each band. Once it begins searching
the correct band, proceed with step 3 before the phone
moves to the next band.
3. Select Menu.
4. Scroll down the options and select System.
5. Select New Search and OK.
The phone should display Searching and then
New System – xxxxxx , where xxxxxx is the alpha
tag (alphanumeric SID) for the system.
6. If the displayed alpha tag is the alpha tag assigned to the
AIReach OS, select OK complete the registration.
(If you don’t know the AIReach OS alphanumeric SID, you
can find it on the Controller: From the AIReach Office
banner menu, select Configure → BSC Configuration,
and then click the Network tab.)
When the phone is registered on the system, the alpha
tag is displayed in window 07 of the test phone.
7. If the displayed alpha tag is not
the alpha tag assigned to
the AIReach OS, select Next to continue searching.
If the phone displays No New Systems, verify that the
correct information is entered in the subscriber window
(Section 6.6), paying special attention to the MIN, ESN,
and PSID values. Then repeat steps 1 through 6 to register
the phone on the system.
6.8
Registering test
mobile phones