
Installation Instructions


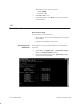
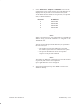
Table Of Contents
- Title page
- Contents
- About this manual
- Safety information
- Ch 1 - Introduction
- Ch 2 - Adding cards to the Controller
- Unpacking the System Controller
- Unpacking the picocells
- System Controller card configuration
- Adding cards to the System Controller (first steps)
- Jumper and DIP switch settings
- Attaching bus cables
- Adding cards to the System Controller (final steps)
- Configuring Controller cards
- Verifying the card configuration
- Ch 3 - Installing the Controller
- Ch 4 - Verifying the Controller configuration
- Ch 5 - Configuring the router
- Ch 6 - Testing picocells
- Ch 7 - Installing picocells
- Ch 8 - Connecting to external equipment
- Ch 9 - System testing
- Ch 10 - Installation inspection
- Ch 11 - Provisioning
- Ch 12 - Remote Client
- Ch 13 - Troubleshooting
- Ch 14 - Maintaining Quad T1 cards
- App A - Specifications
- App B - Standards compliance information
- App C - Part numbers
- App D - Updates and backups
- Index

1026209–0001 Revision B
Provisioning 11–1
Chapter 11
Provisioning
This chapter explains the procedure for provisioning permanent
subscribers. To provision temporary subscribers (visitors, for
example), see page 4–20.
After the system has been installed and verified, provision the
subscribers as follows:
1. If not already connected to the system, click the Connect
button in the Connect window to display the main AROSC
Configuration window.
2. Select Configure → NSS → HLR.
3. Click the MIN Range tab to display the HLR Configuration
window.
4. Select the specified AROSC Name from the dropdown list.
5. Enter the specified MIN range values, then click Save to
save them.
6. Repeat step 5 until the information for all subscribers is
entered.
Note
When using Allocation Type, Individually Allocated,
information must be entered for each subscriber.
7. Click the LDN Range tab.
8. Enter the LDN range values, and then click Save to save
them.
9. Repeat step 8 until the information for all subscribers is
entered.
Note
When using Allocation Type, Individually Allocated,
information must be entered for each subscriber.
10. When the information for all subscribers is entered, click
Close to return to the main AIReach Office window.
11. Select Configure → Subscriber.
12. Click the Identification tab to display the Subscriber
Provisioning window.
(Initially, this window may contain no data.)
11.1
Provisioning
permanent
subscribers