
Installation Instructions

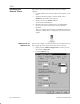

Table Of Contents
- Title page
- Contents
- About this manual
- Safety information
- Ch 1 - Introduction
- Ch 2 - Adding cards to the Controller
- Unpacking the System Controller
- Unpacking the picocells
- System Controller card configuration
- Adding cards to the System Controller (first steps)
- Jumper and DIP switch settings
- Attaching bus cables
- Adding cards to the System Controller (final steps)
- Configuring Controller cards
- Verifying the card configuration
- Ch 3 - Installing the Controller
- Ch 4 - Verifying the Controller configuration
- Ch 5 - Configuring the router
- Ch 6 - Testing picocells
- Ch 7 - Installing picocells
- Ch 8 - Connecting to external equipment
- Ch 9 - System testing
- Ch 10 - Installation inspection
- Ch 11 - Provisioning
- Ch 12 - Remote Client
- Ch 13 - Troubleshooting
- Ch 14 - Maintaining Quad T1 cards
- App A - Specifications
- App B - Standards compliance information
- App C - Part numbers
- App D - Updates and backups
- Index

1026209–0001 Revision B
Remote Client 12–3
3. Change the Initial Environment value from the default
setting to 2048.
4. Click OK.
Make sure the Remote Client connects to the Controller:
The instructions below are for Windows 95, Windows 98, or
Windows NT .
1. At the remote computer, double–click the AROS
Configuration icon:
The software displays the AIReach Office banner and a
Login dialog box.
2. In the Login dialog box, enter:
- The name of the Controller you want to connect to
(Replace the default entry, Localhost, after
AROSC, with the name of the Controller you want to
connect to.)
- User name
(No entry is needed if this field is grayed out.)
- Password
The default administrator password is “abc123.”
3. Click Connect.
The login window disappears, and the Remote Client
connects to the Controller you specified.
If the Remote Client cannot connect, it displays a message
stating that the connection failed.
12.3
Testing the Remote
Client