
Installation Instructions
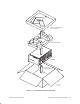
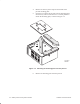
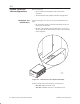
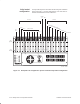
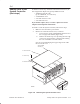
Table Of Contents
- Title page
- Contents
- About this manual
- Safety information
- Ch 1 - Introduction
- Ch 2 - Adding cards to the Controller
- Unpacking the System Controller
- Unpacking the picocells
- System Controller card configuration
- Adding cards to the System Controller (first steps)
- Jumper and DIP switch settings
- Attaching bus cables
- Adding cards to the System Controller (final steps)
- Configuring Controller cards
- Verifying the card configuration
- Ch 3 - Installing the Controller
- Ch 4 - Verifying the Controller configuration
- Ch 5 - Configuring the router
- Ch 6 - Testing picocells
- Ch 7 - Installing picocells
- Ch 8 - Connecting to external equipment
- Ch 9 - System testing
- Ch 10 - Installation inspection
- Ch 11 - Provisioning
- Ch 12 - Remote Client
- Ch 13 - Troubleshooting
- Ch 14 - Maintaining Quad T1 cards
- App A - Specifications
- App B - Standards compliance information
- App C - Part numbers
- App D - Updates and backups
- Index

1026209–0001 Revision B 2–4 Adding cards to the System Controller
After unpacking the Controller, unpack the picocells so you can
record their serial numbers. Picocells are not installed until later
(as explained in Chapter 7), but you need to record their serial
numbers so you can enter them when you verify the Controller
configuration (Chapter 4).
Each picocell is packaged in a cardboard box. Unpack the
picocells using the following steps. See Figure 2-2.
1. Open the box at the top. Note that the picocell is supported
in the box by two end caps made of form–fitted foam
packing material.
2. Remove the picocell and packing from the box as one piece.
3. Remove both end caps from the picocell. Remove the
plastic bag covering the picocell.
Note that the mounting plate is mounted and locked to
the picocell.
2.2
Unpacking the
picocells