
Installation Instructions
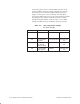
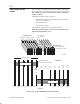


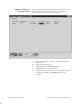
Table Of Contents
- Title page
- Contents
- About this manual
- Safety information
- Ch 1 - Introduction
- Ch 2 - Adding cards to the Controller
- Unpacking the System Controller
- Unpacking the picocells
- System Controller card configuration
- Adding cards to the System Controller (first steps)
- Jumper and DIP switch settings
- Attaching bus cables
- Adding cards to the System Controller (final steps)
- Configuring Controller cards
- Verifying the card configuration
- Ch 3 - Installing the Controller
- Ch 4 - Verifying the Controller configuration
- Ch 5 - Configuring the router
- Ch 6 - Testing picocells
- Ch 7 - Installing picocells
- Ch 8 - Connecting to external equipment
- Ch 9 - System testing
- Ch 10 - Installation inspection
- Ch 11 - Provisioning
- Ch 12 - Remote Client
- Ch 13 - Troubleshooting
- Ch 14 - Maintaining Quad T1 cards
- App A - Specifications
- App B - Standards compliance information
- App C - Part numbers
- App D - Updates and backups
- Index

1026209–0001 Revision B 2–24 Adding cards to the System Controller
After making sure all jumpers and DIP switches on the card are set
correctly:
1. Use a Phillips screwdriver to remove the screw from the
card slot cover (blank panel), and then remove the card slot
cover from the Controller chassis.
2. Slide the card into place. Fully insert the card’s edge
connector(s) into the sockets on the System Controller
backplane.
Install the card according to the manufacturer’s directions.
3. Replace and tighten the slot cover screw (now into the card
bracket) to secure the card to the Controller chassis.
4. When all cards are installed, replace the System Controller
top cover.
5. Connect power to the Controller.
6. Boot the Controller. (Power it on.)
2.7
Adding cards to the
System Controller
(final steps)