
Installation Instructions
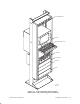


Table Of Contents
- Title page
- Contents
- About this manual
- Safety information
- Ch 1 - Introduction
- Ch 2 - Adding cards to the Controller
- Unpacking the System Controller
- Unpacking the picocells
- System Controller card configuration
- Adding cards to the System Controller (first steps)
- Jumper and DIP switch settings
- Attaching bus cables
- Adding cards to the System Controller (final steps)
- Configuring Controller cards
- Verifying the card configuration
- Ch 3 - Installing the Controller
- Ch 4 - Verifying the Controller configuration
- Ch 5 - Configuring the router
- Ch 6 - Testing picocells
- Ch 7 - Installing picocells
- Ch 8 - Connecting to external equipment
- Ch 9 - System testing
- Ch 10 - Installation inspection
- Ch 11 - Provisioning
- Ch 12 - Remote Client
- Ch 13 - Troubleshooting
- Ch 14 - Maintaining Quad T1 cards
- App A - Specifications
- App B - Standards compliance information
- App C - Part numbers
- App D - Updates and backups
- Index

1026209–0001 Revision B 3–2 Installing the Controller
Mount the System Controller, monitor, and keyboard (with
touchpad) on an available 19–inch rack, as shown in Figure 3-1 .
Optionally, a UPS, power distribution tray, patch panel, and CSU
tray can be mounted on the same rack. (These components are also
shown in Figure 3-1.)
WARNING
The AIReach Office System Controller can
weigh in excess of 50 pounds. To avoid
personal injury or damage to equipment,
follow these precautions:
• Do not attempt to move or install the
System Controller by yourself. Two
people are required for these tasks.
• If the System Controller will be rack
mounted, secure the rack to the floor
or wall so the rack cannot fall.
3.1
Rack–mount
configuration