
Installation Instructions


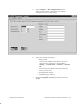
Table Of Contents
- Title page
- Contents
- About this manual
- Safety information
- Ch 1 - Introduction
- Ch 2 - Adding cards to the Controller
- Unpacking the System Controller
- Unpacking the picocells
- System Controller card configuration
- Adding cards to the System Controller (first steps)
- Jumper and DIP switch settings
- Attaching bus cables
- Adding cards to the System Controller (final steps)
- Configuring Controller cards
- Verifying the card configuration
- Ch 3 - Installing the Controller
- Ch 4 - Verifying the Controller configuration
- Ch 5 - Configuring the router
- Ch 6 - Testing picocells
- Ch 7 - Installing picocells
- Ch 8 - Connecting to external equipment
- Ch 9 - System testing
- Ch 10 - Installation inspection
- Ch 11 - Provisioning
- Ch 12 - Remote Client
- Ch 13 - Troubleshooting
- Ch 14 - Maintaining Quad T1 cards
- App A - Specifications
- App B - Standards compliance information
- App C - Part numbers
- App D - Updates and backups
- Index

1026209–0001 Revision B 4–2 Verifying the System Controller configuration
To verify the System Controller configuration, you use the
AIReach Office Operation and Maintenance Center (OMC)
software, as explained below. The OMC software runs on the
System Controller, under Microsoft Windows NT.
Important: For configuration values to enter in the AIReach OS
software windows, see the site–specific AIReach Office
Configuration Report. References to specified values or
parameters in this manual refer to values and parameters specified
in the Configuration Report. For values not listed in the
Configuration Report, use the default values shown in the
software or specified in these instructions.
Controller (BSC) configuration windows are available to only
one user (local or remote) at a time.
Starting from the Windows NT desktop, verify the site information
as follows:
1. Launch the AIReach Office application by double–clicking
on the traffic light icon labeled AROS Configuration,
shown below.
The software displays the AIReach Office banner window
and a Login dialog box.
If the application is already running, click its button on the
Windows taskbar (and skip step 2).
2. In the Login dialog box, enter:
- System to log into
To use the local Controller, leave the default,
Localhost, after AROSC.
- User name
(No entry is needed if this field is grayed out.)
- Password
The default administrator password is “abc123.”
3. Click Connect.
4. After you successfully log in, change the administrator
password if you have not already done so: Click File →
Change Password, and enter a password.
4.2
Verifying the
System Controller
configuration
Verifying the site
information