
Installation Instructions
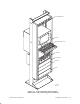


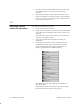

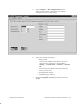
Table Of Contents
- Title page
- Contents
- About this manual
- Safety information
- Ch 1 - Introduction
- Ch 2 - Adding cards to the Controller
- Unpacking the System Controller
- Unpacking the picocells
- System Controller card configuration
- Adding cards to the System Controller (first steps)
- Jumper and DIP switch settings
- Attaching bus cables
- Adding cards to the System Controller (final steps)
- Configuring Controller cards
- Verifying the card configuration
- Ch 3 - Installing the Controller
- Ch 4 - Verifying the Controller configuration
- Ch 5 - Configuring the router
- Ch 6 - Testing picocells
- Ch 7 - Installing picocells
- Ch 8 - Connecting to external equipment
- Ch 9 - System testing
- Ch 10 - Installation inspection
- Ch 11 - Provisioning
- Ch 12 - Remote Client
- Ch 13 - Troubleshooting
- Ch 14 - Maintaining Quad T1 cards
- App A - Specifications
- App B - Standards compliance information
- App C - Part numbers
- App D - Updates and backups
- Index

1026209–0001 Revision B
Verifying the System Controller configuration 4–3
5. Select Configure → BSC Configuration from the
AIReach Office banner to display the main AROSC
Configuration window, shown below.
6. Verify the following information:
- AROSC Name
Verify that the AROSC Name matches the name
assigned to the Controller by clicking Start →
Settings → Control Panel → Network → Network
ID.
Do not change the AROSC Name unless the TAC
instructs you to do so.
- Operating Mode: Normal
- Companding Type: Mu–Law
7. Enter the Geographic Location information; then click
Accept.