
Installation Instructions
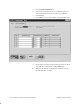
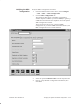
Table Of Contents
- Title page
- Contents
- About this manual
- Safety information
- Ch 1 - Introduction
- Ch 2 - Adding cards to the Controller
- Unpacking the System Controller
- Unpacking the picocells
- System Controller card configuration
- Adding cards to the System Controller (first steps)
- Jumper and DIP switch settings
- Attaching bus cables
- Adding cards to the System Controller (final steps)
- Configuring Controller cards
- Verifying the card configuration
- Ch 3 - Installing the Controller
- Ch 4 - Verifying the Controller configuration
- Ch 5 - Configuring the router
- Ch 6 - Testing picocells
- Ch 7 - Installing picocells
- Ch 8 - Connecting to external equipment
- Ch 9 - System testing
- Ch 10 - Installation inspection
- Ch 11 - Provisioning
- Ch 12 - Remote Client
- Ch 13 - Troubleshooting
- Ch 14 - Maintaining Quad T1 cards
- App A - Specifications
- App B - Standards compliance information
- App C - Part numbers
- App D - Updates and backups
- Index

1026209–0001 Revision B
Verifying the System Controller configuration 4–17
To verify the systemwide configuration:
1. From the AIReach Office banner menu, select
Configure → NSS → Systemwide to display the
System Wide Configuration window.
2. Click the System Capability tab.
3. Select the specified AROSC Name from the dropdown list.
4. Enter or verify the system capability information.
The default selection for IS41 Interface is GW (gateway). If
you change IS41 Interface to SS7, check all parameters to
make sure they are set correctly for an SS7 interface.
5. Click Save.
Notes
The customer may provide updated information at the time
of installation.
In the following steps, if you have not entered or changed
any information, you do not need to save; you can go on to
the next tab.
Verifying the
systemwide
configuration