
Installation Instructions
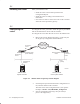
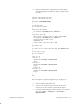
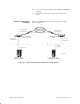
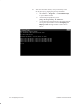

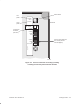
Table Of Contents
- Title page
- Contents
- About this manual
- Safety information
- Ch 1 - Introduction
- Ch 2 - Adding cards to the Controller
- Unpacking the System Controller
- Unpacking the picocells
- System Controller card configuration
- Adding cards to the System Controller (first steps)
- Jumper and DIP switch settings
- Attaching bus cables
- Adding cards to the System Controller (final steps)
- Configuring Controller cards
- Verifying the card configuration
- Ch 3 - Installing the Controller
- Ch 4 - Verifying the Controller configuration
- Ch 5 - Configuring the router
- Ch 6 - Testing picocells
- Ch 7 - Installing picocells
- Ch 8 - Connecting to external equipment
- Ch 9 - System testing
- Ch 10 - Installation inspection
- Ch 11 - Provisioning
- Ch 12 - Remote Client
- Ch 13 - Troubleshooting
- Ch 14 - Maintaining Quad T1 cards
- App A - Specifications
- App B - Standards compliance information
- App C - Part numbers
- App D - Updates and backups
- Index

1026209–0001 Revision B 5–2 Configuring the router
When you install the router:
• Install the router in the location specified in the
Configuration Report.
• Install the router according to the manufacturer’s
instructions.
• Use CAT 5 T1 cable to connect the router to the Controller
and to the service provider’s gateway.
To configure the router, you need to obtain the gateway IP address
and circuit identification values from the customer.
To configure the Cisco 1602–R router for use in the AIReach OS:
1. Refer to the network diagram in Figure 5-1 and verify the
IS–41 gateway configuration and IP addresses.
AIReach Office
System Controller
Service provider
macro system network
S1
E0
S0
E1
Service provider
frame relay
DLCI = A DLCI = B
T0001027
Service provider
router
IP address Z
mask Z
IP address Y
mask Y
IP address X
mask X
IS-41
gateway
Controller IP
address
Customer router
(Cisco 1602-R)
Figure 5-1 AIReach OS IS–41 gateway network diagram
2. Use Notepad to open the standard router configuration text
file, which is loaded on the Controller
.
The name of the router configuration file is site–specific.
Examples: router.txt, RELIATEL_bldg2.txt
3. Save the configuration file using a new file name (to
preserve the original file).
5.1
Installing the router
5.2
Configuring the
router