
User's Manual


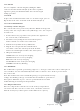

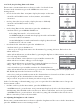

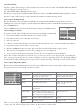
Table Of Contents
- LILJ-Baby Monitor-IVBCV301M-ML-10-28-2015-3
- LILJ-Baby Monitor-IVBCV301M-ML-10-28-2015-4
- LILJ-Baby Monitor-IVBCV301M-ML-10-28-2015-5
- LILJ-Baby Monitor-IVBCV301M-ML-10-28-2015-6
- LILJ-Baby Monitor-IVBCV301M-ML-10-28-2015-7
- LILJ-Baby Monitor-IVBCV301M-ML-10-28-2015-8
- LILJ-Baby Monitor-IVBCV301M-ML-10-28-2015-9
- LILJ-Baby Monitor-IVBCV301M-ML-10-28-2015-10
- LILJ-Baby Monitor-IVBCV301M-ML-10-28-2015-11
- LILJ-Baby Monitor-IVBCV301M-ML-10-28-2015-12

4. General Operation
4.1 Power On/Off
To power on both monitor and camera unit, press the power button on each unit once. The power
LED will light up to indicate the unit is operating. To power off the monitor and camera unit, press
and hold each power button for three (3) seconds.
4.2 Adjusting the Volume of the Monitor Unit
Press the VOL + / VOL - buttons at the top of the monitor unit to increase or decrease the speaker
volume. Once the volume is changed, the status bar will indicate the current volume level: more
bars = louder; fewer bars = softer.
Note: Do not place the camera unit too close to the monitor unit with a high volume setting. You
may experience feedback / shrilling noise.
4.3 Intercom / Two-way talk
Press and hold the Push to Talk button on the monitor unit to activate the intercom function and
transmit your voice signal from monitor unit to the camera unit. Release the Push to Talk button to
stop the intercom function.
4.4 On Screen Status Bar
The on screen status bar is located at the top of the streaming video. It shows the current settings
of the system and provides the monitoring data to the user.
Details indicated below:
Camera name: The camera name in the top left corner of the display indicates which camera
image is shown on the screen.
Volume: The volume icon displays the current volume level.
Temperature: This indicates the current temperature reading of the camera unit.
Time: This displays the current time. To set the date and time, please see section 4.6.
Battery status: Displays the remaining capacity of battery. When the battery is charging, a
flashing icon will be displayed.
4.5 Menu and Navigation
To enter the user menu, press the Menu icon on the
Monitor unit’s touch screen.
The user menu will display as shown:
The user menu is divided into four on-screen
icons: Cameras, Alarm, Lullaby, Settings
To exit the user menu, press the Home
icon once.
7
Volume level icon
Volume Temp Time Battery StatusCamera Name