
Operation Manual


6 English
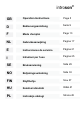
Standard components
Please check if all listed items are included:
- introson
IR
- Transmitter and Receiver
- 12 V plug-in PSU
- Connection cable
- Operating Instructions
- Warranty card
If any parts are missing please immediately contact your dealer or the manufacturer directly.
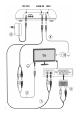
Connecting the infrared transmitter
- Plug in the audio connection cable
1
that comes with the device into the “LINE IN” con-
nection jack of the transmitter and the other end into the connection jack of your sound
source (e.g. the TV).
Other connection adapters are available optionally: a 3.5-mm stereo cinch jack adapter
2
which can be connected to a headphone jack, or a SCART connector
3
, which can be
plugged into the SCART jack of the audio source (marked with AV).
If your sound source is not equipped with a headphone jack or any other connection op-
tions, then you can clip a microphone
4
onto the sound source. This microphone is then
plugged into the corresponding MIC jack on the transmitter. The microphone is sold se-
parately.
- Connect the power supply unit that comes with the device
5
to the transmitter using the
“DC12V” connection plug. Then plug the power supply unit itself into a 230V electrical
wall outlet.
-
Set the under-the-chin receiver into the charging tray of the transmitter without using any
excessive force
6
. A red LED will light up to indicate that the device is being charged up.
- Beforethedeviceisusedforthersttime,thereceiverwiththebuilt-inrechargeablebat-
tery should be charged for 24 hours.
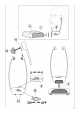
Setting up or adjusting the transmitter
- Place the transmitter close to the sound source in a suitable position. There must be a
clear line of sight between the front of the transmitter (polished front surface
7
) and the
receiver
8
. The polished surface of the transmitter must be aimed at the front of the
transmitter.
Using the receiver
- Use the volume control
9
to initially set the receiver to a low volume to protect your hear-
ing. Turn the volume control in the direction of the “6” to increase the volume and in the
direction of the “0” to decrease the volume.
- Use the sliding switch
10
, on the rear side of the under-the-chin receiver to switch the
device “ON” or “OFF”. Make sure that the sound source connected is switched on and
adjust the volume on the receiver to a level that is comfortable for you.