Notice Thank you for purchasing a HUMAX product. Please read this user’s manual carefully to be able to safely install, use and maintain the product at maximum performance. Keep this user’s manual next to your product for future reference. The information in this user’s manual is subject to change without notice.
Notice Meaning of Symbols To reduce the risk of electric shock, do not remove cover (or back). No user serviceable parts inside. Refer servicing to qualified service personnel. This symbol indicates dangerous voltage inside the product that presents a risk of electric shock or personal injury. This symbol indicates important instructions accompanying the product. Customer information According to art. 13 of the Legislative Decree 25th July 2005, no.
Safety Warning This product has been manufactured to comply with international safety standards. Please read the following safety precautions carefully. Safety Instructions and Precautions 1. MAINS SUPPLY 90-250V a.c., 50/60Hz • Operate this product only from the type of power supply indicated on the marking label. If you are not sure of the type of power supplied to your home, consult your local power company.
Safety Warning 10. LOCATION • Place the product indoors to avoid exposing it to lightning, rain or sun. • Do not place it near a radiator or heat register. • Make sure it has more than 10 cm clearance from any appliances susceptible to electromagnetic influences, such as a TV or a VCR. • Do not block the openings with any object, and do not place the product on a bed, sofa, rug, or other similar surface.
Safety Warning Warning 1. To avoid damage of the power cord or plug; • • • • Do not modify or process the power cord or plug arbitrarily. Do not bend or twist the power cord. Make sure to disconnect the power cord holding the plug. Keep heating appliances as far as possible from the power cord in order to prevent the cover vinyl from melting. • The mains plug, as a disconnection device, shall remain readily accessible by the user. 2. To avoid electrical shock; • • • • Do not open the main body.
Contents 1. Before Using the Product 1.1 Package Contents . . . . . 1.2 Front Panel . . . . . . . . . 1.3 Conditional Access . . . . 1.4 Rear Panel . . . . . . . . . . 1.5 Remote Control . . . . . . 1.6 Remote Control Batteries . . . . . . . . . . . . . . . . . . . . . . . . . . . . . . . . . . . . . . . . . . . . . . . . . . . . . . . . . . . . . . . . . . . . . . . . . . . . . . . . . . . . . . . . . . . . . . . . . . . . . . . . . . . . . . . . . . . . . . . . . . . . . . . . . . . . . . . . . . .
Contents 5.5 A/V Control . . . . . . . . . . . . . . . . . . . . . . . . . . . . . . . . . . . . . . . . . . . . . . . . . . . . GB42 5.6 Miscellaneous Settings . . . . . . . . . . . . . . . . . . . . . . . . . . . . . . . . . . . . . . . . . . . . . GB44 5.7 MHP Settings . . . . . . . . . . . . . . . . . . . . . . . . . . . . . . . . . . . . . . . . . . . . . . . . . . . GB45 6. Edit Channels . . . . . . . . . . . . . . . . . . . . . . . . 6.1 Edit Terrestrial Channel Lists . . . . . . . . . . . . . 6.
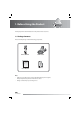
1. Before Using the Product This chapter provides detail instructions on the product and its accessories. 1.1 Package Contents Please check all package contents before using your product. Remote Control SCART Cable User’s Manual User’s Manual Batteries Note: • • Faults may occur if the remote control is left without battery for a long time. Always keep the battery inserted in the remote control. Package contents may vary according to area.
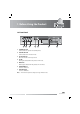
1. Before Using the Product 1.2 Front Panel 1 2 3 4 5 6 7 1. STANDBY BUTTON Switches between operation and standby modes. 2. TV/RADIO BUTTON Switches between TV and radio modes. 3. CH-/CH+ BUTTON Moves the TV/radio channel up or down. 4. TV LED Green light is emitted when the product is in TV mode. 5. RADIO LED Amber light is emitted when the product is in radio mode. 6. SMARTCARD SLOT A slot for a Smartcard 7.
1. Before Using the Product 1.3 Conditional Access Although some TV and radio channels are free to air, most TV and radio/music channels are available on a subscription basis and can only be enjoyed via a Conditional Access component. 1. Inserting the Smartcard 1. 2. 3. Open the right-hand flap on the front panel of the product to expose the card slot. Hold the Smartcard horizontally with the electronic chip (small square-shaped, gold in colour) facing upwards. Insert the Smartcard into the top slot.
1. Before Using the Product 2. Inserting a CI (with Smartcard) A CI module looks like a PC map (PCMCIA) for laptops. There are different kinds of CI Modules, suitable for different coding systems; Irdeto, Conax and more. Additionally to the CI module, a Smartcard is needed to decode the channels. 1. 2. 3. 4. Open the right-hand flap on the front panel of the product to expose the card slot. Follow the instructions of the module and insert the Smartcard into the CI module.
1. Before Using the Product 1.4 Rear Panel 1 2 3 4 5 6 7 8 9 1. ANTENNA IN Connects the aerial cable. 2. TV/VCR Connects to the RF IN of the TV using an RF cable. 3. LNB IN Connects a satellite antenna cable. 4. LNB OUT Connects another digital satellite receiver. 5. TV SCART Connects to the TV using a TV SCART cable. 6. VCR SCART Connects to the VCR or DVD using a VCR SCART cable. 7. AUDIO/VIDEO Connects to the TV or VCR using an RCA cable. 8.
1. Before Using the Product 1.5 Remote Control 1 1. DTV Controls the receiver. 2 2. TV Controls the TV. 3 3. NUMERIC(0-9) BUTTONS Enters a TV/radio channel number or menu option number. 4. MyEPG Displays the MyEPG. 4 5 6 7 5. BACK Closes and returns to the previous menu and screen. 6. ARROW BUTTONS Changes the channel or moves the cursor up, down, left or right. 7. COLOUR BUTTONS Select the colour keys for interactive applications. 8 8. CH-/CH+ (PAGE-/PAGE+) Changes the channel or page. 9 9.
1. Before Using the Product 13. STANDBY Switches between operation and standby modes. 13 14. GUIDE Displays the standard EPG. 15. EXIT Exits all On-Screen Display (OSD) screens. 14 16. OK Selects a menu or confirms the selected operation. Displays the channel list while watching a programme. 15 17. V-/V+ Adjusts the audio volume. 18. MUTE Mutes or unmutes the audio temporarily. 16 19. LANG Displays the audio, subtitle list and teletext. 20. LIST Displays the channel list.
1. Before Using the Product 1.6 Remote Control Batteries 1. 2. 3. Press down the top of the battery cover and slide the cover off. Insert the new batteries. Make sure the plus (+) ends meet the plus markings on the battery case. Slide the cover back into place.
2. Setup This chapter describes how to connect the product to the TV with the particular equipments for gaining optimum signal quality. The product provides various interfaces to connect to the TV, VCR or other devices. Select the most appropriate procedure depending on the equipment you have. Note: If you encounter any problems setting up your product, please contact your local product distributor. 2.1 Connecting to the Antenna 1. 2. Connect your aerial to the ANTENNA IN.
2. Setup 2.2 Connecting TV 1. Using SCART Cable Connect the product and the TV using a SCART cable.
2. Setup 2. Using RCA Cable Connect the product and the TV using an RCA cable.
2. Setup 3. Using RF Cable Connect the product and the TV using an RF cable to watch analogue terrestrial channels.
2. Setup 2.3 Connecting the TV and VCR 1. Using SCART Cable Connect the product and the TV/VCR using a SCART cable.
2. Setup 2.4 Connecting the Audio System Select the most appropriate procedure for your convenience. • Connect the product and the audio system using an RCA cable. • Connect the product and the audio system for higher quality sound using an S/PDIF cable.
2. Setup 2.5 Connecting the Modem Connect the product and the telephone using a telephone line.
2. Setup 2.6 Powering On 1. 2. Connect the power cord of the product to a wall outlet. Power on by pressing the STANDBY button of the remote control or the STANDBY button at the front of the product.
3. Installation Wizard When powering on your product for the first time after purchase, the installation wizard will operate automatically. Note: If you encounter any problems setting up your product, please contact your local product distributor. 3.1 Language You can select the main language. Select the appropriate language from the list using the / button and press the OK or button to save the selected language as a default language. 3.2 Country You can select the country.
3. Installation Wizard 3.3 Terrestrial Channel Search You can search the terrestrial channels. 1. 2. 3. 4. 5. Select Automatic Channel Numbering using the / button and press the OK or button to select Enable/ Disable. Select Next and press the OK button to search the terrestrial channels During the channel search, the cursor is located at Stop. Therefore, if you press the OK button during the search, the search will stop and the channels found until then will be displayed.
3. Installation Wizard 3.6 Antenna Setting You can set the antenna and LNB information for channel search. 1. 2. Select Satellite using the / button and press the OK or button to select an option. Select LNB Frequency using the / button and press the OK or button to select an option. If the required value does not exist, select User Define and enter the LNB frequency directly using the NUMERIC(0-9) buttons. Note: 3. If you select Universal, the 22kHz Tone value is set to Disabled.
3. Installation Wizard 3.8 Satellite Channel Search You can search the satellite channels. Please wait until the channel search is complete. Satellite channel search is similar to that of the terrestrial channel search. Please refer to 3.3 Terrestrial Channel Search. 3.9 Time Setting You can set the GMT offset for current time and the daylight saving time. 1. Select GMT Offset using the / button and press the OK or button. Select your GMT offset using the / button and press the OK or button.
3. Installation Wizard 3.11 Installation Checklist Before using the product, please make sure that you have completed the following steps.
4. Basic Operation 4.1 Switching Channel You can switch the current channel using one of the following methods. 1. 2. Press the CH-/CH+ button. Enter the channel number using the NUMERIC(0-9) buttons to move to the channel directly. Note: • • • The channel will be switched within the most recently watched channel group. Please refer to 4.7 Channel List. You can switch channels using the channel list or guide. To return to the previous channel, press the BACK button. 4.
4. Basic Operation 2. Press the LANG button again to display Subtitle list. Select the required subtitle language using the / button and press the OK button. The subtitle will be displayed in the selected language at the bottom of the screen. Note: 3. You can select a default subtitle language. Refer to 5.2.1 Subtitle Language. Select Teletext using the / button and press the OK button while the subtitle list is displayed. To display teletext menu, press the MENU button in teletext mode.
4. Basic Operation 4.5 Option List You can view and confirm detailed information about the current channel and change the information if necessary. Tip: • The default password is 0000. • If you have forgotten your password, please contact your local product distributor. 1. 2. Press the OPT+ button. Select Favourite using the / button and press the OK or button. Select a favourite group using the / button and press the OK button to register for favourite group. Note: 3.
4. Basic Operation 4.6 Programme Information Programme information is always displayed for a certain period of time each time you switch channels. You can view the programme information by pressing the i button while watching a programme. Press the EXIT button to hide the i-plate. 1. General Information The general information is displayed as the following. 1 5 1. 2. 3.
4. Basic Operation 4. 5. 6. 7. 8. 9. Current time Detailed programme information Signal strength and quality Current channel list icon Programme broadcasting time and progress bar Next programme Information Note: If there is no programme information available, programme information is not displayed. 2. Detailed Programme Information You can see the detailed information about the current programme. Press the i button where the i-plate is displayed to view detailed information.
4. Basic Operation 4.7 Channel List Six types of channel lists are provided for quick and easy channel search.
4. Basic Operation 4.8 Guide The programme guide displays the detailed programme information of each channel, in time and date order. You can customize your own programme guide to list the channels or programmes of interest to you and schedule your viewing using the programme information. You can view programme information for all channels. 1. 2. 3. 4. 5. Press the GUIDE button. Move to previous /next programme within the same channel using the / button. Move to another channel using the / button.
4. Basic Operation 3. Using Time Bar You can quickly search the time zone using the time bar. 1. 2. 3. Press the GREEN button to display the time bar. Select the each button using the / button and press the OK button to move the time bar. If you press the button repeatedly, the same operation is repeated. Each button functions as follows. Exits the time bar. Now Moves to the current programme where the cursor is located. Moves back to the previous programme or 30 minutes before.
4. Basic Operation Note: • If the channel is locked, you will be prompted to enter the password to complete the reservation. • If the reserved programme is overlapped with other programme, adjust the reservation appropriately. Editing a Reserved Programme 1. 2. 3. Select a programme you want to edit using the / button and press the OK button. Select Delete using the / button and press the OK button to delete the reserved programme. A pop-up will appear. Select OK and press the OK button.
4. Basic Operation 4.10 MEDIASET Premium PPV (MEDIASET Smartcard Users Only) You can use Mediaset Premium PPV services only when you tune to a Mediaset Pay TV channel. You can purchase a programme when you have the authority to buy it. 1. 2. 3. Switch to the Mediaset PPV channels using the CH-/CH+ button. When you are allowed to buy a PPV programme, a banner pops up. The banner provides general information on the programme that can be purchased.
5. Preferences 5.1 Parental Control Tip: • The default password is 0000. • If you have forgotten your password, please contact your local product distributor. 1. 2. 3. Press the MENU button. Select Preferences using the / button and press the OK or button. Select Parental Control using the / button and press the OK or button. 1. Censorship Classification Censorship Classification allows you to block programmes according to the age level you have set. 1. 2.
5. Preferences 5.2 Language Setting 1. 2. 3. Press the MENU button. Select Preferences using the / button and press the OK or button. Select Language Setting using the / button and press the OK or button. 1. Menu/Audio/Subtitle Language 1. 2. Select Menu/Audio/Subtitle Language using the / button and press the OK or button. Select the language using the / button and press the OK or button. 2. Subtitle Display 1. 2. Select Subtitle Display using the / button.
5. Preferences 5.3 Time Setting 1. 2. 3. Press the MENU button. Select Preferences using the / button and press the OK or button. Select Time Setting using th / button and press the OK or button. 1. GMT Offset You can set the GMT offset for current time. 1. 2. Select GMT Offset using the / button and press the OK or button. Select your GMT offset using the / button and press the OK or button. Note: • The current time is set automatically whenever GMT offset changes.
5. Preferences 5.4 Schedule 1. 2. 3. Press the MENU button. Select Preferences using the / button and press the OK or button. Select Schedule using the / button and press the OK or button. Note: For more information about Schedule, refer to 4.8.4 Schedule. 5.5 A/V Control 1. 2. 3. Press the MENU button. Select Preferences using the / button and press the OK or button. Select A/V Control using the / button and press the OK or button. 1. TV-SCART 1.
5. Preferences 3. Audio Output Select Audio Output using the / button and press the OK or button to select from Stereo and Mono. 4. Dolby Digital Output Select Dolby Digital Output using the / button and press the OK or button to select On/Off. 4. Dolby Digital Output Select Dolby Digital Output using the / button and press the OK or button to select On/Off. 5. Screen Ratio You can set the aspect ratio of your TV. 1. Select Screen Ratio using the / button. 2.
5. Preferences 5.6 Miscellaneous Settings 1. 2. 3. Press the MENU button. Select Preferences using the / button and press the OK or button. Select Miscellaneous Settings using the / button and press the OK or button. 1. i Display Time You can set the automatic display time of the information box when the channel is switched. 1. 2. Select i Display Time using the / button and press the OK or button. Select a value between 1~20 seconds using the / button and press the OK or button.
5. Preferences 4. MyEPG You can set whether or not to use the MyEPG. 1. 2. Select MyEPG using the / button. Press the OK or button to select On/Off. Note: • MyEPG will be automatically updated in the standby mode when MyEPG is set to On. • The product is automatically powered off and on again whenever MyEPG setting changes. 5.7 MHP Settings 1. 2. 3. Press the MENU button. Select Preferences using the / button and press the OK or button.
6. Edit Channels 6.1 Edit Terrestrial Channel Lists Tip: • The default password is 0000. • If you have forgotten your password, please contact your local product distributor. You can edit the terrestrial channels. 1. 2. 3. 4. 5. 6. 7. 8. 9. Press the MENU button. Select Edit Channels using the / button and press the OK or button. Select Edit Terrestrial Channel Lists using the / button and press the OK or button. Press the OK or button in Group to select the group of channel list.
6. Edit Channels 6.2 Edit Satellite Channel Lists You can edit the satellite channels. 1. 2. 3. Press the MENU button. Select Edit Channels using the / button and press the OK or button. Select Edit Satellite Channel Lists using the / button and press the OK or button. Note: For more information about how to edit the satellite channels, refer to 6.1 Edit Terrestrial Channel Lists. 6.3 Edit Favourite Channels You can edit the favourite channels. 1. 2. 3. 4. Press the MENU button.
6. Edit Channels 6.4 Automatic Channel Numbering You can set whether or not the channels are numbered automatically by broadcaster. 1. 2. 3. Press the MENU button. Select Edit Channels using the / button and press the OK or button. Select Automatic Channel Numbering using the / button and press the OK or button to select Enable/Disable. Note: • When changing from Enable to Disable or vice versa, the terrestrial channels will be searched again and the product will reboot automatically.
7. Installation 7.1 Terrestrial Channel Search Tip: • The default password is 0000. • If you have forgotten your password, please contact your local product distributor. You can search the terrestrial channels. 1. 2. 3. Press the MENU button. Select Installation using the / button and press the OK or button. Select Terrestrial Channel Search using the / button and press the OK or button. 1.
7. Installation 2. Manual Search You can search channels manually by searching parameters, using the MUX information. 1. 2. 3. 4. 5. 6. Select Manual Search using the / button and press the OK or button. Select Channel using the / button and press the OK or button. Select one of channels using the / button and press the OK button. When entering channel value, the appropriate frequency value is displayed. Select Frequency using the / button and press the OK or button.
7. Installation 4. Invisible Channel Search Select Invisible Channel Search using the / button and press the OK or button to select Enable/ Disable. Note: If you set Invisible Channel Search to Enable, search channel again to view the invisible channels. 7.2 Satellite Channel Search Tip: • The default password is 0000. • If you have forgotten your password, please contact your local product distributor. You can search the satellite channels. 1. 2. 3. Press the MENU button.
7. Installation 4. Select LNB Frequency using the / button and press the OK or button to select an option. If the required value does not exist, select User Define and enter the LNB frequency directly using the NUMERIC(0-9) buttons. Note: 5. 6. 7. 8. If you select Universal, the 22kHz Tone value is set to Disable. Select 22kHz Tone using the / button and press the OK or button to select Enable/Disable. Enable Dual LNB is used or two antennas are connected to the 22KHz tone switch box.
7. Installation 2. Antenna Setting (Motor Antenna) When using a motor antenna, press the OPT+ button in antenna setting menu. Motor Type 1. 2. 3. Select Motor Type using the / button and press the OK or button. Select LNB Frequency using the / button and press the OK or button to select an option. If the required value does not exist, select User Define and enter the LNB frequency directly using the NUMERIC(0-9) buttons.
7. Installation Motor Setting 1. 2. 3. 4. 5. 6. Select Motor Setting using the / button and press the OK or button. Select Satellite using the / button and press the OK or button. Select the satellite the antenna is pointing to from the options using the / button and press the OK or button. Select Transponder using the / button and press the OK or button. Select an option for transponder using the / button and press the OK or button.
7. Installation Installer Menu 1. 2. Select Installer Menu using the / button and press the OK or button to set default setting and operation limit for motor antenna. Select Motor Limit using the / button and press the OK or button to select Enable/Disable. To save the present location, change the Motor Limit to Enable. Enable Motor limit is set. motor does not exceed the limit. Disable Setting is released.
7. Installation 3. Automatic Search If the product is connected to the antenna and TV, you can automatically search satellites and channels without entering any other information. 1. 2. 3. Select Automatic Search using the / button and press the OK or button. Select Satellite using the / button and press the OK or button to select the satellite. Select Search Type using the / button and press the OK or button. Select an option among All, FTA and CAS and press the OK or button.
7. Installation 4. Manual Search 1. 2. 3. 4. 5. 6. 7. Select Manual Search using the / button and press the OK or button. Select Satellite using the / button and press the OK or button to select the satellite. Select Transponder using the / button and press the OK or button. Select a transponder using the / button and press the OK or button. To add another transponder, select User Define from the list. Add transponder screen will appear.
7. Installation 7.3 Software Update In order to maintain proper performance of the product, it is essential to have the most up-to-date software. Visit the Humax website to check the latest news and newly released software versions. – http://www.humaxdigital.com. It is recommended that you periodically check for the availability of software update. 1. 2. 3. Press the MENU button. Select Installation using the / button and press the OK or button.
7. Installation Note: • • • It may take 5~10 minutes to update software. Other functions will not activate while software update takes place. You cannot schedule programmes during software update. 2. Automatic Update You can set the product to find HUMAX software update site and update software automatically. 1. 2. 3. 4. 5. Select Automatic Update using the / button and press the OK or button. Automatically search for new software. Select Cancel and press the OK button to finish search.
7. Installation 4. Software Update from PC You can connect the product to your PC and update the software directly by transferring the latest software from the PC. Follow the steps below to download the latest software over the internet. 1. 2. 3. 4. 5. Download the latest software from the website (http://www.humaxdigital.com). Download and install the download tool. Connect your PC to the product with an RS-232C serial cable. Execute the installed download tool and follow the instructions provided.
7. Installation 7.4 Regular Auto Update You can update the channel and software and specify the update option. 1. 2. 3. 4. 5. 6. 7. Press the MENU button. Select Installation using the / button and press the OK or button. Select Regular Auto Update using the / button and press the OK or button. Select Update Target using the / button and press the OK or button. Select an option from the list using the / button and press the OK or button.
7. Installation 7.5 Default Setting Tip: • The default password is 0000. • If you have forgotten your password, please contact your local product distributor. Default Setting enables you to restore the product to the factory default. Warning: 1. 2. 3. 4. 5. 6. Please note that once you perform Default Setting, all data such as antenna setting information, channel list, and all user configured data will be deleted. Press the MENU button.
8. System 8.1 Status You can view system information. 1. 2. 3. Press the MENU button. Select System using the / button and press the OK or button. Select Status using the / button and press the OK or button. Note: DTT version in the status menu may be requested when contacting the call center. 8.2 Signal Detection You can view the signal strength and signal quality of the channel that is currently on AV. 1. 2. 3. Press the MENU button.
8. System 8.4 Modem Setup You can set the modem information appropriate for your modem and test the modem. 1. 2. 3. 4. Press the MENU button. Select System using the / button and press the OK or button. Select Modem Setup using the / button and press the OK or button. Configure and test the modem. This equipment has been approved [Council Decision 98/482/EC - “TBR 21”] for single terminal connection to the Public Switched Telephone Network (PSTN).
9. Pay per View services 9.1 MEDIASET PREMIUM You can view the information on the card and the list of purchased programmes. 1. 2. 3. 4. 5. Press the MENU button. Select Pay per View services using the / button and press the OK button. Select MEDIASET PREMIUM using the / button and press the OK button. Select CARD INFORMATION using the / button and press the OK button to view the information on the card.
10. Appendix 10.1 Menu Map Preferences Edit Channels 1. 2. 3. 4. 5. 6. 7. Parental Control Language Setting Time Setting Schedule A/V Control Miscellaneous Settings MHP Settings 1. 2. 3. 4. 5. Edit Terrestrial Channel Lists Edit Satellite Channel Lists Edit Favourite Channels Automatic Channel Numbering Renew Channel Numbers 6. Import/Export Channels 1. 2. 3. 4. 5. Terrestrial Channel Search Satellite Channel Search Software Update Regular Auto Update Default Setting 1. 2. 3. 4.
10. Appendix 10.2 Universal Remote Control 1. Using the Universal Remote Control You can manipulate the TV using the remote control provided by Humax. Note: • This function may not be supported depending on the TV model. • The listed TV codes may differ from the TV codes set to the remote control. 1. 2. 3. 4. 5. 6. Point the remote control towards the remote control sensor of the TV. Press the TV button, and the TV button LED will blink once.
10.
10.
10.
10.
10.
10.
10.
10. Appendix 10.3 Multi Custom Code If you are using more than two receivers that have the same custom code, reset the custom code of the remote control as the following. 1. 2. 3. 4. 5. If you have other HUMAX receivers supporting the multi custom code, turn them off to prevent change of the custom code. Point the remote control towards the remote control sensor of the receiver. Press the 0 and OK button for 5 seconds. Press the NUMERIC button (from 1 to 6) to select the mode.
10. Appendix 10.4 Trouble Shooting Before contacting your local service centre, please read the tips below carefully. If the problem persists after completing the following procedure, please contact your local product distributor or service centre for further instructions. 1. • • • No message displayed on the front panel. (The product will not switch on.) Check the main power cable and make sure it is plugged into a suitable power outlet. Check that the mains supply is switched on.
10. Appendix 5. Remote control does not operate. • To control the product, the top end of the remote control should point directly towards the receiving part of the product. • Remove and reinsert the batteries in the remote control. • Replace the batteries in the remote control for a new set. 6. Cannot make reservations. • Check that no previous reservations are conflicting with the new reservation. • Check that the product is switched on at the time of the reservation. 7. No password information is given.
10. Appendix 10.5 Error Message Error message No or bad signal The channel is scrambled or not available. Audio not available GB78 User’s Manual Possible causes What to do The satellite dish is not pointing at the satellite. Adjust dish alignment. Signal is too weak. Connect a signal amplifier. Satellite dish is too small. Change to a larger dish. Problem with LNB. Change the LNB. The aerial is not pointing properly. Adjust aerial. Check the cable from the aerial.
10. Appendix Error message CI module not installed. Invalid CI module Possible causes What to do CI module is not installed. Insert CI module. CI module is not inserted correctly Reinsert CI module. CI module is not recognized. Insert a different CI module to check if your existing module is working. Wrong CI module. Insert the correct CI module. CI module is not inserted correctly. Remove and reinsert the CI module. CI module is damaged Replace CI module. LNB cable is short.
10. Appendix 10.6 Specification Terrestrial Tuner & Channel Input Connector IEC 169-2 Female Frequency Range 177.5MHz to 226.5MHz (VHF) 470MHz to 862MHz (UHF) Signal Level -10 to -70 dBm Demodulation OFDM Mode 2K, 8K FEC Mode 1/2, 2/3, 3/4, 5/6 and 7/8 Guard Intervals 1/4, 1/8, 1/16 and 1/32 Satellite Tuner & Channel Input Connector IEC 169-24 (F-Type) Frequency Range 950MHz to 2150 MHz Signal Level -25 to -70 dBm LNB Power & Polarisation 18V/13Vdc, Current : Max.
10. Appendix Memory Flash Memory 8 Mbytes Graphic (MPEG)/System DRAM 64 Mbytes A/V & Data In/Out Video RCA/TV SCART/VCR SCART Video Output (CVBS, S-Video, RGB) Audio RCA/TV SCART/VCR SCART Volume and Mute Control (Resolution:20bits DAC, MAX. 2Vrms) RS-232C 9 pin Socket type Power Supply Input Voltage 90-250V a.c., 50/60Hz Type SMPS Power Consumption Operation: Max. 28W Standby: Max.
10. Appendix 10.7 Glossary • DiSEqC (Digital Satellite Equipment Control) A DiSEqC compatible receiver relies on a switching box which detects the 22kHz tone pulsing rapidly on and off. In this way, a specially designed receiver can control numerous LNBs through a DiSEqC switching box. • Dolby Digital An encoding system that digitally compresses up to 5.1 discrete channels of audio (left front, centre, right front, left surround, right surround) into a single Bitstream.
10. Appendix • RF (Radio Frequency) Television signals are modulated onto RF signals and are then demodulated by your television’s or STB’s tuner. • RS-232C A connection to allow you to connect to a PC to update receiver’s software. • SCART A 21-pin connector standard to connect two pieces of Audio-Visual equipment such as a TV and a VCR. Each device will have a 21-pin female connection; a cable with male connection at both ends is used for connecting the devices.
10. Appendix 10.8 Service and Support You can receive information such as a troubleshooting guide, software upgrades and product support guide from the following web sites and call center (Hotline). Please try to contact to your local dealers first when you have any problem. Call Center Service customers Modernizations generic and technical software, information http://www.mediasat.com (technical area) Italiano Technical Hotline: 899 100080 This service is charged with a cost per minute of 1.€+VAT.