** ** ** ** ** Notice ** Copyright (Copyright © 2001 HUMAX Corporation) Not to be copied, used or translated in part or whole without HUMAX's prior consent in writing except approval of ownership of copyright and copyright law. ** Warranty The information in this document is subject to change without notice. HUMAX does not have any responsibility for direct, indirect, accidental, necessary and other corruptions due to your offer or use of the information contained in this manual.
** ** ** ** ** Notice ** Read this manual carefully and make sure you understand the provided instructions. For your safety, know what the reaction upon each action will be. ** Warnings, Cautions and Notes Throughout the whole manual, pay special attention to the following marks that indicate hazardous situations. ** • Warning ** Indicates a hazardous situation which, if not avoided, could result in (serious) injury.
** ** ** ** ** Safety and Warning ** This digital terrestrial receiver has been manufactured to satisfy international safety standards. Please read the following safety precautions carefully. ** Safety Instructions and Precautions ** 1. MAINS SUPPLY ** 90 - 250V AC 50/60Hz Operate your product only from the type of power source indicated on the marking label. If you are not sure of the type of power supplied to your home, consult local power company.
** ** ** ** ** Safety and Warning ** 10.LOCATION ** Place the receiver indoors to avoid exposing it to lightening, rain or sun. Do not place it near a radiator or heat register. Make sure it has more than 10 cm clearance from any appliances susceptible to electromagnetic influences, such as TV and VCR. Do not block these openings with any object, and do not place the product on a bed, sofa, rug, or other similar surface.
** ** ** ** ** Contents ** 1. Before Using the Receiver GB7 ** 1.1 Package Contents GB7 1.2 Front Panel GB8 1.3 Rear Panel GB9 1.4 Remote Control GB10 2. Setup GB12 ** 2.1 Connecting Aerial GB12 2.2 Powering On GB14 3. Installation Wizard GB15 4. Basic Operation GB16 ** ** 4.1 Switching Channel GB16 4.2 Volume Control GB16 4.3 Text and interactive services GB16 4.4 Change the Subtitle Language GB17 4.5 Change a Audio Language GB17 4.
** ** ** ** ** Contents ** 7. Setting Preferences GB35 ** 7.1 Parental Control GB35 7.2 Language Setting GB37 7.3 Time Setting GB38 7.4 Schedule GB40 7.5 A/V Control GB40 7.6 UHF Tuning GB42 7.7 Miscellaneous Settings GB43 GB44 8. Installation ** 8.1 Automatic Search GB44 8.2 Manual Search GB45 8.3 Default Setting GB47 9. Software Update GB48 ** ** 9.1 OTA (Over the Air) GB48 9.2 S/W Update from PC GB51 10. System Information ** GB52 ** 10.1 Status GB52 10.
** ** ** ** ** 1.Before Using the Receiver ** This chapter describes detail instructions on the product and its accessories. 1.1 Package Contents Please check all package contents before using your receiver. ** ** ** Remote Control (1) User's Manual (1) Batteries (2) Scart Cable (1) ** ** Note: Since faults may occur if the remote control is being left without a battery for a long time, always keep the battery inserted in the remote control.
** ** ** ** ** 1. Before Using the Receiver ** 1.2 Front Panel ** 1. STANDBY Button ** Switches between Operation and Standby modes. 2. TV/RADIO Button ** Switches between TV and Radio. 3. CH - / CH + ** Moves the TV/Radio channel up/down. 4. STANDBY LED ** ** Red light is displayed when the product is in the Standby mode. Green light is displayed when the product is in operation. ** 5. TV LED ** Green light is displayed when the receiver is in TV mode. 6.
** ** ** ** ** ** ** 1.3 Rear Panel ** 1. ANTENNA IN ** Connects a aerial to a ANTENNA input jack on the your receiver. ** 2. TV / VCR ** Connects a RF signal from your receiver to RF (ANT) input jack on your TV or VCR. ** 3. TV SCART ** Connects a TV SCART cable. 4. VCR SCART ** ** ** Connects a VCR SCART cable. 5. AUDIO L/R ** Connects to your TV or VCR and output Audio signals. 6. VIDEO ** Connects to your TV or VCR and output Video signals. 7.
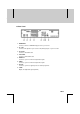
** ** ** ** ** 1. Before Using the Receiver ** 1.4 Remote Control ** ** ** ** ** ** 1. DTV 7. COLOR BUTTONS (R/G/Y/B) 13. TV/RADIO 18. V-/V+ 2. TV 8. CH-/CH+(PAGE-/PAGE+) 14. STANDBY 19. MUTE 3. NUMERICAL BUTTONS 9. MENU 15. GUIDE 20. I (INFORMATION) 4. LIST 10. TEXT 16. EXIT 21. SUBTITLE 5. BACK 11. SOUNDTRACK 17. OK 22. AUX 6. ARROW BUTTONS 12.
** ** ** ** ** ** ** 1. DTV 12.OPT+ (OPTION) ** ** Controls the Receiver. Displays the channel attributes during watching a programme. ** ** 2. TV ** 13.TV/RADIO Controls the TV. ** ** Switches between TV and Radio modes. 3. NUMERICAL BUTTONS ** ** Enters a TV/Radio channel number or menu option number. 14.STANDBY ** ** Switches between Operation and Standby modes. 4. LIST ** ** Displays the channel list. 15.GUIDE ** ** 5. BACK Displays the Programme Guide.
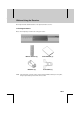
** ** ** ** ** 2. Setup ** This chapter describes how to set up the receiver. Select the most appropriate procedure depending on your case. Note: If you encounter any problem when setting up the receiver, please contact your local product distributor. Where possible, use an outdoor roof aerial intended for receiving UHF channels between 21 and 69. It is not advisable to use indoor or window mounted aerials, as digital channels will be difficult or even impossible to receive. 2.1 Connecting Aerial 1.
** ** ** ** ** ** ** 2. Connecting Hi-Fi system 1 Connect the outputs on this receiver to corresponding inputs on your Hi-Fi system.( left audio out to left audio in, right audio out to right audio in) ** 3. Connecting Hi-Fi system 2 ** If you wish to connect the optical S/PDIF terminal and Dolby digital decoder to listen digital audio, connect as following.
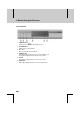
** ** ** ** ** 2. Setup ** 2.2 Powering On 1. Connect the power cord of the receiver to a wall outlet. 2. Power on by pressing the STANDBY button at Remote Controller. The Standby LED indicator is turned on Green.
** ** ** ** ** 3. Installation Wizard ** When powering on your receiver for the first time after purchasing, the Installation Wizard is automatically started. It immediately performs Channel Search.(You can run the Installation Wizard in Default Setting.) Please wait for finishing the Channel Search. If you want to stop the Channel Search, select the OK button. If the Channel Search is stopped or finished, the result of Channel Search is automatically saved.
** ** ** ** ** 4. Basic Operation ** This chapter describes functions such as switching channel, volume control, and basic features for watching programmes. 4.1 Switching Channel You can switch the current channel using one of the following methods. 1. Press the CH-/CH+ button. 2. Enter your desired channel numeric using the NUMERICAL (0-9) buttons to move to the channel directly. 3. Press the TV/RADIO button to switch between TV channel and Radio channel.
** ** ** ** ** 4. Basic Operation ** 4.4 Change the Subtitle Language If the current programme provides Subtitle information, you can select the language for the Subtitle. 1. Press the SUBTITLE language list. button to display the subtitle 2. Select your desired subtitle language using the button, and press the OK button. Then the subtitle will be displayed in the selected language at the bottom of the screen. 3. Select OFF from the subtitle language list not to display subtitle from the screen.
** ** ** ** ** 4. Basic Operation ** 4.6 Programme Information (I- plate) Programme information is always displayed for a specific period of time whenever you switch channels. You can view the programme information by pressing the i button while watching a button to hide the I-plate. programme. Press the EXIT 1. General Information General Information is displayed as follows on the screen. ** ** ** 1. Channel number and channel name 2. Programme name 3.
** ** ** ** ** ** ** 4. Current time 5. Detail programme information: displayed if detailed programme information is provided. 6. Channel looping mode and Channel List Name : if you select Within the current channel list by selecting MENU - Edit channels - Channel Change Mode , the Icon of Channel looping mode is displayed. And channel list, which you selected, is displayed. 7. Programme broadcasting time and progress bar: displays programme playing time and progress bar. 8.
** ** ** ** ** 4. Basic Operation ** 4.7 Option List You can view and confirm detailed information about the current channel and change the information in necessary. Note: Press the OPT+ button when the channel list is displayed to view Option List. Then the following functions in the option list are performed to the current channel where cursor is located. 1. Add a channel to favourite group You can add current channels to the favourite group immediately.
** ** ** ** ** ** ** 2. Lock/Unlock a Channel You can lock or unlock the current channel while watching a programme. 1. Press the OPT+ button. button, and press the 2. Select Lock using the button. OK or button, and press the 3. Select Lock option using the button. OK 4. Select Unlock option using the button. the OK button, and press 5. You will be prompted to enter your Password. Enter your password to unlock the channel. 6. Move to the parent menu using the changes automatically.
** ** ** ** ** 5. Channel List ** 3 types of channel lists are provided for easy and quick channel searching. TV The list of all TV channels with 2 sub-groups: one is sorted by channel number, the other is sorted by channel name. Radio The list of all Radio channels with 2 sub-groups: one is sorted by channel number, the other is sorted by channel name. Favourite The list of the favourite channels with 5 sub-groups that You can organise channels by your private taste. 5.
** ** ** ** ** ** ** 5.2 Changing Channel List Group You can select channel list by group. 1. Press the button while the channel list is displayed to view the group list. 2. Select your desired channel group using the to display its sub-groups. or 3. Press the OK sub-group using the button. button button, select your desired button, and then press the OK 4. The channel list for the selected sub-group is displayed.
** ** ** ** ** 5. Channel List ** 5.3 Edit Channels You can edit all channels or each channel by channel list group. 1. Press the MENU button. 2. Select Edit Channels using the or button. the OK 3. Select Edit Channel lists using the or button. press the OK button, and press button, and 4. You will be prompted to enter your password. Enter your password using NUMERICAL (0-9) button.
** ** ** ** ** ** ** 2. Delete Channels You can delete one or more channels. 1. Move the cursor to the channel list using the button. 2. Select your desired channel, and then press the OK button to delete the channel(s). You can select multiple channels. 3. Select Delete in the right using the button. the OK button, and press 3. Lock/Unlock Channels You can lock or unlock one or more channels. 1. Move the cursor to the channel list using the button. 2.
** ** ** ** ** 5. Channel List ** 5.4 Edit Favourite Channels You can edit Favourite channel or Favourite channel list. 1. Press the MENU button. 2. Select Edit Channels using the button. the OK button, and press 3. Select Edit Favourite Channels using the or button. and press the OK button, Note: • or Press the BACK or EXIT the MENU button to save the changes and return to the previous menu. Press button to exit the Menu screen.
** ** ** ** ** ** ** 1. Add/Remove favourite channels You can add favourite channel(s) to a specific Favourite channel list or remove the added favourite channel(s) from the list. 1. Select Favourite Group using . 2. Select your desired channel(s) in all TV/Radio channel to add Favourite channel(s). list, and press 3. Select your desired channel(s) in Favourite channel list, to remove Favourite channel(s).
** ** ** ** ** 5. Channel List ** 4. When finishing entering the Favourite channel list name, select OK, and press the OK button. 4. Additional Features Additional Features provides many useful functions which are necessary to add Favourite Channel. ** Change between TV and Radio channel list You can add not only TV channel(s) but also Radio channel(s) to Favourite channel list. Press switch all channel list into TV or Radio channels.
** ** ** ** ** ** ** 5.5 Channel Change Mode You can change the channel either in the group or in the entire groups while watching a programme. 1. Press the MENU button. button, 2. Select Channel Change Mode using the or button. and press the OK 3. Select All Channels or within the current channel list button, and press the OK button. using the Note: When Within the current channel list in Favourite Group option is selected, you can only change the channel within the current channel list.
** ** ** ** ** 6. Programme Guide ** The Programme Guide displays programme information about each channel, based on the date and time.You can also schedule your watching using the information given. ** 6.1 Viewing Programme Guide Information You can view programme information for all channels. 1. Press the GUIDE button. 2. Move to previous or next programme within the same button. channel using the button. 3.
** ** ** ** ** ** ** 2. Viewing Programme Information Using Time Bar You can quickly search for your desired time zone using the Time bar. 1. Press the GUIDE button. 2. Press the Green button to display Time Bar. button, and 3. Select the Time Bar button using the button to move as your desired amount press the OK of time. If you press the button repeatedly, the same operation is repeated. 4. Each button functions as follows. Now Moves to the current programme where the cursor is located.
** ** ** ** ** 6. Programme Guide ** 6.2 Finding a Programme You can find your desired programme by programme name or genre easily. 1. Press the GUIDE button. 2. Press the Blue button to display Find screen. 3. Enter the programme name directly using the keyboard displayed on the screen. 4. When completing entering programme name, select the Find button, and press the OK button. 5.
** ** ** ** ** ** ** 6.3 Viewing Reserved Programme You can add or edit reserved programmes by viewing the reserved programme list. 1. Press the GUIDE button. 2. Press the Yellow button to display the Schedule screen. 3. Select the scheduled programme and press the OK button to edit the reservation information. 4. Select vacant list and press the OK new reservation schedule. ** button to add a ** ** 1. Editing a Reserved Programme 1.
** ** ** ** ** 6. Programme Guide ** 2. Adding a Reservation 1. Enter your desired channel number using the NUMERICAL (0-9) button. The channel name is automatically displayed by channel number. 2. Enter your desired Start Time using the the NUMERICAL (0-9) button. button and button and 3. Enter your desired End Time using the the NUMERICAL (0-9) button. 4. Select one of repeat mode options among Once, Daily, and Weekly using the button. button to complete entering. 5.
** ** ** ** ** 7. Setting Preferences ** You can set censorship, watching time, and all other items suitable for your environment. Note: • or Press the BACK or EXIT the MENU button to save the changes and return to the previous menu. Press button to exit the Menu screen. • You can easily select any item from the menu using the NUMERICAL (0-9) buttons. ** 7.1 Parental Control You can set parental control for each programme and watching time. You can also change your Password. 1.
** ** ** ** ** 7. Setting Preferences ** View All All programmes can be watched because there is no age limitation. 7 Programmes are blocked for children under the age of 7. 12 Programmes are blocked for children under the age of 12. 15 Programmes are blocked for children under the age of 15. 18 Programmes are blocked for children under the age of 18. Lock All Programmes are blocked without considering the age level.
** ** ** ** ** ** ** 3. Change Password You can change the existing Password into new one. 1. Select Change Password using the button. press the or OK button, and 2. Enter New Password using the NUMERICAL button. (0-9)button, and press OK 3. Enter the New Password again to confirm the Verify button. Password, and press the OK Note: The Default Password is "0000". If you have forgotten your Password, please contact your local product distributor. 7.
** ** ** ** ** 7. Setting Preferences ** 2. Subtitle Display You can select whether or not to display the Subtitle if provided. 1. Select Subtitle Display using the or OK 2. Presse the button. button to display the Auto or Manual option. 3. Select your desired option and press the OK button. ** Auto Subtitles are displayed automatically in the predefined subtitle language.
** ** ** ** ** ** ** 1.Setting Current Time You can set the GMT Offset for current time. 1. Select GMT Offset using the button. button to display GMT list. GMT 2. Press the or OK is changed by from 30 minutes to 1 hour. 3. Select your GMT offset using the button. the OK buttons, and press Note: • The current time is set automatically whenever GMT Offset changes. • The default item is Auto. If GMT Offset is Auto, it is automatically set depending on your country. 2.
** ** ** ** ** 7. Setting Preferences ** 3. Power Off You can set the time when the product is automatically powered off. 1. Select Power Off using the button, and press the or OK 2. Select either Enable or Disable the Power Off using the button. button. button, and press the OK ** Enable Uses the Power Off and sets the Power Off time. Disable Not uses the Power Off. 3. If Enable has been selected, enter the Time using the NUMERICAL (0-9) buttons, and press the OK button.
** ** ** ** ** ** ** 1. TV-SCART/VCR-SCART You can set TV/VCR-SCART Output. 1. Select TV-SCART or VCR-SCART button, and press the OK button, and press the OK 2. Select one option using the or or button. button. 2. Audio Output Set the Audio Output. 1. Select Audio Output button, and press the OK or button. button. 2. Select one option form Stereo or Mono using the 3. Screen Ratio You can set the aspect ratio of your TV. 1. Select Screen Ratio button, and press the OK 2.
** ** ** ** ** 7. Setting Preferences ** 7.6 UHF Tuning You can set the UHF channel. 1. Press the MENU button. 2. Select Preferences using the or button. the OK button, and press 3. Select UHF Tuning using the or button. OK button, and press the 1. UHF Channel You can select UHF Channels for the TV. The Channel range and Frequency change according to PAL Standard. 1. Select UHF Channel using the button, and press the OK or button. button, and press 2.
** ** ** ** ** ** ** 7.7 Miscellaneous Settings 1. Press the MENU button. 2. Select Preferences using the or button. the OK button, and press button, 3. Select Miscellaneous Settings using the or button. and press the OK 1. i-Plate Display Time You can set the duration during which the Information box is to be displayed when you switch the channel. 1. Select i-Plate Display Time using the button, and press the OK 2. Select a value between 1~20 seconds using the or button.
** ** ** ** ** 8. Installation ** This chapter describes how to search for channels and a series of procedures. 8.1 Automatic Search If your receiver is connected to the aerial and television, you can automatically search channels without entering any other information. 1. Select MENU button. 2. Select Installation using the or button. OK button, and press the 3. Select Automatic Search from Installation menu using button, and press the OK or button. the 4.
** ** ** ** ** ** ** 8.2 Manual Search You can search channels manually by searching parameters, if you know the MUX information. 1. Channel Number Enter your desired frequency channel to search. When entering frequency channel value, the appropriate frequency value is entered. 1. Select Channel using the or button. OK button, and press the 2. Select one of channel using the button. the OK button, and press 2. Frequency ** Enter the your desired frequency to search directly.
** ** ** ** ** 8. Installation ** 4. Guard Interval Required for Channel Search. If you don't know the value, please select Auto. 1. Select Guard Interval using the or button. the OK button, and press 2. Select one option among Auto, 1/4,1/8,1/16 and 1/32 button, and press the OK button. using the 5. Network Search If specified frequency channel information and other channel information are provided together, the channel, which belongs to other frequency channel, is also searched. 1.
** ** ** ** ** ** ** 8.3 Default Setting Default Setting restores the receiver to the default settings. Warning: Please note that once you perform Default Setting, all data such as Channel List, and User Configured data are deleted. To perform Factory Default: 1. Press the MENU button. 2. Select Installation using the or button. OK button, and press the 3. Enter Password using the NUMERICAL (0-9) button. 4. Select Default Setting using the or button. OK 5.
** ** ** ** ** 9. Software Update ** In order to maintain proper performance of this product, it is essential to have the most up to date software. The latest news and release of software versions may be found at Humax website http://www.humaxdigital.com. It is recommended that you periodically check for the availability of software upgrade. 9.
** ** ** ** ** ** ** ** 2. If updating software from Menu 1. Press the MENU button. 2. Select Installation using the or button. OK button, and press the 3. Enter Password using the NUMERICAL (0-9) buttons. 4. Select Software Update using the or button. press the OK button, and ** 3. If new version of software is detected during watching a programme 1. A message will be displayed to notify that new software is found. 2. Select Yes and press the OK button to start button to upgrading.
** ** ** ** ** 9. Software Update ** 4. Select Yes and press the OK button to start updating. button to return to the Select No and press the OK previous menu without updating. button to update Select Later and press the OK later. That means the update menu display as soon as you turn on the receiver next time. 5. When completing the software update, the product is automatically powered off and on again. 5.
** ** ** ** ** ** ** 6. Software Auto-Detecting and Time You can specify the software detecting time. If the receiver powers on during software auto-detecting, Detecting will stop. 1. Select Software Auto-Detecting from Software Update screen using the 2. Select Enable or Disable using OK detecting time automatically. or button. button whether or not setting the software 3. When you select Enable, you can set the detecting time in the Auto-Detecting Time. 9.
** ** ** ** ** 10. System Information ** You can view all system information, signal strength and quality. 1. Press the MENU button. 2. Select System using the or button. button, and press the OK 10.1 Status You can view System information 1. Select Status using the or button. button, and press the OK 2. Confirm the information about Hardware version, Software version, Loader version, Update Date and System ID. ** ** 10.
** ** ** ** ** 11. Games ** This product provides various games for user's entertainment. 1. Press the MENU button. 2. Select Games using the button, and press the OK or button. 3. According to the instruction displayed on screen, you can enjoy the game using and OK button. Note: Press the EXIT or BACK button to exit the game.
** ** ** ** ** 12. Manipulating your TV using Remote Control ** You can manipulate TV using the remote control provided by Humax. Note: This function may not be supported depending on TV model. TV code setting Note: While you are setting TV code, please keep pressing TV button. 1. Point remote control towards the remote control receiving parts of TV. button, and the TV button LED blinks once. 2. Press the TV Keep pressing TV button for 3 seconds, then TV button LED turn on.
** ** ** ** ** ** ** ** Brand Code Brand Code BLACKSTRIPE 106 CIE 133 BLACKSTRIPE 108 CIMLINE 004,117 BLAUPUNKT 059,060,061 CINERAL 029,084 BLUE SKY 064 CITIZEN BLUE STAR 075 015,019,025,026,029,040, 057,074 BOOTS 063 CLAIRTONE 056 BOSCH-BAUER 098 CLARIVOX 018 BPL 075 CLARIVOX 125 BRADFORD 052 CLATRONIC 098 BRINKMANN 123 CLATRONIC 127 BRITANNIA 062 CME BROCKWOOD 009 BROKSONIC 002,067,085 004,005,017,018,028,042, 049,063,065,066,068,076, 079,087 BROTHE
** ** ** ** ** 12.
** ** ** ** ** ** ** ** Brand Code Brand Code GRANADA 018,028,063,109,124 INFINITY 023 GRANDIN 075 INGEKEN 139 GRUNDIG 018,059,060,068,137 INGELEN 042 GRUNPY 051 INNOHIT 028,124 GRUNPY 052 INNOVA 018 HALIEAX 071 INTEQ 007 HALLMARK 050 INTERBUY 071 HANSEATIC 018,089,097,098,099, 118,119 INTERFUNK 018,042,095,099 INTERVISION 018,063,071,127,144 HARLY DAVIDSON 051 ISUKAI 064 HARMAN KARDON 023 ITT 042,099,108 HARVARD 052 JACSON 129 HCM 004,071,075 JBL
** ** ** ** ** 12.
** ** ** ** ** ** ** ** Brand Code Brand Code NOKIA 071,094,095,096,099,106, 108,143 PCE/PEC 040,106,108 PENNEY 001,102,008,009,011,013, 015,016,019,020,021, 025,026,034,040,050 PHASE 016 PHILCO 009,010,012,014,015,023, 035,057,058,085,123 PHILIPS 007,008,009,010,011,012, 013,014,018,019,023, 089,110,124,138, PHONOLA 018,098 PILOT 009,015,019 PIONEER 042,044 POLICOM 068 POLYRON 071 PORTLAND 009,019,029 NOSHI 008 NTC 029 OCEANIC 042,099,106,118 ONWA 052 OPTIMUS 038
** ** ** ** ** 12.
** ** ** ** ** ** ** ** Brand Code Brand Code SIAREM 127 SUPRA 025 SICATEL 121 SUSUMU SIEMENS 018,059,060,061 064,010,012,014,015,023, 057,058,080 SIGNATURE 006,040 SYMPHONIC 047 SILVER 017 SYSLINE 018 SIMPSON 057,058 TADNDY 124 SINGER 127 TANDY 028,030,042,063,064 SINUDYNE 049 TASHIKO 110 SKANTIC 099 TASHKO 017,063 SKY 018 TATUNG 002,018,024,028,063,124 SOGERA 098 TEC 063,133 SOLAVOX 016 TECHLINE 127 SOLAVOX 042 TECHNEMA 098 SONITRON 108 TECHNI
** ** ** ** ** 12.
** ** ** ** ** 13.
** ** ** ** ** 14. Trouble Shooting ** 14.1 Trouble Shooting Before contacting your local service, please make sure following instructions. If the product does not work normally after completing the following trouble shooting, please contact your local product distributor or service center. 1. No message is displayed on the front panel or product has no power - Check the main power cable and check that it is plugged into a suitable power outlet. - Check whether Power Switch is On. 2.
** ** ** ** ** ** ** 14.2 Error Message Error message Possible causes What to do No or bad signal The aerial is not pointing properly. Adjust aerial. Check the cable from the aerial.If you cannot resolve the problem you may need to have your aerial and installation tested by a professional. The channel is scrambled or not available. The channel has signal, but no audio or video. Confirm if the channel is currently on air. The channel is not deleted by broadcasting company.
** ** ** ** ** 15. Specification ** Tuner & Channel Input Connector IEC-Type, IEC 169-24, Female RF Loop through Output connector IEC-Type, IEC 169-24, male Frequency Range 48.5MHz to 226.
** ** ** ** ** ** ** Memory Flash Memory 4 Mbytes Graphics (MPEG) & System Memory 16 Mbytes EEPROM 8 Kbytes RF-Modulator RF/Loop-through Output Connector 75 , IEC 169-2 Frequency 470 ~ 862 MHz Output Channel CH 21 ~ 69 TV standard PAL I/G/B Preset Channel CH 36 A/V & Data In/Out ** Video 1 Output RCA Audio R/L 2 Output RCA RS-232C Transfer Rate: 115,200 bps, 3 pin Socket type ** Power Supply Input Voltage AC 90 ~ 250V, 50/60Hz Type Switching Mode Power Supply (SMPS) Power
** ** ** ** ** 16. Glossary ** Aerial A device that collects and amplifies electromagnetic waves. Also called "Antenna" ** Coaxial cable A specially designed and shields cable that can transport signals with high frequency. ** Frequency The number of cycles or events per one second, which is expressed in the unit of hertz ** FTA (Free- To-Air) An unscrambled broadcast, which you can view without additional payments to a service provider.
** ** ** ** ** 17. Service and Support ** You can get information such as a troubleshooting guide, software upgrades and product support guide from the following web sites and call center (Hotline). Please try to contact to your local dealers first when you have any problem. Web site and e-mail Homepage http://www.humaxdigital.com English http://www.humaxdigital.com/Deutsch/ Deutsch http://www.humaxarabia.
** ** ** ** ** 17. Service and Support ** Call Center Humax Middle East Call Center (Dubai, UAE) Tel: +971 (0)4 359 2323 (Open: 9:00 - 20:00 / close on Friday) E-mail: callcenterME@humaxdigital.