IR-PLUS RoHS/Manual/IRPLUS/100GBFAAR *20007-1560PT* 20000-5760
** Thank you for purchasing a HUMAX Digital Satellite Receiver. Please read this user manual carefully, to be able to safely install, use and maintain the product at maximum performance. Keep this user manual next to your product for future reference. Throughout the whole manual, Note mark indicates additional information of operating product to make the user aware of possible problems and information of any importance to help the user to understand, to use and to maintain the installation.
** The product has been manufactured to satisfy international safety standards. Please read the following safety precautions and warning carefully. ** • • • • • • • • • • • • GB 2 Disconnect the product from the mains before you start any maintenance or installation procedures. Do not overload a wall outlet, extension cord or adapter as this may result in electric fire or shock. The product should not be exposed to any liquids such as dripping or splashing.
** 1. Before Using the Product GB5 ** 1.1 Package Contents 1.2 Front Panel 1.3 Rear Panel 1.4 Conditional Access 1.5 Remote Controller GB5 GB6 GB8 GB9 GB10 2. Setup GB12 ** 2.1 Connecting Antenna/TV 2.2 Connecting Hi-Fi System 2.3 Powering On GB12 GB13 GB14 3. Installation GB15 ** 3.1 Selecting Language 3.2 Searching Services 3.3 Default Setting GB15 GB15 GB21 4. Basic Operation GB22 ** 4.1 Viewing Programme 4.2 Changing Language 4.3 Teletext 4.
** 5. Service List GB25 ** 5.1 Switching Services 5.2 Organising Services 5.3 Organising Favourite Services 5.4 Organising Satellites GB25 GB26 GB27 GB28 6. Programme Guide 7. Setting Preferences GB29 GB31 ** GB 4 7.1 Parental Control 7.2 System Setting GB31 GB31 8. System Information 9. Utility 10. Software Update 11. Troubleshooting 12. Specification 13.
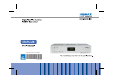
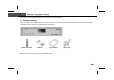
** This chapter provides detailed instructions on the product and its accessories. 1.1 Package Contents When you unpack your package contents, make sure you have all the necessary items shown in figure below. If any of items is missing or damaged, please contact your product dealer for replacement. ** ** Remote Controller ** Batteries ** User's Manual ** RCA Cable ** ** Note: The product image may differ from the actual product.
** 1.2 Front Panel ** ** Note: The front panel of the product may differ according to the product type.
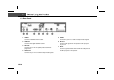
** 1. STANDBY LED ** Red light is emitted when the product is in standby mode. Green light is emitted when the product is in operation. (The second front panel only) ** 2. TV LED ** Green light is emitted when the product is in TV mode. ** 3. RADIO LED ** Amber light is emitted when the product is in Radio mode. ** 4. STANDBY Button ** Switches between Operation and Standby modes. ** 5. VOL Button ** Display the volume bar. ** 6.
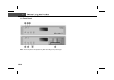
** 1.3 Rear Panel ** ** 1. LNB IN ** Connects a satellite antenna cable. Connects to your TV or VCR and output Video signals. ** 2. LNB OUT ** 6. RF OUT ** ** Connect other digital satellite receiver. Connect a RF signal from the product to RF input jack on your TV. ** 3. RS-232C ** Connects to your PC to update product’s software programme. ** 4. AUDIO L/R ** Connects to your TV or VCR and output Audio signals. ** GB 8 5. VIDEO ** ** 7.
** 1.4 Conditional Access Although some TV and Radio services are free to air, most TV and Radio/Music services are available on a subscription basis and can only be enjoyed via Conditional Access component. The Conditional Access component is removable Smartcard. ** Inserting Smartcard ** A Smartcard looks similar to a credit card and entitles you to view and listen to all the services you choose to subscribe to. The Smartcard slot on the product can be used for Irdeto Smartcard only. ** 1.
** 1.5 Remote Controller 1. SOURCE ** Selects the input source between TV and product. ** 2. TV/RADIO ** Switches between TV and Radio modes. ** 3. NUMERICAL BUTTONS ** Enters a TV/Radio service number. ** 4. MENU ** Displays the main menu. ** 5. TIME - WHITE ** Displays the current time on the screen. To set the current time, refer to 7.2 System Setting. ** 6. ARROW BUTTONS ** Change services or move the cursor to the up, down, left or right menu option. ** 7.
** 9. CH - / CH + 17. ZOOM - BLUE ** ** Changes the Service. Enlarges the picture. ** 10. RECALL ** 18. SUBTITLE - YELLOW ** ** Returns to the previous screen. Display the subtitle language list where available. ** 11. FREEZE ** 19. V - / V + ** ** Freezes the TV screen you are watching. Play the audio continuously. Adjusts the audio volume. ** ** 20. MUTE ** 12. WIDE Pauses the audio temporarily. That is, volumes on/off temporarily. ** Changes the Display Format. ** 13.
** This chapter describes how to set up the product. Select the most appropriate procedure depending on your case. Before you connect the product to any other equipment, you must disconnect all the equipment from their power sources. Note: If you encounter any problem when setting up the product, please contact your local product distributor. 2.1 Connecting Antenna/TV ** ** 1. Connect an Antenna to LNB IN on the product. 2. Connect VIDEO on the product to VIDEO IN on the TV using the RCA cable. 3.
** 2.2 Connecting Hi-Fi System ** ** 1. Connect an Antenna to LNB IN on the product. 2. Connect VIDEO on the product to VIDEO IN on the TV using the RCA cable. 3. Connect AUDIO L/R on the product to AUDIO IN L/R on the Audio System using the RCA cable.
** 2.3 Powering On ** 1. Connect the power cord of the product to a wall outlet. ** ** 2. Press the STANDBY button on the front of the product or on the remote controller.
** 3.1 Selecting Language When powering on your product for the first time after purchasing, the Selecting Language screen is automatically displayed. Select your desired language using the button and press the OK button. The following procedure is HUMAX Auto Search. For information about it, refer to 3.2 Searching Services. 3.2 Searching Services To search services, go to Service Searching menu (MENU-INSTALLATION-SERVICE SEARCHING). ** ** Menu structure varies according to an item and its operation.
** 1. HUMAX Auto Search If your product is connected to the antenna and television, you can automatically search services without entering any other information. Warning: Please note that once you perform HUMAX Auto Search, all data such as Antenna setting information channel lists and smart card information you already set are deleted. When you select this menu, you can view the window asking if you have a motorized dish. If you wish to stop the operation, press the EXIT button.
** 2. Antenna Setting You can set antenna and LNB information to search services. ** • • • • • • • • Antenna Alternative: Select antenna alternative which has different combinations of settings for search. Antenna Alternative 16 is predefined for SMATV. Satellite Name: Displays the satellite list ordered by name. If the desired satellite name is not listed, then select User Defined. You can enter the Satellite Name using the keyboard displayed on the screen. LNB Frequency: Select the L.
** 3. Manual Search You can search services of the selected satellite by transponders if you know the transponder information. ** • • • • • • • • Antenna Alternative: Select antenna alternative which has different combinations of settings for search. Antenna Alternative 16 is predefined for SMATV. Frequency: Enter transponder frequency. Polarisation: Select the type of polarisation. Symbol Rate: Select or enter transponder symbol rate. FEC: Select FEC (Forward Error Correction).
** 4. Satellite Setting This menu appears only when you enable Motorised System in Antenna Setting menu and press the OK button while Antenna Alternative in Manual Search menu is selected. ** • • • Satellite Name: Select a satellite to identify a motor antenna. If the desired satellite name is not listed, then select OTHER. Movement: In user mode, this is used to fine-tune the position of the motor. In installer mode, this is used to search for the position of the satellite manually.
** To initialise satellite position saved at the Motor Antenna, set DiSEqC Command Mode to Installer, set Motor Control to Reset, then press the OK button. You will see a warning message. To continue the procedure, press the OK button. To set the motor position for each satellite manually, select your desired Satellite Name, set DiSEqC Command Mode to Installer, and then set Movement to one option among East, Stop, or West. The motor starts moving.
** 6. Automatic Search If you select the satellite to search services according to the Antenna Setting, you can automatically search the service without entering any other information. To enter Automatic Search menu, press the MENU button, then select INSTALLATION-SERVICE SEARCHING-MANUAL SEARCH-AUTOMATIC SEARCH. ** • • • • Antenna Alternative: Select antenna alternative which has different combinations of settings for search. The Satellite Name is automatically displayed.
** 4.1 Viewing Programme You can change a service into your desired service using the CH-/CH+, List or Programme Guide. button. You can adjust the audio volume using the V-/V+ or , or NUMERICAL button. You can also use the Service ** Programme Information (i-plate) ** i-plate which is also called Information Box is always displayed for a specific period of time whenever you switch services. You can view the programme information by pressing the i button while watching a programme.
** 4.2 Changing Language If the current programme provides subtitle information, the subtitle icon will appear on the i-plate. You can select the language for the subtitle using the SUBTITLE button. You can select a default subtitle language and set whether or not to display the subtitle in MENU-INSTALLATION-SYSTEM SETTING-LANGUAGE SETTING-SUBTITLE LANGUAGE/SUBTITLE DISPLAY.
** 4.4 Setting Property of Service You can add the current service to Favourite group. In addition, you can lock, unlock, skip, or delete the current service while watching a programme and select the smartcard. The operation is as follows: 1. Press the OK button while watching a programme. The service list will appear on the screen. You can also display the service list using the MENU-SELECT SERVICE-SIMPLE (or ADVANCED). 2. Press the MENU button while the service list is displayed. 3.
** There are 5 types of service lists – All, Favourite, Bouquet, Satellite, Alphabet - to find services you are interested in quickly and easily. All service list displays all searched TV or Radio services sorted by service number. Favourite service list displays favourite services with automatic sub-groups and 4 sub-groups that you can organise services by your private taste. Bouquet service list displays services with several bouquet subgroups.
** 5.2 Organising Services You can edit TV or Radio services using the Organise TV Services (MENU-INSTALLATION-SERVICE ORGANISING-ORGANISE TV SERVICES-ORGANISE ALL SERVICES) or Organise Radio Services (MENU-INSTALLATION-SERVICE ORGANISING-ORGANISE RADIO SERVICES-ORGANISE ALL SERVICES). Before leaving Organise TV/Radio Services screen, you will be prompted to save the changes. If you would like to save the changes, select OK, and press the OK button. You can lock, unlock, move, skip, and delete services.
** 5.3 Organising Favourite Services You can add services to Favourite groups using Organise Favourite TV Services (MENU-INSTALLATION-SERVICE ORGANISING-ORGANISE TV SERVICES-ORGANISE FAVOURITE A~D) or Organise Favourite Radio Services (MENU-INSTALLATION-SERVICE ORGANISING-ORGANISE RADIO SERVICES-ORGANISE FAVOURITE A~D). Before leaving Edit Favourite Services screen, you will be prompted to save the changes. If you would like to save the changes, select OK, and press the OK button.
** 5.4 Organising Satellites You can turn a satellite on or off and delete a transponder. To enter Organise Satellites menu, go to MENU-INSTALLATION-SERVICE ORGANISING-ORGANISE SATELLITES. The Organise Satellites screen consists of Satellite List on the left side of the screen and Transponder List and Service List on the right side. You can move the highlighter in order of Satellite List, Transponder List, and Service List using the button.
** The programme guide provides the programme information for all services, based on date and time. In addition, it provides convenient ways- viewing programmes in Now, Next, Weekly, or Quick mode - to search your desired programme and to watch or reserve it. You can go to the programme guide screen by using MENU-TV GUIDE. To close the guide screen, press the GUIDE or EXIT button.
** Note: • Press the TV/RADIO button to switch to the Radio Guide. • The reservation icons on the reserved programmes in the guide differ according to the reservation type. Once Reserve a programme once. • Daily Reserve a programme everyday. Weekly Reserve a programme once a week. If your desired programme is overlapped with other programme, adjust the reservation appropriately.
** This chapter describes the menu which lets you customise your product by your taste. If you are not familiar with navigating menu, see 3.2 Searching Services before setting preferences. ** 7.1 Parental Control The Parental Control menu (MENU-PARENTAL CONTROL) lets you control the access to programmes by programme rating. Set Censorship Classification by age level. “No Block” allows you to watch programmes without any blocking. You can block all programmes regardless of age level.
** 3. A/V Output Setting This menu lets you adjust the audio and video output, match the screen ratio to your TV, and select the display format according to the screen ratio, and select the TV standard. 4. UHF Tuning You can select UHF Channels for your TV and adjust fine tuning setting. The channel range and frequency change according to PAL Standard. 5.
** The Status menu (MENU-INSTALLATION-STATUS) provides checking tools like status information of system and signal level of service. If you are not familiar with navigating menu, see 3.2 Searching Services. ** 1. STB Status You can view the information about the product serial number, Smartcard version, CA Module version, Loader version, and S/W version. When you contact your service provider or local product distributor, this information may be required. 2.
** The product provides various utilities- viewing calendar, checking your biorhythm, and enjoying games. To use utilities, go to MENU-UTILITY. If you are not familiar with navigating menu, see 3.2 Searching Services. ** 1. Calendar You can see the specified monthly calendar. Press the OK or EXIT button to return to the previous menu. button to change year. Press the button to change month. Press the 2. Biorhythm You can adjust your birth year and date to see your current biorhythm status.
** In order to maintain proper performance of the product, it is essential to have the most up-to-date software. The latest news and release of software versions may be found at the Humax website - http://www.humaxdigital.com. It is recommended that you periodically check for the availability of software upgrades. ** 1.
** The product cannot work at all during software update. It may take 5-10 minutes to update software. Updating software is largely divided into two ways, automatic detection and using software update menu (MENU-INSTALLATION-STATUS-STB UPGRADE). New software can be found when powering on the product. The notice informing you of new software detection will appear on the screen. If you would like to update software, select Yes, and press the OK button.
** Before contacting your local service, please read the following instructions. If the product does not work normally after completing the following troubleshooting, please contact your local product distributor or service centre. ** 1. The LED on the front panel does not light. - Check the main power cable and check that it is plugged into a suitable power outlet. ** 2. No picture - Make sure that the product is in operation mode. - Make sure that the AV Cable is firmly connected to the TV.
** 5. Remote controller does not operate - To manipulate the equipment with the remote controller, its emitting part should directly point towards its receiving part of the product. - Check the battery of the remote controller. ** 6. Reservation is unavailable - Check whether it is not overlapped with other reservation. - Check whether the power is off. ** 7. Watching scrambled service is not available - Check the correct Smartcard is plugged in.
** MPEG Transport Stream A/V Decoding Power Supply Aspect Ratio Video Resolution Audio Mode Input Voltage Type 4:3, 16:9 720 x 576, 720 x 480 Single /Dual mono/ Stereo /Joint stereo Power Consumption Memory Protection Flash Memory Graphics(MPEG) & System Memory EEPROM 2 Mbytes 8 Mbytes 8 Kbytes RF-Modulator Output Channel TV standard Preset Channel CH 21 ~ 69 PAL I/G/B/D/K CH 36 AC 90 ~ 250V, 50/60Hz Switching Mode Power Supply (SMPS) Operation mode: Max. 30 W Standby mode: Max.
** You can get information such as troubleshooting guide, software upgrades and product support guide from the following web sites and call centre (Hotline). Please try to contact to your local dealers first when you have any problem. ** Homepage http://www.humaxdigital.com http://www.humaxdigital.com/Deutsch/ ** Humax Middle East Call Centre (Dubai, UAE) Tel: +971 (0)4 359 2323 E-mail: callcenterME@humaxdigital.