English-1
Notice Notice Read this manual carefully and make sure you understand the instructions provided. For your safety, check what the result of each action will be. To reduce the risk of electric shock, do not remove cover (or back). 1R XVHU VHUYLFHDEOH SDUWV LQVLGH 5HIHU VHUYLFLQJ WR TXDOL¿HG VHUYLFH personnel. Indicates a situation which, if not avoided, could damage the equipment or other apparatus.
Notice Trademarks VIACCESS™ is a trademark of France Telecom. CryptoWorks™ is a trademark of Philips Electronics N.V. Irdeto is a trademark of Mindport BV. Nagravision is a registered trademark of KUDELSKI S.A. Conax is a trademark of Telenor Conax AS. is a trademark of SRS Labs, Inc. TruSurround XT technology is incorporated under license from SRS Labs, Inc. Thank you for purchasing a HUMAX TV.
General Safety Precautions General Safety Precautions Power 3OXJ WKH SRZHU FRUG LQWR WKH FRUUHFW SRZHU RXWOHW $Q XQVWDEOH FRQQHFWLRQ PD\ FDXVH ¿UH Do not use damaged power cords or plugs, or use a loose wall outlet. This may cause electrical shock RU ¿UH Do never touch the power cord with wet hands. This may cause electrical shock.
General Safety Precautions Usage Unplug the product from the wall outlet and do not touch the antenna during a thunderstorm. This will prevent damage to the unit due to lightning and power-surges. Keep dust or water away from the pins or touching points of the power plug. 7KLV ZLOO SUHYHQW HOHFWULFDO VKRFN RU ¿UH Keep children from climbing over the product. The device may cause serious injury or death if it falls on them. Do not place anything over the product that children may try to reach.
Table of Contents Chapter 1 >> Getting Started ................................................................................................8 Package Contents ................................................................................................................................... 8 Front & Top Panel.................................................................................................................................... 9 Rear & Side Panel..............................................
Table of Contents Chapter 8 >> Setting the Sound ..........................................................................................43 Setting the Sound Effect........................................................................................................................ 43 Adjusting the Sound Balance ................................................................................................................ 43 Adjusting the Volume Automatically ..........................................
Chapter 1 >> Getting Started Package Contents LCD TV User’s manual Portable HDD (80GB) Remote control USB cable AAA batteries (X2) HDD stand Warning: 1. It is recommended to use the supplied hard disk drive. This TV provides best performance with the supplied hard disk drive. 2. The company shall not be liable for problems caused by the misuse or improper installation of the hard disk drive.
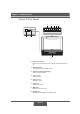
Chapter 1 >> Getting Started Front & Top Panel 4 1 5 6 7 8 2 3 1 Remote control sensor Receives commands directly from your remote control and passes them on. 2 Standby indicator Turns on blue during the Standby mode. 3 VFD (Vacuum Fluorescent Display) Used for the radio channels. 4 P buttons Selects channels. 5 VOL buttons Adjusts the volume. 6 TV/AV button Displays input source. 7 MENU button Displays the on-screen menu. 8 Standby button Switches between operation and standby modes.
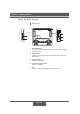
Chapter 1 >> Getting Started Rear & Side Panel Side Panel 1 4 2 5 3 1 AV2 (CVBS) INPUT Connects to the audio and video output jacks of a camcorder, videogame and similar devices. 2 S-VIDEO INPUT Connects to the S-Video jack of a camcorder, video game console, and similar devices. 3 H/P (Headphones) Connects to headphones. 4 CI (Common Interface) SLOT A slot for a CI Module. 5 USB Connects to the supplied hard disk drive.
Chapter 1 >> Getting Started Rear Panel COMPONENT 1 2 3 4 5 6 1 RF INPUT Connects to an antenna or a cable system. 2 AV1 (SCART) INPUT Inputs or Outputs for external devices, such as VCR, DVD, video game console or video disc players. 3 COMPONENT INPUT Connects to Video (Y/Pb/Pr) and audio (L/R) components. 4 PC INPUT/PC AUDIO INPUT Connect to the video and audio output jacks on your PC.
Chapter 1 >> Getting Started Remote Control Buttons STANDBY Switches between operation and standby modes. SNOOZE Switch into the standby mode momentarily. Number (0~9) buttons Enters the channel number for direct display. Used to enter digit numbers. FAV In Analog TV input mode, switches to a favourite channel. Circulates through favourite channels in sequent order while watching TV. In Digital TV input mode, display the favourite channel list. LIST Displays the channel list.
Chapter 1 >> Getting Started TELETEXT Function Buttons (Teletext On/Off) Activates or deactivates the teletext service. (Mix) Overlaps the teletext with the broadcasting screen. Adjusts the opacity to the background in Teletext mode. (Index) Displays the teletext index page. (Cancle) Displays the TV programme when searching for the new teletext page. (Reveal) Shows the hidden information. (Mode) Selects the teletext mode (LIST/ FLOF) (Size) Displays the double-size letters.
Chapter 2 >> Connecting Your TV Connecting to an Aerial or a Cable TV To view the television channels correctly, a signal must be received by the broadcasting provider. COMPONENT or Cable TV 1 Connect the RF coaxial cable from an aerial or a cable TV to the RF jack on the rear of the TV. 2 Turn on the TV, and then press the TV/AV button to select Digital TV or Analog TV. Notes: 1. To receive an optimal signal, it is recommended that you use a 75 ohm IECtype coaxial cable. 2.
Chapter 2 >> Connecting Your TV Connecting to the VCR Using the SCART Cable COMPONENT SCART cable VCR 1 Connect the SCART cable between the AV1 jack on TV and the SCART jack on your VCR. 2 Turn on the TV, and then press the TV/AV button to select AV1. 3 Turn on your VCR, then insert a video cassette into the VCR and press the PLAY button on your VCR.
Chapter 2 >> Connecting Your TV Using the Audio/S-Video Cable S-Video carries the video data as two separate signals (brightness and colour), unlike composite video which carries the entire set of signals in one package. S-Video does not carry audio. Hence, a separate audio connection is required. Audio cable S-Video cable VCR 1 Connect the S-Video cable between the S-VIDEO input jack on TV and the S-Video output jack on your VCR.
Chapter 2 >> Connecting Your TV Using the Audio/Component Video Cable COMPONENT Audio cable Component cable DVD 1 Connect the component video cables between the COMPONENT VIDEO - Y/Pb/Pr input jacks on TV and the component video output jacks on your DVD player. 2 Connect the audio cable between the AUDIO-L/R (for COMPONENT) input jacks on TV and the audio output jacks on your DVD player. 3 Turn on the TV, and then press the TV/AV button to select Component.
Chapter 2 >> Connecting Your TV Connecting to the Set-Top Box Using the SCART cable COMPONENT SCART cable STB 1 Connect the SCART cable between the AV1 jack on TV and the SCART jack on your STB. 2 Turn on the TV, and then press the TV/AV button to select AV1. 3 Turn on your STB.
Chapter 2 >> Connecting Your TV Using the HDMI Cable +LJK 'H¿QLWLRQ 0XOWLPHGLD ,QWHUIDFH +'0, LV WKH OHDGLQJ QHZ VWDQGDUG IRU Digital video and audio interconnection. COMPONENT HDMI cable STB 1 Connect the HDMI cable between the HDMI input jack on TV and the HDMI output jack on your STB. 2 Turn on the TV, and then press the TV/AV button to select HDMI. 3 Turn on your STB.
Chapter 2 >> Connecting Your TV Connecting a HDD (Hard Disk Drive) To use the PVR (Personal Video Recorder) function, you should connect the supplied portable hard disk drive. 1 First, turn off the TV. 2 Connect the USB cable (supplied) between the USB jack on TV and the USB jack on the portable hard disk drive (supplied). 3 Turn on the TV, and then select Digital TV using the TV/AV button to use the PVR function. Warning: 1. It is recommended to use the supplied hard disk drive.
Chapter 2 >> Connecting Your TV Conditonal Access System (for the digital channels only) Conditional Access System (CAS) is a technology used to control access to digital television (DTV) services to authorised users by encrypting the transmitted programming. Inserting a CI Module (with Smartcard) CI Module looks like a PC Card (called PCMCIA) for laptops. There are different kinds of CI Modules, suitable for different coding systems.
Chapter 3 >> Initial Setup Wizard Running Initial Setup Wizard Wizard English UK Language Countr y Channel Search :KHQ \RX WXUQ RQ \RXU 79 IRU WKH ¿ UVW WLPH DIWHU SXUFKDVH RU SHUIRUP WKH GHIDXOW setting, the initial setup wizard will appear automatically. You can easily setup the available analog and digital channels using the wizard. 1 6HOHFW WKH ODQJXDJH RI \RXU FKRLFH XVLQJ WKH Ż Ź EXWWRQ 7KH 2Q 6FUHHQ Display (OSD) menu will be shown in the selected language.
Chapter 4 >> Basic Operation Turning on Your TV 1 Connect the power cord on TV to the wall outlet. The standby indicator lights up. 2 Press the STANDBY button on your remote control (or on the top of your TV) to turn on the TV. Note: To set your TV in standby mode, press the STANDBY button again on the remote control or ( ) on the top of your TV. It saves the electric usage when you want to stop watching TV temporarily (during a meal, for example). 3 To turn off the TV, disconnect the power cord.
Chapter 4 >> Basic Operation Selecting the Main Input Source Once you have connected your various audio and video systems, you can view different sources by selecting input sources. 1 Press the TV/AV button. 2 6HOHFW WKH PDLQ LQSXW DPRQJ WKH VRXUFHV EHORZ XVLQJ WKH Ÿ RU ź EXWWRQ Digital TV > Analog TV > AV1 > AV2 > S-Video > Component > PC > HDMI 3 Press the OK button. 4 In addition, press the TV/RADIO button to switch to digital TV from different sources.
Chapter 4 >> Basic Operation Displaying Information Programme Information (for digital channels only) 3URJUDPPH LQIRUPDWLRQ LV DOZD\V GLVSOD\HG IRU D VSHFL¿F SHULRG RI WLPH whenever you switch digital channels. You can view the information by pressing the INFO button while watching a digital programme. Programme information is available only for digital channels. The Programme Information is displayed at the bottom of the screen as followings.
Chapter 4 >> Basic Operation Simple Information You can view the information such as the channel number (or input source), current time and sound mode (or source resolution) by pressing the INFO button while watching an analog TV channel or external input source. P 11 ----- Component 10:25 AV1 10:25 Stereo 10:25 720x480p Ÿ $QDORJ 79 ,QSXW Ÿ ([WHUQDO ,QSXW (AV1/2, S-Video) Ÿ ([WHUQDO ,QSXW (Component, PC, HDMI) Note: Whenever you switch channels, this information is displayed for 2 seconds.
Chapter 4 >> Basic Operation Digital Programme Features (for digital channels only) These functions are available only for digital channels. Displaying Digital Teletext (MHEG) If your chosen channel has teletext (MHEG) features, you can access them. Teletext services often load automatically shortly after the Digital Teletext window is displayed. In which case, simply follow the given instructions(press color buttons). 1 Press the TEXT button to access teletext(MHEG) features.
Chapter 5 >> Using the Electronic Programme Guide (EPG) The Electronic Programme Guide (EPG) displays programme information about each digital channel, based on the date and time. You can also schedule your watching or recording using the information given. Electronic Programme Guide (EPG) is available only for digital channels. Note: Press the EPG or EXIT button to exit the EPG screen. Viewing the Electronic Programme Guide(EPG) You can view programme information for all digital channels.
Chapter 5 >> Using the Electronic Programme Guide (EPG) Viewing Using Time Bar You can quickly search the time zone using the time bar. 1 Press the EPG button. 2 Press the GREEN button to display time bar. 3 6HOHFW WKH HDFK EXWWRQ XVLQJ WKH Ż Ź EXWWRQ DQG SUHVV WKH OK button to move the time bar. If you press the button repeatedly, the same operation is repeated. 4 Each button functions as follows.
Chapter 5 >> Using the Electronic Programme Guide (EPG) Viewing Reserved Programme You can add or edit the reservation using the Schedule screen. 1 Press the EPG button. 2 Press the YELLOW button. Schedule Note: For more information abaout how to add or edit a reservation, refer to Chapter 11. Recording and Playback > Recording Schedule. Delete Select Reserve Sort Edit Finding a Programme
Chapter 6 >> Setting Channels Scanning Analog Channels Automatically You can automatically scan channels for the frequency ranges available (availability depends on your region). > Channel UK Countr y Auto Search Manual Search Edit Channels Analog channels can be scanned only in Analog TV input mode. Please make sure the main Input is set to Analog TV using the TV/AV button. 1 Press the MENU button.
Chapter 6 >> Setting Channels 10 Select Programme No XVLQJ WKH Ÿ ź EXWWRQ DQG VHOHFW WKH SURJUDPPH QXPEHU \RX ZRXOG OLNH WR DVVLJQ E\ SUHVVLQJ WKH Ż Ź RU NUMBER (0~9) button. To change channel names, select Name XVLQJ WKH Ÿ ź EXWWRQ 11 (QWHU WKH QHZ FKDQQHO QDPH XVLQJ WKH Ÿ ź Ż Ź EXWWRQV DQG SUHVV WKH OK button. 12 Select Search XVLQJ WKH Ÿ ź EXWWRQ DQG SUHVV WKH Ż Ź EXWWRQ WR VWDUW searching channels.
Chapter 6 >> Setting Channels Editing Analog Channels After channel scanning completes, you can delete, skip, move or add into favorite channel group the saved analog channels. > Channel UK Countr y Auto Search Manual Search Edit Channels Analog channels are editable only in Analog TV input mode. Please make sure the main Input is set to Analog TV using TV/AV button. 1 Press the MENU button.
Chapter 6 >> Setting Channels Scanning Digital Channels Automatically > Channel UK Countr y Auto Search Manual Search Edit Channels You can automatically scan digital channels for the frequency ranges available (availability depends on your region). Digital channels can be scanned only in Digital TV input mode. Please make sure the Main Input is set to Digital TV using the TV/AV button.
Chapter 6 >> Setting Channels Scanning Digital Channels Manually You can manually select to scan digital channels. The channel numbers are determined by the broadcasting stations. Digital channels can be scanned only in Digital TV input mode. Please make sure the Main Input is set to Digital TV using the TV/AV button. 1 Press the MENU button.
Chapter 6 >> Setting Channels Editing Digital Channels > Channel UK Countr y Auto Search Manual Search Edit Channels After channel scanning completes, you can delete, lock, and rename saved digital channels. If there is no LCN channel, the function of move is activated. Digital channels can be scanned only in Digital TV input mode. Please make sure the Main Input is set to Digital TV using the TV/AV button. 1 Press the MENU button.
Chapter 6 >> Setting Channels Locking/Unlocking Channels You can lock or unlock one or more channels. 1 6HOHFW D FKDQQHO \RX ZDQW WR ORFN XVLQJ WKH Ÿ ź EXWWRQ DQG SUHVV WKH OK button. You can select multiple channels. 2 Select Lock LQ WKH ULJKW XVLQJ WKH Ÿ ź Ż Ź EXWWRQ DQG SUHVV WKH OK button. ( ) mark appears next to the channel name. To unlock the locked channels, select the channel you want to unlock and select Unlock in the right, and press the OK button.
Chapter 6 >> Setting Channels Editing Favourite Digital Channels > Channel UK Countr y Auto Search Manual Search Edit Channels You can add favourite channels or remove favourite channels from the favourite list. Digital channels are editable only in Digital TV input mode. Please make sure the Main Input is set to Digital TV using TV/AV button. 1 Press the MENU button.
Chapter 6 >> Setting Channels Moving favourite channels You can move favourite channel(s) to your desired location within the favourite channel list. 1 Select a favourite group using . 2 Select your desired channel to move within the favourite channel list and press the OK button. 3 Select , and press the OK button. 4 0RYH WKH FXUVRU WR \RXU GHVLUHG ORFDWLRQ XVLQJ WKH Ÿ ź EXWWRQ DQG SUHVV the OK button. 5 The selected channel(s) is moved into the desired location you selected.
Chapter 7 >> Setting the Picture Selecting a Picture Mode Picture Standard 60 75 50 60 O ff Mode Brightness Contrast Sharpness Colour Fleshtone Colour Temp.
Chapter 7 >> Setting the Picture Fleshtone Use Fleshtone function to improve the picture quality by adjusting colour balance. 1 Press the MENU button. > Picture Standard 60 75 50 60 O ff Mode Brightness Contrast Sharpness Colour Fleshtone Colour Temp. Back light Move H igh 2 Select Picture XVLQJ WKH Ÿ ź EXWWRQ DQG SUHVV WKH OK RU Ź EXWWRQ 3 Select Fleshtone XVLQJ WKH Ÿ ź EXWWRQ 4 6HOHFW WKH UHTXLUHG À HVKWRQH XVLQJ WKH Ż Ź EXWWRQ The following options are available.
Chapter 7 >> Setting the Picture Adjusting Backlight Brightness You can adjust the brightness of Liquid Crystal Display (LCD). 1 Press the MENU button. > Picture Standard 60 75 50 60 O ff Mode Brightness Contrast Sharpness Colour Fleshtone Colour Temp.
Chapter 8 >> Setting the Sound Setting the Sound Effect You can select the type of special sound effect when watching a broadcast. Sound Effect lets you enjoy the best sound without any special adjustment because the TV sets the appropriate sound options based on the programme content. 1 Press the MENU button. > Sound Flat 0 On O ff Effec t Balance AVL SRS TruSurround 2 Select Sound XVLQJ WKH Ÿ ź EXWWRQ DQG SUHVV WKH OK RU Ź EXWWRQ 3 Select Effect XVLQJ WKH Ÿ ź EXWWRQ DQG SUHVV WKH OK button.
Chapter 8 >> Setting the Sound Adjusting the Volume Automatically Each broadcasting station has its own signal conditions, volume may not be adjusted each time you switch channels. This feature lets you automatically adjust the volume of the selected channel by adjusting the sound output depending on the signal modulation. 1 Press the MENU button.
Chapter 9 >> Setting the System Setting the Time Information > System English Language Time Setting Change Password CI PC DT V Setup Panel O ff VFD Clock Default Setting Move You can set the current time. If you want to set time for automatically turning RQ RII WKH SRZHU \RX PXVW VHW WKH ORFDO WLPH ¿ UVW Setting the Current Time Disable Disable 1 Press the MENU button.
Chapter 9 >> Setting the System Changing the Password You can change the current password to a new one. > System English Language Time Setting Change Password CI PC DT V Setup Panel O ff VFD Clock Default Setting Move 1 Press the MENU button. 2 Select System XVLQJ WKH Ÿ ź EXWWRQ DQG SUHVV WKH OK RU Ź EXWWRQ Disable Disable 3 Select Change Password XVLQJ WKH Ÿ ź EXWWRQ DQG SUHVV WKH OK RU Ź button. 4 Enter your old password and enter your new password using the NUMBER Enter (0~9) buttons.
Chapter 9 >> Setting the System VFD Clock You can set to display the current time on VFD in standby mode. > System English Language Time Setting Change Password CI PC DT V Setup Panel O ff VFD Clock Default Setting 1 Press the MENU button. 2 Select System XVLQJ WKH Ÿ ź EXWWRQ DQG SUHVV WKH OK RU Ź EXWWRQ Disable Enable 3 Select VFD Clock XVLQJ WKH Ÿ ź EXWWRQ 4 Select Enable XVLQJ WKH Ż Ź EXWWRQ In standby mode, the VFD will display the current time.
Chapter 10 >> DTV Setup In this chapter, you can set the various options for digital channels such as the subtitle language, i-plate display time and software update. You can access to the DTV Setup menu only in Digital TV input mode. Parental Control 1 Press the MENU button. >> DT V Setup Parental Ctrl.
Chapter 10 >> DTV Setup Language Setting 1 Press the MENU button. >> DT V Setup Parental Ctrl. Language Setup M iscellaneous Sofware Update Signal Strength Status 2 Select System XVLQJ WKH Ÿ ź EXWWRQ DQG SUHVV WKH OK RU Ź EXWWRQ 3 Select DTV Setup XVLQJ WKH Ÿ ź EXWWRQ DQG SUHVV WKH Ź EXWWRQ 4 Select Language Setup XVLQJ WKH Ÿ ź EXWWRQ DQG SUHVV WKH OK RU Ź button. Move Enter Audio/Subtitle Language You can set the language for Audio and Subtitle.
Chapter 10 >> DTV Setup Miscellaneous Settings 1 Press the MENU button. >> DT V Setup Parental Ctrl.
Chapter 10 >> DTV Setup Commercial Skip Time You can skip 15, 30 or 60 seconds of the unwanted scenes. 1 Select Commercial skip time XVLQJ WKH Ÿ ź EXWWRQ DQG SUHVV WKH OK RU Ź button. 2 Select an option among 15, 30 and 60 XVLQJ WKH Ÿ ź EXWWRQ DQG SUHVV WKH OK button. Software Update In order to maintain proper performance of the TV, it is essential to have the most up-to-date software. The latest news and release of software versions may be found at the HUMAX website – http://www.humaxdigital.com.
Chapter 10 >> DTV Setup If new software is found when powering on 1 A message will be displayed to notify that new software is found. 2 Select Yes and press the OK button to update the software. 3 Starts downloading new software. Please wait until the updated is completed. 4 When completing the software update, the equipment is automatically powered off and on again. If updating software from Menu 1 Press the MENU button. >> DT V Setup Parental Ctrl.
Chapter 10 >> DTV Setup Manual Update You can perform Manual Update only if you know MUX information of software update correctly. Manual Update Channel 502000 Frequency 708000 1 Select Manual Update XVLQJ WKH Ÿ ź EXWWRQ DQG SUHVV WKH OK RU Ź button. Search 2 Select Channel XVLQJ WKH Ÿ ź EXWWRQ DQG SUHVV WKH OK RU Ź EXWWRQ 3 6HOHFW WKH FKDQQHO QXPEHU XVLQJ WKH Ÿ ź EXWWRQ DQG SUHVV WKH OK RU Ź button.
Chapter 10 >> DTV Setup Signal Detection You can view the signal strength and signal quality reception for the channel that is currently being viewed. Signal Strength CH 39 (618000kHz 8k 1/32) 1 Press the MENU button. 3 ITV1 Crystal Palace ITV 2 Select System XVLQJ WKH Ÿ ź EXWWRQ DQG SUHVV WKH OK RU Ź EXWWRQ 3 Select DTV Setup XVLQJ WKH Ÿ ź EXWWRQ DQG SUHVV WKH Ź EXWWRQ Strength (50%) 4 Select Signal Strength XVLQJ WKH Ÿ ź EXWWRQ DQG SUHVV WKH OK RU Ź Quality (75%) button.
Chapter 11 >> Recording and Playback This chapter describes the PVR (Personal Video Recorder) function that allows you to record a programme in the connected hard disk drive. You can access to the Recording menu only in Digital TV input mode (if the hard disk drive is connected to the TV correctly). Note: You can record the digital TV or radio programmes only. The analog channels and external AV inputs can’t be recorded.
Chapter 11 >> Recording and Playback Fast Rewind to Previous Scene Press the FAST REWIND button on the remote control to watch the scene passed by. Each time you press the FAST REWIND button, the rewind speed increases. ( x 2, x 4, x 16, x 32, x 64) If you press the PLAY button, the fast rewind operation stops and the programme is played at normal speed. Note: You can fast rewind back to the start point.
Chapter 11 >> Recording and Playback Additional Time Shift Operations You can perform additional time shift operations using the following buttons on the remote control. Direct Jump Press the PLAY EXWWRQ ZKLOH ZDWFKLQJ 79 ,I \RX SUHVV WKH Ż Ź EXWWRQ D moving arrow will appear in the progress bar.
Chapter 11 >> Recording and Playback Bookmark You can jump to a position directly using the bookmark in recorded programme playback. Use bookmark to search positions quickly and easily. • Adding a bookmark Press the ADD BOOKMARK button at a certain position to set a bookmark while playing back a recorded programme. Note: The bookmark function is only available for recorded programmes.
Chapter 11 >> Recording and Playback Notes: 1. Make sure that the hard disk drive is connected correctly before recording. 2. During recording, the standby indicator on the front of your TV turns on RED. 3. Ensure that there is enough free space before recording. If the free space on WKH FRQQHFWHG KDUG GLVN GULYH LV LQVXI¿ FLHQW UHFRUGLQJ ZLOO VWRS 5HFRUGLQJ RQH hour of programme may require up to 2 or 3GB of hard disk space.
Chapter 11 >> Recording and Playback Adding a Reservation Recording Schedule Add Reservation Channel Start Time 00 : 05 End Time 02 : 05 Press the YELLOW button to add a new reservation. 2 Select Channel and Date. 3UHVV WKH Ź EXWWRQ WR GLVSOD\ FKDQQHO DQG GDWH OLVWV DQG VHOHFW DQ LWHP XVLQJ WKH Ÿ ź EXWWRQ DQG OK button. You can also select a channel using the NUMBER(0-9) buttons.
Chapter 11 >> Recording and Playback Programme Playback in the Play List You can playback the recorded programme by pressing the PLAYLIST button. You can switch among VIDEO (TV), AUDIO (radio) and Selected Files list XVLQJ WKH Ż Ź EXWWRQ VIDEO/AUDIO List 1 Select VIDEO/AUDIO OLVW XVLQJ WKH Ż Ź EXWWRQ 2 If you select programmes using the GREEN button, the programmes you select will add to Selected Files list automatically. Delete Unselect Move Sort Play Notes: 1.
Chapter 11 >> Recording and Playback Chase Play You can watch the programme from the beginning as the rest of the programme is simultaneously being recorded. While recording, you can perform TSR (Time Shifted Recording) using the playback control buttons. Note: You can playback the programme being recorded after it has been recorded for at least 30 seconds. Editing Recorded Programmes 1 Press the MENU button.
Chapter 11 >> Recording and Playback Trimming the Recorded Programme 1 Select a programme and press the YELLOW button to trim the recorded programme. 2 A pop-up will appear. Select Trim and press the OK button. Recorded Programme 3 You can trim the recorded programme using the following functions. Edit 16 QVC QVC Selection Note: • When selecting multiple programmes, Trim is inactivated. • You can trim recorded TV (Video) channels only.
Chapter 11 >> Recording and Playback Changing the Attribute 1 Select a programme and press the YELLOW button to change the attribute of the recorded programme. 2 A pop-up will appear. Select File and press the OK button. Recorded Programme 3 Select Programme in the File XVLQJ WKH Ÿ ź EXWWRQ DQG SUHVV WKH OK RU Ź Edit button to display a keyboard on the screen. Enter the programme name on the keyboard. Select OK and press the OK button to complete.
Chapter 11 >> Recording and Playback MP3 You can enjoy the music or edit the MP3 list. MP3 1 Press the MENU button. 2 Select Recording XVLQJ WKH Ÿ ź EXWWRQ DQG SUHVV WKH OK RU Ź EXWWRQ 3 Select MP3 XVLQJ WKH Ÿ ź EXWWRQ DQG SUHVV WKH OK RU Ź EXWWRQ 7KH 03 list appears. Random Repeat Use , , and buttons Playing MP3 6HOHFW WKH ¿OH \RX ZLVK WR SOD\EDFN XVLQJ WKH Ÿ ź EXWWRQ DQG WKHQ SUHVV WKH PLAY or OK button.
Chapter 11 >> Recording and Playback HDD Control You can check the free space of the connected hard disk drive and format (erase) the disk drive if necessary. HDD Control 1 Press the MENU button. 2 Select Recording XVLQJ WKH Ÿ ź EXWWRQ DQG SUHVV WKH OK RU Ź EXWWRQ 3 Select HDD Control XVLQJ WKH Ÿ ź EXWWRQ DQG SUHVV WKH OK RU Ź EXWWRQ Format 4 You can check the free, used, reserved and total space of the HDD.
Chapter 12 >> Setting the Aspect Ratio Setting the Aspect Ratio You can select the modes by simply pressing the WIDE button on the remote control. Auto > 4:3 > 14:9 > Full > Zoom Notes 1. When the Component or HDMI input mode, you can select only the 4:3, 14:9 or Full. 2. It is not available in the PC input mode. Auto Displays the picture as the original aspect ratio of the signal you received. 4:3 Displays the picture in the 4:3 ratio. The black bar appears on each side.
Chapter 13 >> Using the Teletext Displaying Teletext information You can display teletext information at any time on your TV. Most TV broadcasting stations provide text information services via teletext. The index page of the teletext service gives you information on how to use the VHUYLFH
Chapter 14 >> Setting the PC The PC menu is available only when there is a PC input signal. 1 Press the TV/AV button to switch to PC mode. 2 Select PC XVLQJ WKH Ÿ ź EXWWRQ DQG SUHVV WKH OK button. $XWR &RQÀ JXUH $XWRPDWLFDOO\ RSWLPL]HV WKH GLVSOD\ 7KLV LV UHFRPPHQGHG IRU WKH ¿ UVW WLPH connecting to a PC. >> PC Auto Configure H. Position V. Position Clock Phase 0 0 0 53 3 Press the MENU button.
Chapter 14 >> Setting the PC Clock >> PC Auto Configure H. Position V. Position Clock Phase 0 0 0 53 Adjusts the horizontal feature of screen by increasing or decreasing the number of pixels. 6 Select Clock XVLQJ WKH Ÿ ź EXWWRQ 7 $GMXVW WKH RSWLPDO KRUL]RQWDO IHDWXUH XVLQJ WKH Ż Ź EXWWRQ Adjust Move Phase Sets the focus of screen. >> PC Auto Configure H. Position V.
Menu Map Menu Map - Mode Picture - Brightness - Contrast - Sharpness - Colour - Fleshtone - Colour Temp.
Troubleshooting Troubleshooting Before contacting your local service dealer, please make sure you refer to the following guide. If the TV does not work normally after completing the following trouble shooting, please contact your local TV distributor or service centre. (1) No message is displayed on the front panel or the TV has no power. - Check the main power cable and make sure it is plugged into a suitable power outlet. - Check that the mains supply is switched on.
Troubleshooting (12) Cannot record progammes. - Make sure that the HDD is connected correctly. - The hard disk is full. Delete unnecessary programmes and make space for new recording. - Check if recording is overlapped with another channel. Stop the current recording or wait until WKH UHFRUGLQJ LV ¿QLVKHG (13) Cannot operate the TSR (Time Shifted Recording) - Make sure that the HDD is connected correctly.
Specification 6SHFLÀFDWLRQ 6SHFL¿FDWLRQ Item LCD Panel PC Monitor Input/Output Type Colour active matrix TFT-LCD Display Area 19.0”/22.0” Max. Resolution LGB-19DRT : 1440 x 900 pixels LGB-22DRT : 1680 x 1050 pixels Viewing Angle 5 / 8 ' &5 Sync Separate Horizontal Frequency 31.469~48.363kHz Vertical Frequency 60Hz MAX.
Service and Support Service and Support You can get information such as a troubleshooting guide, software upgrades and product support guide IURP WKH IROORZLQJ ZHE VLWHV DQG FDOO FHQWHU +RWOLQH 3OHDVH WU\ WR FRQWDFW WR \RXU ORFDO GHDOHUV ¿UVW when facing a problem. Web site and e-mail Homepage http://www.humaxdigital.com http://www.humaxdigital.com/Deutsch/ http://www.humaxarabia.
Service and Support Call Center Humax Customer Helpline (UK) Tel: 0870 247 8800 E-mail: uksupport@humax-digital.co.uk Open: Local Time in UK (GMT+0), 09:00 – 18:00 (Monday -Friday) Support Language: English Humax Middle East Call Center (Dubai, UAE) Tel: +971 (0)4 359 2323 (Open: 09:00 - 20:00 / close on Friday) E-mail: callcenterME@humaxdigital.