Handheld GPS Connection Kit 531324-1_D
Thank You! Thank you for choosing Humminbird®, America’s #1 name in fishfinders. Humminbird® has built its reputation by designing and manufacturing top-quality, thoroughly reliable marine equipment. Genuine Humminbird® accessories offer the opportunity to upgrade and expand the capabilities of your Humminbird® product. Your Humminbird® is designed for trouble-free use in even the harshest marine environment.
Table of Contents How GPS Works Connecting a Handheld Receiver to the Fishing System Handheld GPS Connection Kit 1 2 3 Direct-connect Cable Installation (AS HHGAR082, AS HHMAG344) ........................................ 3 Bare Wire Cable Installation (AS-HHGPS) ................................................................................4 Views 7 Combo View .............................................................................................................................. 7 Track View ...
Table of Contents Sonar Window (Combo View Only) ........................................................................................ 28 Waypoint [Name] (Most Recently-Created Waypoint) .......................................................... 29 Navigation Menu Tab 30 Current Track .......................................................................................................................... 30 Saved Tracks..................................................................................
Table of Contents Fishing System Accessories 48 1-Year Limited Warranty 50 Humminbird® Service Policy 51 Returning Your Unit for Service 52 Contact Humminbird® 54 NOTE: Entries in this Table of Contents which list (International Only) are only available on products sold outside of the US and Canada by our authorized International Distributors. To obtain a list of authorized International Distributors, please visit our website at www.humminbird.
How GPS Works Your Fishing System uses GPS and sonar to determine your position, display it on a grid, and provide detailed underwater information. The Global Positioning System (GPS) is a satellite navigation system designed and maintained by the U.S. Department of Defense. GPS was originally intended for military use; however, civilians may also take advantage of its highly accurate position capabilities, typically within +/- 10 meters, depending on conditions.
Connecting a Handheld GPS Receiver to the Fishing System Humminbird® has designed two different direct-connect cables to fit the most common GPS Receiver configurations. In case neither of the two direct-connect cables fit your configuration, we also provide a cable that can connect your Handheld GPS Receiver to your Fishing System control head via an additional NMEA data cable which you must purchase from your Handheld GPS Receiver manufacturer.
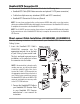
Handheld GPS Connection Kit The Humminbird® Handheld GPS Connection Kit includes the following items: • Handheld GPS Cable (NMEA data connection and optional 12 VDC power connection) • Y-cable for multiple accessory attachment (NMEA and ACCY connections) • Handheld GPS Connection Kit Accessory Manual NOTE: You may have purchased either a direct-connect NMEA data cable, or one that requires splicing to an additional NMEA data cable (made by the manufacturer of the Handheld GPS receiver) to complete the conne
3. Your NMEA Cable allows you to connect your Handheld GPS Receiver to an external 12 VDC power supply. If you choose to run your Handheld GPS Receiver from an external 12 VDC power supply, connect the black wire to ground (-) and the red wire to positive (+) 12 VDC power. CAUTION: Use caution before connecting the red +12V wire to your Handheld GPS Receiver, and consult your Handheld GPS Receiver manufacturer’s user manual before connecting power and ground.
NOTE: If the terminal slot is already used by another accessory, you will need to replace it with the included Y-cable. After you’ve inserted the Y-cable’s COM-connector into the appropriate terminal slot on the back of your Fishing System control head, connect the Handheld GPS Cable to the NMEA-COM connector, and attach your accessory cable to the ACCY-COM connector. 2. Connect the NMEA In (Green wire) of the cable to the NMEA Out of your Handheld GPS Receiver.
5. Power up the Fishing System Control Head (see your Fishing System Operations Manual for details). NOTE: The Fishing System accepts NMEA 0183 version 2.20 input at 4800 baud and listens for the NMEA sentences RMC and GGA to determine current position, heading, speed, time and date. In addition, the GSA and GSV sentences are used to monitor GPS satellite location and usage. 6.
Views Sonar Views The following views will be added to the view rotation when a Handheld GPS Receiver is connected to the Fishing System: Combo View Bird's Eye View Track View Navigation views: • Combo View • Track View • Bird’s Eye View. When the VIEW key is pressed, the display cycles through the available views. When the EXIT key is pressed, the display cycles through the available views in reverse order. Any view can be hidden or displayed as part of the view rotation using the Views Menu tab.
Combo View with Navigation Depth Sonar Window Track Scale Water Surface Temperature Speed of Boat Bearing of Boat with Respect to True North Track View Track View displays the current track (also known as the position history or breadcrumb trail) showing where the boat has been, along with saved tracks, waypoints, and the current route (when navigating).
Track View with Navigation Depth Track Scale XTE: Cross Track Error.
latitude/longitude coordinates of the cursor, are displayed at the bottom of the view. Pressing the EXIT key moves the cursor back to the original position of the boat. Bird’s Eye View Bird’s Eye View shows a 3D perspective view of the track from a point above and behind the boat (the eye point). As the boat turns, the eye point moves to follow the boat. When you press the 4-WAY Cursor Control key in the Bird’s Eye View, the position of the eye point will shift.
Bird’s Eye View with Navigation Depth Latitude and Longitude Position of Boat XTE: Cross Track Error. Distance of Boat from Route Boat Icon DTG: Distance to Go to Waypoint BRG: Bearing to Waypoint Water Surface Temperature Bearing of Boat with Respect to True North Speed of Boat View Orientation When your Fishing System control head is in Track or Combo View, you can choose the orientation of the view by selecting North-Up or Course-Up on the Navigation Main Menu.
Introduction to Navigation Use your Fishing System to establish waypoints at areas of interest and navigate to those waypoints via a route (representing the shortest intended distance between waypoints). You can also view and save tracks, which represent the actual path of the boat. Waypoints, Routes and Tracks Waypoints are stored positions that allow you to mark areas of interest or navigation points. Waypoints, Routes and Tracks Depth Route Waypoint XTE: Cross Track Error.
Save, Edit, or Delete a Waypoint Save your current position as a waypoint: On any view, press the MENU key to display the XPressTM Menu. Select Mark and press the RIGHT Cursor key to save the current position of the boat as a waypoint. Save the cursor position as a waypoint: On the Track or Combo View, use the 4-WAY Cursor Control key to designate the position you want to save as a waypoint. Then press the MENU key to display the X-PressTM Menu.
To make it easier to view a waypoint to edit, select Sort By and press the LEFT or RIGHT Cursor keys to select a sort order: • Name shows the waypoints alphabetically • Time shows the most recently-created waypoint first • Distance shows the closest waypoint first. Delete a waypoint: From the Waypoints submenu, select Delete and press the RIGHT Cursor key to display a list of waypoints. Select the waypoint you want to delete, then press the RIGHT Cursor key.
Add a Waypoint Target or Trolling Grid Add or Remove a Waypoint Target: From the Waypoints submenu, select Target and press the RIGHT Cursor key to display a list of waypoints. Select the waypoint you want to target. A target consisting of concentric circles centered on the selected waypoint will appear on all of the navigation views; the target shows various distance ranges from the targeted waypoint.
Save or Clear a Current Track Save the current track: From the Navigation X-PressTM Menu, select Save Current Track and press the RIGHT Cursor key. The track will remain on the display, but will change from black to gray. To remove the track completely from the display, see Edit, Delete or Hide Saved Tracks. NOTE: When you save a track, a name is automatically assigned. The track name consists of a date/time stamp but can be re-named later (see Edit a Saved Track).
The Menu System The menu system is divided into easy-to-use menu modules. The main components of the menu system are as follows: Start-Up Options Menu - Press the MENU key during the power up sequence to view the Start-Up Options menu. X-PressTM Menu - The X-PressTM Menu allows you to access the frequently-used settings without having to navigate through the whole menu system. Press the MENU key once to display the X-Press™ Menu.
User Mode (Normal or Advanced) - An Advanced Mode is provided for users who desire the highest level of control over the Fishing System, and Normal Mode is provided for users who desire greater simplicity and fewer menu choices. Additional Advanced menu choices will be displayed throughout the menu system when you navigate to specific menus while in Advanced Mode. Any changes made while in Advanced Mode will remain in effect after you switch back to Normal Mode.
Start-Up Options Menu Press the MENU key when the Title screen is displayed to access the Start-Up Options menu. Start-Up Options Menu Use the UP or DOWN Cursor keys to position the cursor, then the RIGHT Cursor key to select one of the following choices. If you wait too long, the system will default to whichever menu mode happens to be highlighted: • Normal • Simulator • System Status • PC Connect (use with PC Connect Cable). See the following paragraphs for more information about each of these choices.
Simulator Use the Simulator to learn how to use your Fishing System before taking your boat on the water. The Simulator is a very powerful tool that simulates on the water operation, providing a randomly-updated display. We recommend going through this manual while using the Simulator, since all of the menus function and affect the display the way they actually do when in Normal operation.
System Status Use System Status to view system connections and to conduct a unit self-test. Exit System Status by powering your Fishing System off. The following screens are displayed in turn when you press the VIEW button when using System Status: • Self Test • Accessory Test • GPS Diagnostic View. Self Test displays results from the internal diagnostic self test, including unit serial number, Printed Circuit Board (PCB) serial number, software version, total hours of operation and the input voltage.
GPS Diagnostic View shows a sky chart and numerical data from the GPS receiver. The sky chart shows the location of each visible GPS satellite with its satellite number and a signal strength bar. A dark grey bar indicates that the satellite is being used to determine your current position. A light gray bar indicates that the satellite is being monitored, but is not yet being used. NOTE: The GPS Diagnostic View only appears if the GPS Receiver is connected.
Sonar X-PressTM Menu (Sonar Views Only) The Sonar X-PressTM Menu provides access to the settings most frequently-used. Press the MENU key once while in any of the Sonar Views to access the Sonar X-PressTM Menu. NOTE: Menu choices will vary depending on system settings such as whether the unit is set for Advanced User mode. The Mark menu selection will be added to the Sonar X-PressTM Menu when a Handheld GPS Receiver is connected to the Fishing System.
Navigation X-PressTM Menu (Navigation Views Only) The Navigation X-PressTM Menu provides access to the settings most frequently used. Press the MENU key once while in the Bird’s Eye View, Track View, or Combo View to access the Navigation X-PressTM Menu. NOTE: Menu choices will vary depending on system settings, such as whether you are currently navigating.
Waypoint [Name] (Only with an Active Cursor on a Waypoint) Waypoint [Name] allows you to view the Waypoints submenu for the waypoint under your cursor. To View the Waypoint [Name] Submenu: 1. Move the cursor onto an existing waypoint and press the MENU key once, or use the Cursor to Waypoint to select a waypoint from a list of saved waypoints. 2. Highlight Waypoint [Name] on the Navigation X-Press™ Menu. 3.
Zoom Zoom allows you to change the scale of the Bird’s Eye, Track and Combo Views. To Zoom: 1. Highlight Zoom on the Navigation X-PressTM Menu. 2. Press the LEFT or RIGHT Cursor keys to increase or decrease the Zoom level. Go To Go To allows you to start Navigation towards a waypoint. If the Cursor is active, choosing Go To creates a waypoint and starts navigation towards that waypoint.
Clear Current Track Clear Current Track allows you to clear the current track being displayed and start a new track at the present position. To Clear Current Track: 1. Highlight Clear Current Track on the Navigation X-PressTM Menu. 2. Press the RIGHT Cursor key to initiate clearing the current track. 3. The Confirm dialog box will appear. To clear the current track, press the RIGHT Cursor key once more. To cancel clearing the current track, press the LEFT Cursor key.
Remove Target (Only if a Target is Active) Remove Target removes the waypoint target from the display. This menu choice will only appear when a target has already been applied to a waypoint. See Navigation Menu Tab: Waypoints for more information. To Remove a Target: 1. Highlight Remove Target on the Navigation X-PressTM Menu. 2. Press the RIGHT Cursor key to remove the target. Remove Grid (Only if a Grid is Active) Remove Grid removes the waypoint grid from the display.
Waypoint [Name] (Most recently-created waypoint) Waypoint [Name] allows you to view the waypoints submenu for the most recently created waypoint. NOTE: You must have created a waypoint at least once since you last powered up the Fishing System for this menu choice to appear. To view the Waypoint [Name] Submenu: 1. Highlight Waypoint [Name] on the Navigation X-Press™ Menu. 2. Press the RIGHT Cursor key to view the Waypoints submenu.
Navigation Menu Tab Press the MENU key twice to access the Main Menu System, then press the RIGHT Cursor key to select the Navigation tab. NOTE: Menu choices will vary depending on system settings.
Saved Tracks Saved Tracks allows you to edit, delete, or change the default appearance of your saved tracks. To view the Saved Tracks Submenu: 1. Highlight Saved Tracks on the Navigation main menu. 2. Press the RIGHT Cursor key to view the Saved Tracks submenu. The Saved Tracks Submenu contains the following menu choices: Edit allows you to select a saved track and change its Name, Visibility, Style and Color. Select Edit and press the RIGHT Cursor key to display the list of saved tracks.
Waypoints Waypoints allows you to view the Waypoints submenu to easily manage the waypoints on your Fishing System. To view the Waypoints Submenu: 1. Highlight Waypoints on the Navigation main menu. 2. Press the RIGHT Cursor key to view the Waypoints submenu. The Waypoints Submenu contains the following menu choices: Create allows you to create a new waypoint and edit it immediately. The current boat position will be used as the default, but you can set the coordinates to any valid position.
Cursor To allows you to move the cursor quickly to a waypoint from the list of saved waypoints. Select Cursor To and press the Right Cursor key to view the saved waypoints list. Use the UP and DOWN Cursor keys to choose a waypoint from the list, and press the Right Cursor key again to initiate the cursor to that waypoint. Go To allows you to select a waypoint and start navigation toward that waypoint, or add that waypoint to the end of the current route.
North Reference North Reference allows you to have bearings displayed with one of two orientations: True North or Magnetic North. To change the North Reference setting: 1. Highlight North Reference on the Navigation main menu. 2. Press the LEFT or RIGHT Cursor keys to change the North Reference setting. (True, Magnetic, Default = True) Grid Rotation Grid Rotation allows you to set the orientation of the trolling grid in degrees, where a setting of 0° displays a standard North, South, East, West alignment.
Track Min Distance (Advanced) Track Min Distance allows you to set a minimum distance of travel before a trackpoint is added to the track. The Track Min Distance menu choice is only available when User Mode is set to Advanced (see The Menu System: User Mode). NOTE: Track Min Distance works in conjunction with Trackpoint Interval. Both conditions must be met before a trackpoint is added to the current track. To change the Track Minimum Distance setting: 1.
Course Projection Line Course Projection Line allows you to display or hide an arrow extending from the bow of the boat that projects your current course, and shows where the boat will go if you continue on your present course. To change the Course Projection Line setting: 1. Highlight Course Projection Line on the Navigation menu. 2. Press the LEFT or RIGHT Cursor keys to change the Course Projection Line setting.
Alarms Menu Tab From any view, press the MENU key twice to access the Main Menu System. The Alarms tab will be the default selection. NOTE: When an alarm is triggered, you can silence it by pressing any key. The alarm will be silenced, and will not be triggered again until a new instance of the alarm condition is detected. The following menu choices will be added to your Alarms Menu Tab when a Handheld GPS Receiver is connected to the Fishing System: • Off Course Alarm • Arrival Alarm • Drift Alarm.
Arrival Alarm Arrival Alarm sounds when the boat has either exceeded the distance to the destination waypoint, or has entered the Arrival Alarm Circle, based on the menu setting when navigating. Arrival Alarm allows you to set how close the boat must be to the destination waypoint before the Arrival Alarm will sound. To change the Arrival Alarm setting: 1. Highlight Arrival Alarm on the Alarms main menu. 2. Press the LEFT or RIGHT Cursor keys to change the Arrival Alarm setting.
Setup Menu Tab From any view, press the MENU key twice to access the tabbed Main Menu System, then press the RIGHT Cursor key until the Setup tab is selected. NOTE: Menu choices will vary depending on system settings such as whether the unit is set for Advanced User mode and what accessories are attached to the unit.
Units - Distance Units - Distance selects the units of measure for all distancerelated readouts. To change the Units - Distance setting: 1. Highlight Units - Distance on the Setup menu. 2. Press the LEFT or RIGHT Cursor keys to change the Units - Distance setting.
Local Time Zone (Advanced) Local Time Zone selects your time zone in reference to the time reported by the GPS receiver when Time+Date is selected as a Digital Readout on the Sonar View (see Select Readouts in your Fishing System Operation Manual). This menu choice is available only when in Advanced User Mode (see The Menu System: User Mode.) To change the Local Time Zone: 1. Make sure you are in Advanced User Mode, then highlight Local Time Zone on the Setup menu. 2.
Time Format (Advanced, International Only) Time Format changes the time format used by the unit. This menu choice is available only when in Advanced User Mode (see The Menu System: User Mode) International Models Only. Time Format selects a 12 hour or 24 hour format for the time of day displayed when Time + Date is selected as a Digital Readout on the Sonar View (see Select Readouts in your Fishing System Operation Manual). To change the Time Format: 1.
NMEA Output (Advanced) NMEA Output turns the NMEA* output on or off. This menu choice is available only when in Advanced User Mode (see The Menu System: User Mode.) NMEA Output should be turned On if you connect the NMEA Output wires of the GPS Receiver cable to another NMEA-compatible device, such as an autopilot. *NMEA 0183 is a National Marine Electronics Association standard for data communication.
Accessories Menu Tab From any view, press the MENU key twice to access the tabbed Main Menu System, then press the RIGHT Cursor key until the Accessories tab is selected. If no accessories are attached to the Accessory Bus, no accessory menu choices will appear under the Accessories tab. If an accessory is attached, however, additional menu choices that support the accessory will be added automatically. See the Operations Manual that is included with your accessory for detailed information.
Troubleshooting Before contacting the Humminbird® Customer Resource Center, please read the following section. Taking the time to review these troubleshooting guidelines may allow you to solve a performance problem yourself, and therefore avoid sending your unit back for repair.
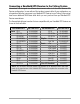
Display Problems There are several main conditions or sources of possible interference that may cause problems with the quality of the information displayed on the control head. Look in the following table for some symptoms of display problems and possible solutions: Problem Possible Cause The control head loses power at high speeds. If the power output of your boat’s engine is unregulated, the control head may be protecting itself using its over-voltage protection feature.
Finding the Cause of Noise Electrical noise usually affects the display with many black dots at high speeds, and high sensitivity readings. One or more of the following sources can cause noise or interference: Possible Source of Noise Isolation Other electronic devices Turn off any nearby electronic devices to see if the problem goes away, then turn them on one at a time to see if the noise re-appears.
Fishing System Accessories Fishing System Accessories customize the Fishing System to your needs and enable you to stay on the edge of new technology. When an accessory is connected to the Fishing System, additional menus and readouts are added automatically to the Main Menu System.
With the new InterLink™ Network Connection, you can now share GPS position, waypoints, routes and your current track between two Humminbird® Fishing Systems in real time. Mark a waypoint at the console, and it’s instantly available on the second unit. No matter where you’re at on the boat, you’ll have access to your critical fishing and navigation information. Plus, daisy chain InterLink™ with other System Modules and you’ll have a network that lets you share digital data around the boat.
1-Year Limited Warranty We warrant the original retail purchaser that products made by Humminbird® have been manufactured free from defects in materials and workmanship. This warranty is effective for one year from the date of original retail purchase. Humminbird® products found to be defective and covered by this warranty will be replaced or repaired free of charge at Humminbird’s option and returned to the customer freight prepaid.
Humminbird® Service Policy Even though you’ll probably never need to take advantage of our incredible service policy, it’s good to know that we back our products this confidently. We do it because you deserve the best. We will make every effort to repair your unit within three business days from the receipt of your unit at our factory. This does not include shipping time to and from our factory.
Returning Your Unit for Service Before sending your unit in for repair, please contact the factory, either by phone or by email, to obtain a Repair Authorization Number for your unit. NOTE: Please do not return your Humminbird® to the store for service. Please have your product model name and serial number available before calling the factory.
Notes 53
Contact Humminbird® Contact the Humminbird® Customer Resource Center in any of the following ways: By Telephone (Monday - Friday 8:00 a.m. to 4:30 p.m. Central Standard Time): 1-800-633-1468 By e-mail (typically we respond to your e-mail within three business days): cservice@johnsonoutdoors.