
Fish Finder User's Manual


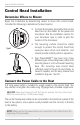
Table Of Contents
- Cover
- About this Manual
- Warnings
- Table of Contents
- Installation Overview
- Transducer Installation Overview
- Inside the Hull Transducer Installation
- Trolling Motor Transducer Installation
- Powering ON and OFF
- What You See On the Display
- PiranhaMAX™ Sonar Technology
- The Menu System
- Maintenance
- Troubleshooting
- International Purchases
- Humminbird® 1-Year Limited Warranty
- Humminbird® Service Policy
- Returning Your Unit for Service
- Specifications
- Contact Humminbird®

NOTE: Humminbird® is not responsible for over-voltage or over-current failures. The
control head must have adequate protection through the proper selection and
installation of a 1 amp fuse.
1a. If a fuse terminal is available, use
crimp-on type electrical connectors
(not included) that match the terminal
on the fuse panel. Attach the black
wire to ground (-), and the red wire to
positive (+) 12 VDC power (Figure 3).
Install a 1 amp fuse (not included) for
protection of the unit. Humminbird® is
not responsible for over-voltage of
over-current failures.
or...
1b. If you need to wire the control head
directly to a battery, obtain and install
an inline fuse holder and a 1 amp
fuse (not included) for the protection
of the unit (Figure 4). Humminbird® is
not responsible for over-voltage or
over-current failures.
NOTE: In order to minimize the potential for interference with other marine electronics,
a separate power source (such as a second battery) may be necessary.
Inline Fuse Holder
Figure 4
GROUNDGROUND
POSITIVEPOSITIVE
Figure 3
3
Control Head Installation