NEXZDAS PRO Manual Trademarks HUMZOR®, NEXZDAS®, NEXZLINK®, and NEXZSCAN® are trademarks of Shenzhen Hanzhi Technology Co., Ltd., registered in China, the United States and other countries. All other marks are trademarks or registered trademarks of their respective holders.
every circumstance. It is the automotive technician's responsibility to be knowledgeable of the system being tested. It is crucial to use proper service methods and test procedures. It is essential to perform tests in an appropriate and acceptable manner that does not endanger your safety, the safety of others in the work area, the device being used, or the vehicle being tested.
CONTENTS 1 USING THIS MANUAL ........................................................................................................... 5 1.1 CONVENTIONS..................................................................................................................................... 5 2 GENERAL INTRODUCTION .................................................................................................. 6 2.1 TABLET.....................................................................................
13 FEEDBACK ........................................................................................................................ 42 14 SETTINGS .......................................................................................................................... 44 14.1 SYSTEM INFO .................................................................................................................................. 44 14.2 UNITS ..........................................................................
1 Using This Manual This manual contains device usage instructions. Some illustrations shown in this manual may contain modules and optional equipment that are not included in your system. 1.1 Conventions The following conventions are used. 1.1.1 Bold Text Bold text is used to highlight selectable items such as buttons and menu options. Example: Tap NEXT. 1.1.2 Notes and Important Messages A NOTE provides helpful information such as additional explanations, tips, and comments.
2 General Introduction The NEXZDAS PRO ND366 is a multi-platform diagnostic solution comprised of a powerful 10.1 inch TFT-LCD touchscreen Android-based tablet, a NEXZBOX communication and diagnostic measurement unit and an on-tool and cloud-based repair instructions and expert advice.
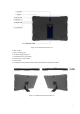
Figure 2-2 NEXZDAS Table Back View 4. Back Camera 5. Type-C charging port 6. DC Power supply input port 7. Volume button for up and down 8. Reset button for restart tablet 9. Power button 10.
2.1.2 Power Source The tablet can receive power from any of the following sources: Internal Battery Pack AC/DC Power Supply IMPORTANT Do not charge the battery when the temperature is lower than 0°C (32°F) or higher than 45°C (113°F). Internal Battery Pack The tablet can be powered with the internal rechargeable battery, which if fully charged can provide sufficient power for about 8 hours of continuous operation.
Temperature Operating Temp. 0 to 50°C (32 to 122°F) Storage Temp. -20 to 60°C (-4 to 140°F) Software specifications Software platform: Android 9.0 Interface style Google Language Support multi-languages Input Standard Android soft keyboard (support third-party handwriting input method/support external hard keyboard) Audio: MP3,MP2, AMR,AWB,APE,M4A, MIDI, OGG,WAV,FLAC,3GP (Need License: AAC, WMA) Video: MPEG4-SP, H.264/AVC,H.
owner or maintenance worker can learn the basic information and the existed faults of the vehicle in real time through the APP, etc., making vehicle maintenance become more convenient. 2.3.2 Features ① Wide coverage of gasoline vehicle brands of Asia, Europe and America, free download. ② Support full-system electronic control diagnosis, quickly scan the conditions of all electronic control systems of the car, and then generate professional diagnosis reports.
Figure 3-1 Application Menu 1. Application Buttons - Diagnose and application functions selection. 2. Locator and Navigation Buttons – Quickly boot to diagnose function or return android system home. 3. Status Icons - Display system and communication signals. NOTE It is recommended to lock the screen when not in use to protect information in the system and conserve the power. Almost all operations on the tablet are controlled through the touchscreen.
Settings Accesses the system settings menu and general tablet menu. Remote Configures your unit to receive remote support Ass using the TeamViewer application. Feedback Collect the customer requirement or question to engineer team. Accesses valuable application Data Management, data Others playback and so on. 3.1.
Forcing a shut down while the tablet is communicating with the vehicle may lead to ECU errors on some vehicles. Please exit the Diagnostics application before shutting off the tablet. To power down the NEXZDAS tablet 1. Long press (press and hold) the Lock/Power Button. 2. Tap Power off option. 3. Tap OK. 3.2.1 Reboot System In case of system crash, long press the Lock/Power button and tap reboot to restart the system. 4 Software Installation and Running 4.
5 Product Registration and Login 5.1 User Registration When you access the "NEXZDAS" application for the first time, you need to follow the steps below to register: 1. Click the "NEXZDAS" icon on the desktop to open the application. 2. On the Login interface, click the "Register" button to enter the registration interface. 3. Enter your mailbox or mobile phone number in the "Email" column. 4. Click the "GET CAPTCHA" button to get your captcha. 5. Enter the captcha you obtained in the "CAPTCHA" column. 6.
Figure 5-2 Sample Registration Interface 5.2 Login Users who have registered can log in through the following steps: 1. Click the "NEXZDAS" icon on the desktop to open the application. 2. On the Login registration interface, enter the email or mobile number you need to log in in the "E-mail" column. 3. Enter your login password in the "Password" column. 4. Click the icon becomes icon on the right side of the "Password" column to encrypt your password, and the .
Figure 5-3 Sample Password Reset Interface 5.2.2 Serial Number Binding After the user logs in successfully, it comes to the serial number binding interface. Users can add, delete, and select products here. Figure 5-4 Sample Binding Serial Number Interface 5.2.3 Product Binding 1. Manually input a. Click the "Add a new product" button and the "Binding serial number" interface will pop up. b.
A. Click the "Add a new product" button and the "Binding serial number" interface will pop up. B. Click the scan code icon on the right side of the "activation code" column to open the scan interface. C. Align the QR code of the device you purchased, and if the code is scanned successfully, the serial number will be automatically bound. 5.2.
Figure 5-7 Sample Location Icon-1 2. Click the icon on the right side of the top navigation bar. In the pop-up location permission prompt box, click the "OK" button. Figure 5-8 Sample Location Permission Prompt Box 3. In "Location" interface, if the switch on the right side of the "Use location" column is not turned on, please click the on switch. Figure 5-9 Sample Location Interface Figure 5-10 Sample Location Status Bar-1 4.
5. After setting, click the return button at the top to return to the main app interface, and the icon disappears. 6. On the main interface of "HUMZOR", if there is an icon on the top navigation bar that NEXZDAS positioning is not turned on. , it indicates Figure 5-11 Sample Location Icon-2 7. Click the icon on the right side of the top navigation bar. In the pop-up location permission prompt box, click the "OK" button. Figure 5-12 Sample Location Permission Prompt Box 8. In the "Location" interface.
Figure 5-14 Sample Location Status Bar-2 9. After setting, click the return button at the top to return to the main APP interface, and the icon disappears. 5.3 Bluetooth Connection After you select the product serial number to enter the "HUMZOR" main interface, you can view and connect to the VCI device with the corresponding serial number you have purchased through the following steps: 1. Insert the VCI of the HUMZOR NEXZDAS product you purchased tightly into the OBD port.
3. When the above steps are completed, check the VCCI navigation button at the bottom bar on the screen. If a blue BT, Wi-Fi or USB icon displays at the lower right corner, the NEXZDAS PRO Diagnostic Platform is ready to start vehicle diagnosis. 6.2 Protocol Supported The following protocols are included: High Speed CAN - offers baud rates from 40 Kbit/s to 1 Mbit/sec, depending on cable length.
Figure 6-1 Sample Vehicle Menu Screen Manufacturer Buttons The Manufacturer buttons display the various vehicle brand names. Select the manufacturer button after the VCCI device is properly connected to the test vehicle to start a diagnostic session. Select EUROPE->BMW brand to check.
6.3.2 Vehicle Identification The NEXDAS diagnostic system supports two methods of Vehicle Identification. 1. Vehicle Manual Select 2. Vehicle Select by VIN Figure 6-3 Sample Diagnostic Menu Selection 6. 3.2.1 Vehicle Manual Select For vehicles that do not support the Auto VIN diagnose function, the NEXZDAS diagnostic system allows you to enter the vehicle brand manually. Figure 6-4 Sample Manual Selection 6.3.2.
systems for fault codes. Click on BMW and the system will acquire VIN information automatically or allow users to input the VIN manually. To perform Manual Input 1. Tap the Diagnostics application button from the Menu. The Vehicle Menu displays. 2. Select Manual input. 3. Tap the input box and enter the correct VIN code or license numbers. 4. Tap ENTER. The vehicle will be identified and matched to the vehicle database and the Vehicle Diagnostics screen will display. 5.
Figure 6-6 Sample Communication scream Figure 6-7 Sample System Test mode 6.3.3 Quick Test The Quick Test function performs a comprehensive scanning of all the systems in the vehicle ECU to locate faults and retrieve DTCs. Tap Fault to start. Systems with no faults detected will display in blue; systems containing faults will display red.
Figure 6-9 Sample Quick Test Result Screen 6.3.4 Control Unit This option allows you to manually locate a required control system for testing through a series of choices. Simply follow the menu driven procedure, and make proper selection each time; the program will guide you to the diagnostic function menu after a few choices you've made. Figure 6-10 Sample Function Menu Screen Available functions may vary by vehicle.
configurations, and allows entry of adaptive values for certain component after repairs. Depending on the test vehicle, this selection may sometimes appear. 6.3.5 ECU Information This function retrieves and displays the specific information for the tested control unit, including unit type and version numbers. Figure 6-11 Sample ECU Information Screen 6.3.6 Trouble Codes 6.3.6.1 Read Codes This function retrieves and displays the DTCs from the vehicle control system.
Figure 6-13 Sample Read DTCs Screen Freeze Frame – icon displays when freeze frame data is available for viewing; Tap icon to display data screen. The Freeze Frame interface is similar to that of the Read DTCs interface and share similar operations. Search – tap to search the selected DTC for additional information on the Internet. Clear DTCs – tap to erase codes from the ECU. It is recommended that DTCs are read and needed repairs are performed before erasing codes.
2. A warning message displays to inform you of data loss when this function is applied. a) Tap YES to continue. A confirming screen displays when the operation is successfully done. b) Tap NO to exit. 3. Tap ESC on the confirming screen to exit Erase Codes. 4. Check the Read Codes function again to ensure the operation is successful. Figure 6-15 Sample Clear DTCs Screen 2 6.3.7 Live Data When this function is selected, the screen displays the data list for the selected module.
6.3.8 Active Test The Active Test function is used to access vehicle-specific subsystem and component tests. Available tests vary by vehicle. During an active test, the tablet sends commands to the ECU to activate the actuators. This test determines the integrity of the system or part by reading ECU data, or by monitoring the operation of the actuators. Such tests may include switching a solenoid, relay, or switch, between two operating states. Selecting Active Test displays a menu of test options.
Figure 7-1 Sample Special Function Screen 1 For example: Click on Special Function->BATTERY->Europe->BMW, interface as image such as: Figure 7-2 Sample Special Function Screen 2 Figure 7-3 Sample Special Function Screen 3 31
Figure 7-4 Sample Special Function Screen 4 Figure 7-5 Sample Special Function Screen 5 Figure 7-6 Sample Special Function Screen 6 32
Figure 7-7 Sample Special Function Screen 7 8 Key Programming These functions perform various key programmer, including add and erase keys, reset immobilizer, replace engine or immobilizer ECU, and so on. For example: Click on Key Programming ->ASIA->HYUNDAI->Agree->Calculator->Security code calculator.
Figure 8-2 Sample Key Programmer Screen 2 Figure 8-3 Sample Key Programmer Screen 3 Figure 8-4 Sample Key Programmer Screen 4 9 App Store You can download the model or function you need through the following steps: 34
On the "HUMZOR" main interface, click the "App Store" icon button, and the system will guide you to the "App Store" interface. If the "basic data" of your NEXZDAS application is not the latest, please click the "OK" button and the system will guide you to download the latest "basic data". Figure 9-1 Sample Basic Data Screen 9.1 Vehicle DAS Download You can download the car model through the following steps: 1.
Figure 9-2 Sample Vehicle Model Interface Figure 9-3 Sample Vehicle Model Download Interface 9.2 Special Function Download You can follow the following steps to download special functions: 1. On the "App store" interface, click the "Special Function" button at the top to display the special function interface. 2. Click the function icon, or click the icon button at the bottom left to select single or multiple model functions. 3.
Figure 9-4 Sample Special Function Interface Figure 9-5 Sample Special Function Download Interface 9.3 Key Programming Download You can download the IMMO function through the following steps: 1. On the "App store" interface, click the "IMMO" button at the top to display the IMMO function interface. 2. Click the car model icon, or click the icon button at the bottom left to select single or multiple car models. 3.
Figure 9-7 Sample IMMO Function Download Interface 10 DTC Query You can check the DTC through the following steps: 1. On the "HUMZOR" main interface, click the "DTC Query" icon button, and the system will guide you to the DTC query interface. 2. One-finger slide down to query the DTC you need to view, or enter the ID of the DTC you want to query in the "Searching Code" input box. 3. Click on the globe icon on the right to jump to the Google webpage and query the DTC of the corresponding ID.
the VIN query interface. 2. Enter the VIN you need to query in the input box, or click the icon on the right side of the input box to scan the code. 3. Click the "Search Vehicle Info" button, if the VIN you entered exists, the system will guide you to the vehicle information display interface. 4. Click the icon on the left of the input box, and the system will guide you to the interface which shows the historical VIN you have inquired.
Figure 12-1 Sample Editing Personal Information Interface 1 Figure 12-2 Sample Editing Personal Information Interface 2 12.2 Upgrade If your NEXZDAS application is not the latest version, you can upgrade the application version through the following steps: 1. On the Personal interface, click the "Upgrade" icon button. 2. Click the "Download" button on the right to start downloading the new version.
Figure 12-3 Sample Upgrade Interface 1 3. The version is downloaded successfully, click the "INSTALL" button to start the installation. Figure 12-4 Sample Upgrade Interface 2 4. After installation, click the "OPEN" button, then the upgrade completes successfully.
12.3 Product Serial Number Switch If you need to switch the current product to another serial number, you can switch through the following steps: On the Personal interface, click the "switch/add product" icon button, and the system will guide you to the product serial number switching interface. 12.
Figure 13-1 Sample Feedback Interface 2. On the Feedback interface, click the icon on the right, and the system will guide you to the model and function module selection interface. Figure 13-2 Sample Vehicle Interface 3. Click to select, double-click to deselect, you can click the icon button on the left of the bottom tab bar to select all or cancel all. 4.
14 Settings On the "HUMZOR" main interface, click the "Settings" icon button, and the system will guide you to the Settings interface. 14.1 System Info Figure 14-1 Sample System Info Interface 14.2 Units In the Settings interface, click the "Units" button to switch the units. Figure 14-2 Sample Units Interface 14.3 Search Engine In the Settings interface, click the "Search Engine" button to switch the search engine.
Figure 14-3 Sample Search Engine Interface 14.4 Run Mode In the Settings interface, click the "Run Mode" button to switch between modes. Figure 14-4 Sample Run Mode Interface 14.5 Language You can switch the display language through the following steps: 1. On the Settings interface, click Language, the system will guide you to the language selection interface 2. Click the language you need to display, the language switch setting completes.
Figure 14-5 Sample Language Interface 15 Other On the "HUMZOR" main interface, click the "Other" icon button, and the system will guide you to the other interface. Figure 15-1 Sample Other Interface 15.1 Data Playback Data stream playback function. 15.2 Data Manage You can manage the downloaded models, functions, screen recordings, screenshots, etc. through the following steps: 1. On the Other interface, click the "Data Manage" icon button to enter the Data Manage interface.
2. If you need to manage the pictures captured in the NEXZDAS application, click the "Images" button on the left. Click the picture to zoom in and view the picture in full screen; click the selection box at the bottom right corner of the picture, or click the pictures. Click the icon button at the bottom left to select single or multiple icon button at the bottom right, and then click the YES button in the pop-up window to delete the picture successfully. Figure 15-2 Sample Data Manage Interface 1 3.
corner, or click the icon button at the bottom left to select single or multiple video. Click the icon button at the bottom right, and then click the YES button in the pop-up window, and the video is deleted successfully. Figure 15-4 Sample Data Manage Interface 3 16 Navigation Bar The buttons on the navigation bar from left to right are Screen recording、Screenshot、Bluetooth connection. 16.1 Record Video When you use the NEXZDAS application, you can do the following steps to record video: 1.
Figure 16-1 Sample Record Video Prompt Box Figure 16-2 Sample File Name Input Prompt Box 16.2 Screenshot When you use the NEXZDAS application, you can save a screenshot of the current interface through the following steps: On the main interface of "HUMZOR", click the icon on the right side of the top navigation bar, the screenshot is saved successful, and you can view it on the "Data Manage" interface.