
Installation Instructions


Thank you for purchasing a LEVOLOR
®
motorized window covering.
Download the LEVOLOR App on your Apple and Android devices to walk through the pairing
process. Use the App’s scheduling function to program your window coverings to adjust
automatically, while you’re at home or away.
Copies of the LEVOLOR Remote Control Guide along with "How to Pair the Remote" videos
are available on LEVOLOR.com. to help walk you through the set up and operation of the
6 channel remote control.
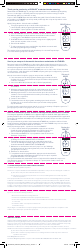
Quick Pairing
Guide: Add a shade to a GROUP.
1.
To begin program mode press and hold the stop button on
remote until the white program light starts flashing
2. Select GROUP 1 (blue light above 1 button will blink)
3.
Press and HOLD the manual control button on the window covering
4.
While continuing to hold the manual control button on the window
covering, press and HOLD the up arrow on the remote
5.
Hold BOTH buttons until the window covering moves slightly up and
down (should only take a few seconds)
6. Release both buttons
7.
To end program mode, press and hold the stop button on remote until
the white program light stops flashing
The remote will now operate the shade when Group 1 is selected. Repeat steps
1-7 to add shade to groups 2-6 if desired.
Gracias por comprar la decoración de ventanas motorizada de LEVOLOR.
Descargue la aplicación LEVOLOR en sus dispositivos Apple y Android para revisar el proceso de
vinculación. Utilice la función de programación de la aplicación para programar la cobertura de su
ventana para regularla de manera automática cuando esté en casa o fuera.
Las copias de la Guía de control remoto de LEVOLOR junto con los videos sobre “Cómo sincronizar
el control remoto” están disponibles en LEVOLOR.com para guiarlo por la configuración y operación
del control remoto de 6 canales
.
Guía de sincronización rápida: agregue una persiana a un GRUPO.
1. Para comenzar el modo del programa, mantenga presionado el botón
de detención en el control remoto hasta que la luz blanca del programa
comience a destellar.
2. Seleccione GRUPO 1 (la luz azul sobre el botón 1 parpadeará)
3. Mantenga presionado el botón del control manual en la decoración
de ventanas
4. Mientras siga presionando el botón de control manual en la decoración
de ventanas, mantenga presionada la flecha en el control remoto
5. Mantenga presionados los dos botones hasta que la decoración de
ventanas se mueva ligeramente hacia arriba y hacia abajo (solo deben
tomar algunos segundos)
6. Suelte los dos botones
7. Para finalizar el modo del programa, mantenga presionado el botón
de detención en el control remoto hasta que la luz blaca del programa
deje de destellar.
El control remoto operará la persiana cuando se seleccione el Grupo 1. Repita los pasos 1 a 7
para agregar la persiana a los grupos 2-6, si así lo desea.
Nous vous remercions d’avoir acheté un habillage de fenêtre motorisé LEVOLOR.
Téléchargez l’application LEVOLOR sur vos appareils Apple ou Android. Cette application vous
guidera pendant le processus de jumelage. Utilisez la fonction de programmation de l’application
pour régler l’ajustement automatique de vos habillages de fenêtre lorsque vous êtes à la maison
ou à l’extérieur.
Vous pouvez obtenir le guide de la télécommande LEVOLOR et consulter les vidéos « How to
Pair the Remote » (jumelage de la télécommande) sur le site LEVOLOR.com pour vous aider à
configurer et à utiliser la télécommande à 6 canaux.
Guide de jumelage rapide : ajouter un store à un GROUPE
1. Pour accéder au mode de programmation, appuyez sur le bouton
d’arrêt de la télécommande et maintenez-le enfoncé jusqu’à ce
que le voyant de programmation blanc se mette à clignoter.
2. Sélectionnez le GROUPE Nº 1 (le voyant bleu situé au-dessus du
bouton nº 1 clignotera).
3. Appuyez sur le bouton de commande manuelle du caisson de
l’habillage de fenêtre et MAINTENEZ-LE ENFONCÉ
4. En maintenant enfoncé le bouton de commande manuelle du
caisson de l’habillage de fenêtre, appuyez sur la flèche vers le haut
de la télécommande et MAINTENEZ-LA ENFONCÉE.
5. Maintenez les deux boutons enfoncés jusqu’à ce que l’habillage
de fenêtre monte et descende légèrement (cela ne devrait prendre
que quelques secondes).
6. Relâchez les deux boutons.
7. Pour quitter le mode de progra
mmation, appuyez sur le bouton d’arrêt
de la télécommande et maintenez-le enfoncé jusqu’à ce que le voyant de
programmation blanc cesse de clignoter.
Vous pouvez maintenant commander le store à l’aide de la télécommande lorsque vous
sélectionnez le groupe nº 1. Répétez les étapes 1 à 7 pour ajouter d’autres stores aux
groupes 2-6, au besoin.
U.S. RADIO FREQUENCY FCC COMPLIANCE STATEMENT
U.S. Radio Frequency FCC Compliance
This device complies with Part 15 of the FCC Rules. Operation is subject to the following two conditions:
(1) This device may not cause harmful interference, and
(2) This device must accept any interference received, including interference that may cause
undesired operation.
This equipment has been tested and found to comply w
ith the limits for a Class B digital device, pursuant
to Part 15 of the FCC Rules. These limits are designed to provide reasonable protection against harmful
interference in a residential installation. This equipment generates uses and can radiate radio frequency
energy and, if not installed and used in accordance with the instructions, may cause harmful interference
to radio communications. However, there is no guarantee that interference will not occur in a particular
installation. If this equipment does cause harmful interference to radio or television reception, which can be
determined by turning the equipment off and on, the user is encouraged to try to correct the interference
by one or more of the following measures:
• Reorient or relocate the receiving antenna.
•
Increase the separation between the equipment and receiver.
•
Connect the equipment into an outlet on a circuit different from that to which the receiver
is connected.
•
Consult the dealer or an experien
ced radio/TV
technician for help.
Any changes or modifications not expressly approved by the party responsible for compliance could
void the user’s authority to operate the equipment.
INDUSTRY CANADA
Under Industry Canada regulations, this radio transmitter may only operate using an antenna of a type and
maximum (or lesser) gain approved for the transmitter by Industry Canada. To reduce potential radio inter-
ference to other users, the antenna type and its gain should be so chosen that the equivalent isotopically
radiated power (e.i.r.p.) is not more than that necessary for successful communication.
This device contains licence-exempt transmitter(s)/receiver(s) that comply with Innovation, Science
and Economic Development Canada’s licence-exempt RSS(s). Operation is subject to the
following two conditions:
(1) this device may not cause interference, and
(2)
this device must a
ccept any interference, including interference that may cause undesired
operation of the device.
Class B Digital Device Notice
This Class B digital apparatus complies with Canadian ICES-003, RSS-Gen and RSS-210.
ALL
1 2
3
4 5
6
GROUP Buttons
ALL
1 2
3
4 5
6
Botones de
GRUPO
ALL
1 2
3
4 5
6
Boutons des
GROUPES
18-0053-029_6-Channel_Remote_Insert_F_wu.indd 2 2/22/19 1:37 PM