3 in 1 Portable Fan Owner’s Manual English Model 90390 Form# 44825-01 20091105 ©2009 Hunter Fan Co.
Table of Contents Introduction ������������������������������������������������������������� 3 Safety and Warnings ������������������������������������������������ 3 Unpacking ��������������������������������������������������������������� 5 Fan Assembly ���������������������������������������������������������� 5 Base Assembly ��������������������������������������������������������� 6 Stand Fan Height Adjustment Table Fan Wall Mount 6 6 7 7 Remote Battery Installation ������������������������������
Introduction Thank you for choosing the Hunter 3 in 1 Fan. This manual gives you complete instructions for assembling and using your fan.
6. Use fan only for intended use, as described in this instruction manual. 7. To protect against electrical shock, DO NOT immerse unit, plug or cord in water or spray with liquids. 8. Close supervision is necessary when any appliance is used by or near children. 9. NEVER insert fingers, pencils or any other objects through the grill when the fan is running. 10. DO NOT operate any appliance with a damaged cord or plug, after the appliance malfunctions or has been dropped or damaged in any manner. 11.
Unpacking (1) Spinner As you unpack the fan, save the carton and packing materials in case you want to move or ship the unit in the future. Carefully remove all items from the box. NOTE: It is best to have someone hold the box while you lift the fan and the protective packaging out of the carton. Make sure all shipping materials are removed from fan before operating. (2) Nut Figure 3. Fan Assembly (3) Rear Grill 1. Remove the Plastic Spinner (1) and the Plastic Nut (2) from the fan motor housing.
Base Assembly (7) Telescope Pole Stand Fan 1. Slide the Telescope Rod (7) into the top of the Stand Base (8) of the stand fan. The pole is notched so it will only fit into the base 1 way. Figure 7. (8) Stand Base 2. Secure the Telescope Rod (7) by screwing the Base Nut (9) onto it from underneath the base. Figure 8. 3. Slide the Fan Assembly onto the telescope pole of the base until it rests on the top of the pole. Figure 9. Figure 7. 4. tighten the screw on the back of the fan Assembly until secure.
Table Fan 1. Align the Fan Assembly over the Table Base (10) and push together until secure. Figure 10. 2. Turn the Table Fan over and secure the 2 pieces together using the 3 Table Base Screws. Figure 11. (10) Table Base Wall Mount Before installing the Wall Mount Adapter, ensure the fan location is close enough to a wall adapter that the fan can be plugged in. Figure 10. Caution: Due to the weight of this product, it is required it be mounted into a wall stud.
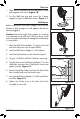
Remote Battery Installation 1. Turn the Remote Control over and Remove the Battery Cover from the back by gently pressing down on the tab and sliding down on the tab. Figure 14. 2. Insert 2 “AAA” Batteries into the battery compartment, ensuring the positive and negative ends of the batteries are installed correctly. 3. Slide the Battery Cover back and snap into place. Figure 14. Operation - Fan/remote - turns the unit on and off. - Adjust the speed of the unit between High, medium, and low.
Maintenance This fan is permanently lubricated and will not require additional lubrication (oil) for the life of the fan. This fan requires little maintenance and contains no user serviceable parts. DO NOT try to fix it yourself. Contact qualified service personnel if servicing is needed. Before cleaning, turn fan off and unplug from electrical outlet. Wipe off excess dust with a lintfree cloth.
1. Problem 33Fan will not oscillate. Solution 33Push down on the knob on top of motor housing to activate oscillation. 2. Problem 33Can not adjust the angle of the fan. Solution 33Gentle grasp the grill of the fan and tilt up or down. 3. Problem 33Remote control will not operate. Solution 33Remove the battery cover and confirm the batteries are installed correctly according to polarity markings.
y If any part of your Hunter Portable Fan other than the motor fails at any time with one year after the date of sale to you due to a defect in material or workmanship, we will repair or, at our option, replace the defective part free of charge for parts and labor performed at our nearest service center or at our Service Department in Memphis, Tennessee. nt ra ar W such as remote controls, remote control receivers or transmitters used in conjunction with the motor.
y nt ra ar W Memphis, Tennessee 38016. Please contact us before shipping your fan to us. If we authorize you to ship it to us, you will be responsible for all insurance and freight or other transportation charges to our factory service center. We will return your Hunter Fan freight prepaid. Your portable fan should be properly packed to avoid damage in transit since we will not be responsible for any such damage. Proof of purchase is required when requesting warranty service.