SINCE 8 1886 EE INSTALLATION INSTRUCTIONS FOR HUNTER DUAL MOUNT LIGHT FIXTURES MODELS 28550 & 28551 IMPORTANT NOTE: READ AND SAVE THESE INSTRUCTIONS! NOTE: This it a Dual Purpose Light kit that allows fhe user to install the light fixture to the ceiling, as you would any light fixture, It also has the feature of being convertible o mount directly to 2 Hunter ceiling fan.
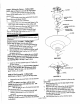
STEP 2: Wiring the Fixture Ceiling Light NOTE: Refer to Figures 2nd 3 For the steps below, CANOPY 1. Locate the green ground wire from the Eight \ fixture and the supply ground wire coming outhouse electrical box. ! ( ‘{ 3. Cotonou both ground wires underneath the green \\g’i > ground sower on the hanger bracket. Sk ,fi{/ ~ DECORATIVE 3. Using approved wire connectors: ° / NUTS * Connect the white wire from the light fixture to the Ve white supply wire coming out of the ceiling; and LAMP HOLDER x\ / + Connec
CEILING FAN LIGHT KIT SECTION: « Read entire text carefully before beginning installation and save these instructions, » Should you desire to change the unit over to a different style mounting, you will need to follow these instructions to convert from one installation style to another, » To reduce the vise of electrical shock, install this light kit only on Listed Hunter ceiling fans type A through Z.
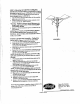
STEP 3: Mounting the Light Kit Ceiling Fan IMPORTANT INSTALLATION INFORMATION: Before mounting the light kit o your ceding fan, locate and instill the Watchtowers included in the light kit suck pairs ante e screws identified below in Sub-step 2. 1. Align the holes in the fan mounting plate with the mounting orioles in the swish housing, 2. Attach the light kit to the switch housing, using the scows provided with the fan.
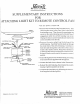
SINCERE @ FAN | T ) 4~SWITCH HOUSING T 6] TOP COVER ELECTRICAL PLUG \ MOTE CONTROL ’ whitening TRACER v REMOTE CONTROL e WHITE WIRE IT KIT LIGHT KIT. Whitehall WIRE BLACK WIRE REMOTE P CONTROL MODULE — SWITCH Ho Using CENTER PLUG TYPICAL e LIGHT KIT FITTER EED WIRES ?ROUGH CENTER HOLE FORMNO.
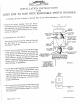
_\TIMER SINCE 1888 INSTALLATION INSTRUCTIONS ’ FOR LIGHT KITS TO FANS WITH REM LOVABLE SWITCH HOUSINGS CAUTION; Be sure all power is removed from the fan before attempting to install the light kit, 1. Remove the switch housing from the fan by Loosening the three screws at the top of the housing and twisting the housing to disengage if necessary. pull down on the switch housing to remove it from the fan, See Figure 1 2, Unplug the wires.