Visalia Installation Manual Model: 50595 Quartz Grey 53430 Fresh White Fan weight ±2 lbs: 20.9 lbs (9.5 kg) ©2020 Hunter Fan Co.
Congratulations on purchasing your new Hunter® ceiling fan! The ceiling fan you purchased will provide comfort and performance in your home or office for many years. This instruction manual contains complete instructions for installing and operating your fan. We are proud of our work and appreciate the opportunity to supply you with the best ceiling fan available anywhere in the world. We are here to help! This Instruction Manual is designed to make installation as simple as possible.
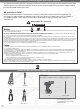
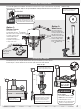
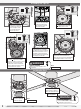
1886 Here is what comes in your box: We recommend that you pull everything out of the box and lay it out. We have grouped the drawn components below with the hardware you’ll need for those parts. The screws below are drawn to scale to make it easier to identify what piece of hardware is needed to install each component. Wood Screw Hunter Pro Tip: Do not discard the hardware bags or mix parts from different bags. Make note of the symbol printed on each hardware bag.
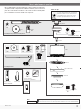
1886 Choosing the Right Installation Location You probably bought this fan with a location in mind. Let’s check below to make sure it is a good fit. Check the room dimensions: Check the outlet box: You must be able to secure the fan to building structure or fan-rated outlet box.
1886 Installing the Ceiling Bracket You have two options for installation. Pick which one works best for your location. Remove any existing bracket prior to installation. Only use the provided Hunter ceiling bracket that came in your fan’s box. Hunter Pro Tip: The machine screws are the ones that came with your outlet box.
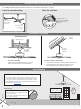
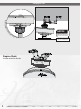
1886 Hanging the Fan S li d e c a n o p y ove NOTICE rd o wn ro d an d To prevent damage to fan, ALWAYS lift holding either the fan housing or the downrod. w i re s . Place the downrod ball into the slot in the ceiling bracket. Progress Check: Your fan should look like this.
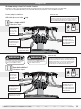
1886 Wiring the Fan We know wiring is hard. Let’s make it easier. Follow these steps to get your fan wired quickly and safely. Follow the route below that best matches your wall switch setup. If you are unfamiliar with wiring or uncomfortable doing it yourself, please contact a qualified electrician. You are going to need these: Hunter Pro Tip: Here is how to connect the wires: Push the bare metal ends of the wires together and slide a wire nut over them. Then, twist the wire nut clockwise until tight.
1886 Installing the Canopy Insert the two canopy screws hardware bag. found in the x2 Canopy Screw BAG op Fi t t h e c a n yi n pla ce as s h o w n. Lift the canopy into place so that the screw holes are aligned. NOTICE Hunter Pro Tip: Let the tool do the work! A magnetic screwdriver will give you more visibility when securing the canopy. If screw holes do not align properly then rotate the canopy 180 degrees. Hanger ball shape must match canopy opening for correct canopy installation.
1886 Installing the Blades: Put the blade washers, found in the hardware bag, onto the blade screws, found in the hardware bag. Then install the blade screws to secure each blade to a blade iron. Repeat x4 x12 BAG Blade Screw x12 IMPORTANT BAG Washer NOTE: Follow the instructions on the blade. Installing it incorrectly could result in your fan not functioning. Remove instructional label after installation. Note: Fan style may vary.
1886 Assembling the LIght Kit 1 of 6 2 of 6 BAG BAG Light Kit Screw Feed the wire plug through the center hole of the upper switch housing, then wrap keyhole slots around the screws and twist counterclockwise. Partially install two light kit assembly screws, found in the hardware bag, halfway into the motor housing as shown. It does not matter which two screw holes you choose. Light Kit Screw Insert the third screw, found in the hardware bag, into place and then tighten all three screws.
1886 Preparing the Remote The remote control is already paired for use. For your convenience, a remote function card is packed in with your remote. NOTICE • Always purchase the correct size and grade of battery most suitable for the intended use. • Replace all batteries of a set at the same time. • Clean the battery contacts and also those of the device prior to battery installation.
1886 Troubleshooting Remote Only Works Close to Fan Fan Doesn’t Work • • Make sure power switch is on. • Push the motor reversing switch firmly left or right to ensure that it is engaged. Change battery. Noisy Operation • Check the circuit breaker to ensure the power is turned on. • Make sure the blades are properly installed. • Make sure the blades spin freely. • Check to see if any of the blades are cracked. If so, replace all of the blades.
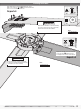
1886 Downrod If you need a different downrod length follow these steps: Follow steps 1-5 to remove standard downrod pipe 1 10 2 3 9 4 8 5 7 6 Follow steps 6-10 to reassemble with new downrod WARNING FAN FALL HAZARD To prevent SERIOUS INJURY or DEATH: • ALWAYS follow the downrod assembly instructions exactly. • VERIFY the downrod is assembled correctly by firmly pulling on the hanger ball.