© 2003 Hunter Fan Company 41847-01 04/21/2003
® If you need help installing the fan, your Hunter fan dealer can direct you to a licensed installer or electrician. gathering the tools Your new Hunter® ceiling fan is an addition to your home or office that will provide comfort and performance for many years. This installation and operation manual gives you complete instructions for installing and operating your fan. We are proud of our work. We appreciate the opportunity to supply you with the best ceiling fan available anywhere in the world.
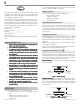
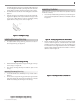
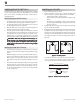
Angl e M oun Mo unttin ingg (Figure 3) hangs from a vaulted or angled ceiling. 34º Max 8 Pitch 12 using an existing fan site If you are preparing a new fan site, go to the p rep arin ingg a n neew ffaan sitte section. si If you plan to use an existing fan site, complete the following checklist for the support brace, ceiling hole, outlet box, and wiring.
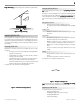
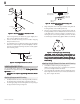
cutting the ceiling hole 1. 2. preparing the wiring Locate the site for the hole directly below the joist or support brace that will hold the outlet box and fan. Cut a 4" diameter hole through the drywall or plaster of the ceiling as shown in Figure 6. You will use the hole to install the support brace and outlet box. 1. Ceiling Joist Support Brace 2. 3. 4” Diameter Ceiling Hole Ceiling 4.
4. Align the slotted holes (refer to Figure 10) in the ceiling plate with the pilot holes in the wood support structure. Note: The isolation pads should be flush against the ceiling. For Angled Ceilings: Be sure to orient the ceiling plate so that the arrows on the ceiling plate are pointing towards the ceiling peak. Refer to Figure 10.
6. 7. • Place the canopy trim ring then the canopy over the adapter as shown in Figure 15. Place the low profile washer (lip up) into the canopy as shown in Figure 15 fitting the notch in the low profile washer over the adapter set screw and hook. 3. control the light with one wall switch and the fan with another (two wall switches required). Use connection 2, as described in Figure 17, if there is no separate wall switch power wire for the light fixture. NOTE: Wall switches not included.
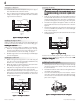
2. 3. For Flush Mounting: The arrows on the low profile washer and on the ceiling plate should be pointing in the same direction and should be pointing towards the tab hole on the canopy. Hook the tab hole over the tab on the ceiling plate as shown in Figure 19. Raise the canopy, be sure the holes in the canopy and the ceiling plate are aligned, and loosely assemble the canopy screws one at a time. When all three screws are assembled, securely tighten all three canopy screws. Refer to Figure 19.
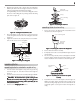
Switch Housing Mounting Plate Blade Iron Housing Assembly Screw Upper Plug Connector Upper Switch Housing Fi gur he up p er ssw wi tch hho ou sin o tth he uree 26 - A Attt ach in ingg tth upp singg tto moun unttin ingg p pllate Medallion 3. 4. Fi gur he bbll ad e tto o tth he bbll ad e ir o n aan nd uree 24 - A Attt ach in ingg tth iro me d alli on llio 3. 4. If you used grommets, the blades may appear slightly loose after screws are tightened. This is normal.
Fi gur lin h e liligght ffii xtur uree 28 - A Asss emb mblin lingg tth uree 3. Securely tighten the light kit assembly into the bottom of the lower switch housing. Refer to Figure 29. 4. Install the nut and washer onto the end of the light kit assembly inside of the lower switch housing.
installing without the light fixture operating your ceiling fan Your Hunter fan comes with an integrated light fixture assembly and an optional switch housing cap and plug button. This feature gives you the option of installing the fan with or without the included light fixture. 1. 2. attaching the upper switch housing 1. 2. 3. 4. Partially install two #6-32 x 3/8" housing assembly screws into the switch housing mounting plate as shown in Figure 26.
cleaning your ceiling fan caring for finishes For cleaning, a soft brush or lint-free cloth should be used to prevent scratching the finish. A vacuum cleaner brush nozzle can remove heavier dust. Surface smudges or an accumulation of dirt and dust can easily be removed by using a mild detergent and a slightly dampened cloth. An artistic agent may be used, but never use abrasive cleaning agents as they will damage the finish. caring for blades Wicker blades should be cleaned with a damp cloth.