For Your Records and Warranty Assistance Model Name: _____________________ Catalog/Model No.: ________________ Serial No.: ________________________ Date Purchased: ___________________ Where Purchased: _________________ For reference also attach your receipt or a copy of your receipt to the manual.
Welcome READ AND SAVE THESE INSTRUCTIONS Your new Hunter® ceiling fan is an addition to your home or office that will provide comfort and performance for many years. This installation and operation manual gives you complete instructions for installing and operating your fan. We are proud of our work. We appreciate the opportunity to supply you with the best ceiling fan available anywhere in the world.
Optional Accessories Understanding Mounting Hunter’s patented mounting system provides you maximum ease in installing your fan. This fan was designed to be mounted only on flat ceilings and can be used only on ceilings no less than 9 feet high. Considering Optional Accessories Consider using Hunter’s optional accessories, including a wall-mounted or remote speed control. To install and use the accessories, follow the instructions included with each product.
Getting Ready To install a ceiling fan, be sure you can do the following: • Locate the ceiling joist or other suitable support in ceiling. • Drill holes for and install wood screws. • Identify and connect electrical wires. • Lift 40 pounds. If you need help installing the fan, your Hunter fan dealer can direct you to a licensed installer or electrician.
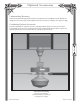
Pre-Installation Pre- Installation Select installation site: Normally this is near the center of the room, often replacing a light fixture. Make certain that ample clearance is left for the rotating fan blades. For maximum efficiency, no obstruction (walls, posts, etc.) should be within 24” of the tips of the blades (see Fig. 1).
Installing Ceiling Hardware ! CAUTION ! DO NOT USE LUBRICANT ON SCREWS 1. Drill (2) 11/64” diameter holes through the outermost holes in the box 2” deep into the cross brace. These holes are for the U-bracket bolts. Install rubber bushing and pin into the u-bracket. Use a 3/8” wrench to install the (2) 3 1/2” lag bolts to secure the U-bracket to the joist (see Fig. 2). Exploded View Installed View Cross Brace 6 Rubber Bushing and Pin Ceiling Outlet Box U-Bracket Lag Bolt Fig.
Hanging The Fan ! CAUTION ! BE SURE TO TIGHTEN THE HANGER PIPE INTO THE FAN, AND THE HANGER BRACKET ONTO THE PIPE. TIGHTEN THE 2 SET SCREWS, AS DESCRIBED IN STEP 7, TO PREVENT THE FAN FROM FALLING. YOUR FAN MAY WEIGH UP TO 50 LBS. ALL OF THE FOLLOWING STEPS MUST BE FOLLOWED IN ORDER TO ENSURE A SECURE MOUNTING. 1. Feed the wires from the top of your motor through the hanger pipe (see Fig. 3). 2.
Hanging The Fan 5. Back out the set screw on the hanger bracket. 6. Feed the 3 wires through the hanger bracket assembly and screw the hanger bracket onto the hanger pipe until tight (at least 3 turns) (see Fig, 6). 7. Use pliers to tighten both the hanger bracket assembly and the hanger pipe together. 8. Tighten the set screw in the motor housing and the hanger bracket assembly (see Fig 7). Hanger Bracket Hanger Bracket Set Screw Hanger Pipe Motor Housing Set Screw 8 Fig. 6 Fig. 7 9.
Wiring the Fan ! CAUTION ! BE CERTAIN THAT THE ELECTRICITY IS TURNED OFF AT THE MAIN PANEL BEFORE STARTING THIS SECTION. NOTE: All wiring must be in accordance with national and local electrical codes and ANSI/ NFPA 70-1999. If you are unfamiliar with wiring, use a qualified electrician. Wall switches are not included. Select an acceptable general-use switch in accordance with national and local electrical codes. 1. Before attempting installation, make sure the power is still off. 2.
Installing The Canopy 1. Partially install the fillister head #8-32 set screw. 2.. Slide canopy up close to ceiling. 3. Tighten the canopy fillister head #8-32 set screw (see Fig. 11). Canopy Screw, Fillister Head #8-32 10 Fig.
Lubrication ! CAUTION ! DO NOT TURN FAN ON UNTIL LUBRICATION HAS BEEN ADDED. TO OPERATE THE FAN WITHOUT OIL OR WITH LOW OIL WILL VOID YOUR WARRANTY. Adding Oil 1. Your fan has been shipped without oil in the motor. 2. A 1-ounce tube of high grade SAE 10 non-detergent oil is packaged in the sack parts. 3. All of the oil in the tube must be put into the fan. 4. Cut the tip off the end of the tube and place the tube into the oil hole (see. Fig. 12).
Fan Blade Assembly ! CAUTION ! TO REDUCE THE RISK OF PERSONAL INJURY, DO NOT BEND THE BLADE BRACKETS WHEN INSTALLING THE BRACKETS, BALANCING THE BLADES, OR CLEANING THE FAN. DO NOT INSERT FOREIGN OBJECTS IN BETWEEN ROTATING FAN BLADES. Installation Of Fan Blade Assembly 1. Loosen the blade assembly screw, but do not remove. 2. Align the blade blase assembly screw with the Adapt Air blade shaft counter sink (see Fig. 14). 3. Slide the blade assembly onto the Adapt Air blade shaft. (see Fig. 15). 4.
Installing Bulb And Globe 1. Make sure the fan and light circuits are off before installing the 19 watt CFL (Compact Fluorescent Light) bulb. 2. Insert and screw the CFL bulb into the light socket turning the CFL bulb clockwise (see. Fig. 16). Light Socket 19 Watt CFL Bulb 13 Fig. 16 4. Slide the globe into the fitter and tighten the thumb screws until globe is secure. NOTE: Do not overtighten thumb screws, this can cause globe to crack. 5.
Operation And Care 1. The fan pull chain controls power to the fan. The pull chain has four settings in sequence: High, Medium, Low and Off. • Pull the chain slowly to change settings. • Release slowly to prevent the chain from recoiling into the blades. • The chain uses a breakaway connector that separates if the chain is jerked. If this happens, simply reinsert the chain into the connector (see Fig. 18). 2. The light pull chain controls power to the light. The pull chain has two settings: On and Off. 3.
Troubleshooting Guide Problem: Nothing happens; fan does not move. 1. Turn power on, replace fuse, or reset breaker. 2. Check all connections according to the wiring the fan section. 3. Pull the pull chain to ensure it is on. Problem: Noisy operation. 1. Tighten the blade assembly screws until snug. 2. Check to see if the blade is cracked. If so, replace all the blades. Problem: Excessive wobbling. 1. If your fan wobbles when operating, use the enclosed balancing kit and instructions to balance the fan.
Notes 16 Hunter Fan Company 42704-01 • 01/29/07
©2007 HUNTER FAN CO.