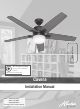
HomeKit Sticker We’re here to help! Check out the installation video at: http://bit.ly/InstallCavera Cavera Installation Manual Model: 50476 Matte Black 50477 Fresh White 50478 Matte Nickel Fan weight ±2 lbs: 22.0 lbs (10.0 kg) ©2019 Hunter Fan Co.
Congratulations on purchasing your new Hunter® ceiling fan! The ceiling fan you purchased will provide comfort and performance in your home or office for many years. This instruction manual contains complete instructions for installing and operating your fan. We are proud of our work and appreciate the opportunity to supply you with the best ceiling fan available anywhere in the world. We are here to help! This Instruction Manual is designed to make installation as simple as possible.
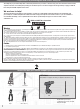
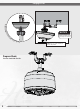
Here is what comes in your box: We recommend that you pull everything out of the box and lay it out. We have grouped the drawn components below with the hardware you’ll need for those parts. The screws below are drawn to scale to make it easier to identify what piece of hardware is needed to install each component. Do not discard the hardware bags or mix parts from different bags. Make note of the symbol printed on each hardware bag.
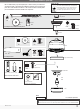
1886 Choosing the Right Installation Location You probably bought this fan with a location in mind. Let’s check below to make sure it is a good fit. Check the room dimensions: Check the outlet box: 30 inches from blade tip to nearest wall or obstruction You must be able to secure the fan to building structure or fan-rated outlet box.
1886 Installing the Ceiling Bracket You have two options for installation. Pick which one works best for your location. Remove any existing bracket prior to installation. Only use the provided Hunter ceiling bracket that came in your fan’s box. Hunter Pro Tip: The machine screws are the ones that came with your outlet box.
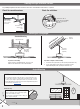
1886 Hanging the Fan S li d e c a n o p y ove NOTICE rd To prevent damage to fan, ALWAYS lift holding either the fan housing or the downrod. o wn ro d an d w i re s . DO NOT PICK THE FAN UP BY THE CANOPY OR WIRES. Place the downrod ball into the slot in the ceiling bracket. Progress Check: Your fan should look like this.
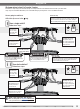
1886 Wiring the Fan We know wiring is hard. Let’s make it easier. Follow these steps to get your fan wired quickly and safely. Follow the route below that best matches your wall switch setup. If you are unfamiliar with wiring or uncomfortable doing it yourself, please contact a qualified electrician. You are going to need these: Hunter Pro Tip: 4 Wire Nuts (these are in the Here is how to connect the wires: Push the bare metal ends of the wires together and slide a wire nut over them.
1886 Installing the Canopy Insert the two canopy screws found in the hardware bag. x2 bag Canopy Screw op Fi t t h e c a n yi n pla ce as s h o w n. Lift the canopy into place so that the screw holes are aligned. Installing the Blades: Put the blade washers, found in the hardware bag, onto the blade screws, found in the hardware bag. Then install the blade screws to secure each blade to a blade iron.
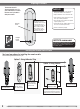
1886 Assembling the LIght Kit 2 of 6 1 of 6 Light Kit Screw bag Partially install two light kit screws, found in the hardware bag, halfway into the light kit assembly plate as shown. It does not matter which two screw holes you choose. bag Light Kit Screw Insert the third light kit screw, found in the hardware bag, into place and then tighten all three screws.
1886 Preparing the Remote The remote control is already paired for use. For your convenience, a remote function card is packed in with your remote. NOTICE • Always purchase the correct size and grade of battery most suitable for the intended use. • Replace all batteries of a set at the same time. • Clean the battery contacts and also those of the device prior to battery installation.
1886 Setting up WiFi SIMPLEconnect connects to available 2.4 GHZ WiFi networks. 1 Download the app: Visit your app store and search “Simpleconnect™ 2.0” to find the app. Use of the HomeKit logo means that an electronic accessory has been designed to connect specifically to iPod, iPhone, or iPad, respectively, and has been certified by the developer to meet Apple performance standards. Apple is not responsible for the operation of this device or its compliance with safety and regulatory standards.
1886 Limited Lifetime Warranty Hunter Fan Company grants this limited warranty to the original purchaser of this Hunter ceiling fan. This document can be found at www.HunterFan.com. Thank you for choosing Hunter! How Can Warranty Service Be Obtained? Proof of purchase is required when requesting warranty service. The original purchaser must present a sales receipt or other document that establishes proof of purchase. Hunter, at its sole discretion, may accept a gift receipt.