Bennett Collection Installation Manual Model: 50281 Matte Fresh White 54189 Matte Black 54190 Brushed Nickel Fan weight ±2 lbs: 23.8 lbs (10.8 kg) ©2019 Hunter Fan Co.
1886 Congratulations on purchasing your new Hunter® ceiling fan! The ceiling fan you purchased will provide comfort and performance in your home or office for many years. This instruction manual contains complete instructions for installing and operating your fan. We are proud of our work and appreciate the opportunity to supply you with the best ceiling fan available anywhere in the world. We are here to help! This Instruction Manual is designed to make installation as simple as possible.
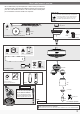
1886 Here is what comes in your box: We recommend that you pull everything out of the box and lay it out. We have grouped the drawn components below with the hardware you’ll need for those parts. The screws below are drawn to scale to make it easier to identify what piece of hardware is needed to install each component. Hunter Pro Tip: Do not discard the hardware bags or mix parts from different bags. Make note of the symbol printed on each hardware bag.
1886 Choosing the Right Installation Location You probably bought this fan with a location in mind. Let’s check below to make sure it is a good fit. Check the room dimensions: Check the outlet box: 30 inches from blade tip to nearest wall or obstruction You must be able to secure the fan to building structure or fan-rated outlet box.
1886 Installing the Ceiling Bracket You have two options for installation. Pick which one works best for your location. Hunter Pro Tip: The machine screws are the ones that came with your outlet box. Do this first! er ow P n r Tu OFF WARNING To avoid possible electrical shock, before installing your fan, disconnect the power by turning off the circuit breakers to the outlet box associated with the wall switch location.
1886 Hanging the Fan S li d e c a n o p y NOTICE ove To prevent damage to fan, ALWAYS lift holding either the fan housing or the downrod. rd o wn ro d an d w i re s . DO NOT PICK THE FAN UP BY THE CANOPY OR WIRES. Place the downrod ball into the slot in the ceiling bracket. Progress Check: Your fan should look like this.
1886 Wiring the Fan We know wiring is hard. Let’s make it easier. Follow these steps to get your fan wired quickly and safely. Follow the route below that best matches your wall switch setup. If you are unfamiliar with wiring or uncomfortable doing it yourself, please contact a qualified electrician. You are going to need these: Hunter Pro Tip: 4 Wire Nuts (these are in the Here is how to connect the wires: Push the bare metal ends of the wires together and slide a wire nut over them.
1886 Installing the Canopy Insert the two canopy screws found in the hardware bag. x2 bag Canopy Screw op Fi t t h e c a n yi n pla ce as s h o w n. Lift the canopy into place so that the screw holes are aligned. Hunter Pro Tip: Let the tool do the work! A magnetic screwdriver will give you more visibility when securing the canopy.
1886 Assembling the Light Remove the cardboard plug guard before proceeding! Notch Push the connector and excess wire into the hole at the top of the light fixture. IMPORTANT Connect the plugs from the fan and light fixture. Make sure to line up the colored markings on the connectors. The connector and excess wiring must be pushed into the light fixture in order to successfully mount the light fixture to the fan. Pin Raise the light kit to the bottom of the fan.
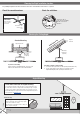
1886 Installing the Remote Control Cradle You have two options for installing the remote cradle. Choose which path works best for you. Option 1: Using Adhesive Strip Option 2: Using Screws Remove the cradle from the cradle bracket. Separate the lining from the back of the adhesive strip on the cradle bracket. Press the cradle bracket against the wall and hold firmly for 30 seconds. Slide the cradle onto the mounted bracket. Choose your cradle installation location.
1886 Limited Lifetime Warranty Hunter Fan Company grants this limited warranty to the original purchaser of this Hunter ceiling fan. This document can be found at www.HunterFan.com. Thank you for choosing Hunter! How Can Warranty Service Be Obtained? Proof of purchase is required when requesting warranty service. The original purchaser must present a sales receipt or other document that establishes proof of purchase. Hunter, at its sole discretion, may accept a gift receipt.