
Installation Guide


5Bathroom Exhaust Fan Installation - English
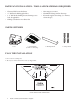
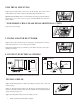
ROOF CAP*
(with built-in
damper)
ROUND
DUCT*
WALL CAP*
(with built-in
damper)
*
Purchase
separately
POWER
CABLE*
INSULATION*
(Place around and
over Fan Housing.)
Seal gaps
around
Housing.
FAN
HOUSING
ROUND
ELBOW(S) *
Seal duct
joints with
tape.
Keep duct
runs short
ROOF EXHAUST OR SIDE WALL EXHAUST
2. THREE TYPES OF TYPICAL MOUNTING
a) For housing mounted to I-joists (Begin at “FOR JOIST OR I-JOIST MOUNTING” )
b) For housing mounted to joists (Begin at “FOR HANGER BARS MOUNTING” )
c) For housing mounted to truss (Begin at “FOR TRUSS MOUNTING” )
Note: For best performance, use the shortest, straightest duct routing possible and avoid installing with
smaller ducts than suggested.
INSTALLATION STEPS
1. REMOVE PACKAGING AND SWITCH OFF POWER
FOR JOIST OR I-JOIST MOUNTING
Step 1: Hold the housing so that it is in contact with the bottom of the joist. Attach the
housing with four (4) screws to the joist through the holes in each mounting ange.
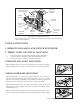
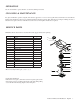
FOR HANGER BARS MOUNTING
Step 1: Sliding hanger bars have been provided, which allow the housing to be
positioned accurately anywhere between the framing. e bars span up to 24 inches
and can be used on all types of framing: I-joist, standard joist, and truss construction.
Slide hanger bars onto housing and adjust as needed to t between framing.
Step 2: Extend the hanger bars to the width of the framing. Position the ventilator
with the hanger bar tabs wrapped around the bottom edge of the framing, holding
the ventilator in place.
Step 3: Secure hanger bars to framing using one screw on each end of hanger bar. Select
a proper hole and secure the hanger bars together using the ange screws(provided).
HANGER
BAR
NAIL
SCREW