
User Guide

PART NO. 5427
5427_Installation Ins#F7A7B.doc
10/31/2006
FORD F-150 without FENDER FLARES—LOGO READY REAR MUD GUARDS
REAR MUD GUARD INSTALLATION INSTRUCTIONS
Please read instructions thoroughly before installation.
Tools Required
• 1/8” drill bit / Drill
• Short #2 Phillips screwdriver
• Center punch
Package Contents
• Driver & passenger side rear mud guard
• #10 screw (qty. 8)
• Washers (qty. 8)
• U-Clip (qty. 4)
• Instruction Sheet
NOTE: It may be necessary to remove the rear wheels for mud guard installation.
1. Clean the mud guard location area on the fender before installation.
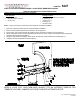
2. Remove factory plastic fasteners from locations C and D (Figure 1).
3. Place U-clips over sheet metal and align fastener and U-clip holes at locations C and D (Figure 1).
4. Attach mud guard with #10 screws and washers at locations C and D, check fit and make sure the mud guard is
parallel to the ground before tightening.
5. Using the mud guard as a template, center punch and drill 1/8” holes at locations A and B (Figure 1).
6. Install #10 screws and washers at these locations.
NEED A LOGO FOR YOUR NEW MUD GUARD? TRY AN INTERNET SEARCH FOR
“EMBLEM” ON E-BAY, AMAZON OR YOUR FAVORITE AUTOMOTIVE SITE.