
User Guide

9132_Insert X 2.doc
12/30/02
CARPET LINER INSTALLATION INSTRUCTIONS
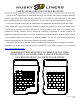
Your new 3D® Carpet Liners are designed to be held firmly in place with a Velcro® anchoring
system. You will find that each of your front liners come with two Velcro® “hook” patches applied to
the underneath surface of the liners. In the hardware bag included in the shipping container you will
find 4 anchor screws with the “loop” portion of the Velcro® applied. The anchor screws will need to
be installed in your factory carpet directly beneath the Velcro® hook patches to hold the liners in
place. The anchor screws will not damage your carpet and can easily be removed if necessary.
To align the anchors with the patches on the liner, first place your liner in the vehicle, adjusting it
to the proper fit. Then, pull up a corner of your liner as shown in the photo below and attach the
anchor screw to the Velcro® pad on the liner. Lower the raised edge and note the position where the
anchor screw touches the vehicle carpet. There are many ways to mark this location; here are a couple
of suggestions:
•Apply a 1” strip of masking tape directly to the carpet underneath the anchor screw. When the
anchor screw is lowered, it will pierce the tape and mark the location.
•Insert a straight pin (needle) next to the point where the anchor screw contacts the carpet to mark
the screw location.
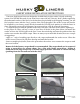
Removal of the factory carpet hook is recommended. The carpet hook can be removed
using a screwdriver to release them. Use a flat wide blade screwdriver, sliding it
under the front edge of the clip. Carefully apply pressure and twist to release the clip
(pushing from the firewall towards the seat).
With screw secured in carpet, align Velcro®
halves to secure liner in place.
Anchor screw will pierce masking
tape, marking screw location.
Anchor screw shown attached to
Velcro® Dot on back of liner.
Velcro® Dot on back of liner.