Leg rte eked ETL G3002TR-US USE AND CARE GUIDE 30 IN. STORAGE CABINET Questions, problems, missing parts? Before returning to the store, call Husky Customer Service 8 a.m. 7 p.m., EST, Monday Friday p.m, EST, Saturday 1-888-43-HUSKY — TS WWW.HUSKYTOOLS.COM Ll tumescent mores, — from the product described herein. THANK YOU We appreciate the trust and confidence you have placed in Husky through the purchase of this cabinet. We strive fo continually carats quality products designed to enhance your home.
wen N Pr-Installation. . . To reduce the risk of serious Injury, read and follow the safety Instructions below before assembling and using this product o This product is intended for indoor use only. o This product is not designed for commercial nor industrial usage. A\ WARNING Unit must be placed on a level surface or leveled with Included hardware (when applicable). Do not sit or stand on or allow children to climb, sit or stand on the assembled product.
11 1bs./5 kg 150 Ibs. / 68 kg 150 Ibs. / 68 kg 622 Ibs. / 282 kg TOOLS REQUIRED Dill Safety Goggles Hex Wrench (Hex Key) (not included) {not included) Socket (10mm) . _ Gloves 6) (not Included) ETT Hex Screwdriver Bit (not Included) HARDWARE INCLUDED Pant | Description Quantity hex socks head screw hex tapping belt 2 CC | Shelf bracket 12 DD | Adjustable foot 4 EE Safely bracket hex socket head cap screw Grommet 2 3 WWW HUSKYTOOLS.COM Please contact 1-888-43-HUSKY for further assistance.
PACKAGE CONTENTS G Part | Description Quantity Part | Description Quantity A Top panel 1 F Bottom panel 1 B Left side panel 1 G Right side panel 1 C Left door 1 H Back pane! 5 D Shelf 3 1 Safety strap 1 E | Right door 1
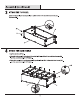
1 ATTACH THE SIDE AND BOTTOM PANELS Attach the side panels (B & G) and bottom panel (F) together. 2 INSTALL THE ADJUSTABLE FEET o Install the adjustable feet (DD) to the bottom panel {F). Make sure side A of the adjustable feet (DD) are facing towards the outside of the cabinet. Tighten securely with sixteen M6 x 16 hex socket head screws (AA). o Fix the side panels (B & 6) and the bottom panel (F} with two M6 x 16 hex socket head screws (AA). Tights securely. BO ene IN os © (ah) SN DD 5 WWW HUSKYTOOLS.
3 ATTACH THE TOP PANEL Attach the top panel (A) to the side panels (B & G) with four M6 x 16 hex socket head screws (AR). Tighten securely. 4 ATTACH THE BACK PANELS o Lay the cabinet on its face. o Attach the back panels (H) to the back of the cabinet with twelve M6 x 16 hex socket head screws (AR). Insert the screws by hand. DO NOT tighten. o Fix the side panels (G & B) and bottom panel (F) together with two M6 x 16 hex socket head screws (AA). Insert the screws by hand. DO NOT tighten.
FIX THE TOP PANEL, BOTTOM PANEL AND SIDE PANELS o Fix the top panel, bottom panel and side panels with six M6 x 16 hex socket head screws (AR) and two M6 x 16 hex socket head cap screws (FF). Insert the screws by hand. DO NOT tighten. -) S&F Two M6 x 16 hex socket head cap scows for additional door security 6 INSTALL THE SHELVES o Insert twelve shelf brackets (CC) into the slots on the side panels at the desired height. Make sure the four brackets (CC) for each shelf (D) are at the same height.
J ATTACH THE DOORS oO Insert the pins of the hinges on the left door (C) Into the slots of the bottom hinges at the front of the left side panel (B). oO Repeat the same procedure to attach the right door (E). o Close the doors to sae if the doors can touch the magnets completely. If not, adjust the cabinet's top and side panels to make sure the shape of the cabinet is square and flush. Until the doors catch the magnets completely and are flush, tighten all the screws at the cabinet front and back.
CONNECT THE CABINET TO THE WALL View from cabinet top View from Inside of cabinet O Install the safety bracket (EE) to the wall with two M6 x 40 hex tapping bolts (BB). © Fasten the tall cabinet by using the safety strap () to tie the tall cabinet and safety bracket (EE) together. Tighten securely. o Check all the screws and nuts periodically for tightness. Tighten them when necessary. Check the safety strap periodically for tightness. Tighten it when necessary.
30 in.
HUSKY Questions, problems, missing parts? Before returning to the store, call Husky Customer Service 8a.m. 7 p.m., EST, Monday Friday 9am. 6 p.m, EST, Saturday 1-888-43-HUSKY WWW. HUSKYTOOLS.COM Retain this manual for future use.