
Use and Care Manual


Assembly (continued)
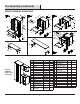
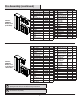
DRAWER REMOVAL AND REPLACEMENT (IF APPLICABLE)
DRAWER REMOVAL
DRAWER REPLACEMENT
Extend the drawer slides (L1 & L2) from the tool chest or cabinet. Insert the brackets on
each side of the drawer into the slots in the slides, being careful that they are properly
positioned. Once properly inserted, completely close the drawer to set the slides in
their proper positions.
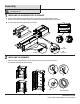
Push down – one side
Pull up – other side
Empty the drawer. Pull the drawer out so it’s almost fully extended. There are two
black release levers, one on each side of the drawer. Pull up the black release lever
on one side, while pushing down the black release lever on the other side. While
holding the levers in the positions as instructed above, pull the drawer outward until
it is released from the drawer slides (L1 & L2).
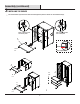
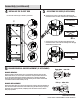
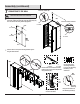
INSTALLING THE CLOSET ROD ADJUSTING THE DOOR (IF APPLICABLE)
See from the top
Level
See from the top
Not level
See from the top
≈4mm
6
4 5
WWW.HUSKYTOOLS.COM
Please contact 1-888-HD-HUSKY for further assistance.
9
Place the closet rod (P) as shown in your locker. Screw the inner screw on the hinge (R) to adjust the gap
between the doors and shell. Ensure the door is always level.
Screw the outer screw on the hinge (R) to adjust the gap
between the doors. Ensure the door is always level. The gap
should always be about 4 mm.
P
X 1