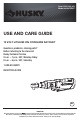
Item #1003 325 401 Model #H38CPRAT USE AND CARE GUIDE 12 VOLT LITHIUM ION CORDLESS RATCHET Questions, problems, missing parts? Before returning to the store,call Husky Customer Service 8 a.m. – 7 p.m., EST, Monday-Friday 9 a.m. – 6 p.m., EST, Saturday 1-888-HD-HUSKY HUSKYTOOLS.COM BC THANK YOU We appreciate the trust and con you have placed in Husky through the purchase of this 12 Volt Lithium Ion Cordless Ratchet. We strive to continuallycreate quality products designed to enhance your home.
Table of Contents Table of Contents……….….……….……… 2 Safety Information……….……………..…...2 Warranty……………………….…………..….6 Pre-Operation…………….……………...…..7 Operation…………….……….……………..9 Maintenance………………………………11 Safety Information □ Avoid body contact with earthed or grounded surfaces, such as pipes, radiators, ranges and refrigerators. There is an increased risk of electric shock if your body is earthed or grounded. □ Do not expose power tools to rain or wet conditions.
□ Prevent unintentional starting. Ensure the switch is in the off-position before connecting to power source and/or BATTERY pack, picking up or carrying the tool. Carrying power tools with your finger on the switch or energising power tools that have the switch on invites accidents. □ Remove any adjusting key or wrench before turning the power tool on. A wrench or a key left attached to a rotating part of the power tool may result in personal injury. □ Do not overreach.
SERVICE IMPORTANT SAFETY RULES FOR CHARGER □ Have your power tool serviced by a qualified repair person using only identical replacement parts. This will ensure that the safety of the power tool is maintained. □ Never service damaged BATTERY packs. Service of BATTERY packs should only be performed by the manufacturer or authorized service providers. □ To reduce the risk of electric shock or damage to the tool and charger, only use the charger (model no. 7106) provided by the manufacturer.
FCC STATEMENT WARNING: ALWAYS use safety glasses. Everyday eyeglasses are NOT safety glasses. Also use face or dust mask if cutting operation is dusty. ALWAYS WEAR CERTIFIED SAFETY EQUIPMENT: Compliance Statement: This device complies with part 15 of the FCC Rules. Operation is subject to the following two conditions: (1) This device may not cause harmful interference, and (2) this device must accept any interference received, including interference that may cause undesired operation. ANSI Z87.
Warranty 2 YEAR LIMITED WARRANTY If within two years from date of purchase, this Husky product fails due to a defect in materials or workmanship, return the product to any Home Depot retail store with a receipt indicating proof of purchase for free repair (or replacement if repair is not possible). This warranty only applies for 90 days from the date of purchase if this product is ever used in a commercial or rental application.
Pre-Operation TECHNICAL SPECIFICATIONS Ratchet Charger Model H38CPRAT Model 7106 Motor 12V DC Input 100-240V ~ 50/60Hz No-Load Speed 0-230 rotations / min Torque Range 30 ft-lb (40.5Nm) Square Drive 3/8” (10mm) Optimum Operating Temperature Weight Output Charging Time Optimum Operating Temperature 32°F(0°C) to 104°F(40°C) Weight 2.15 lbs. 12V 1.8A 70 min 32°F(0°C) to 104°F(40°C) 0.27 lbs.
INTENDED USE This tool is intended for the fastening and loosening of bolts, nuts and various threaded fasteners within the respective range of dimensions. This cordless ratchet has a square anvil that accepts only standard 3/8” (10 mm) sockets. □ DO NOT use under wet conditions or in presence of flammable liquids or gases. DO NOT let children come into contact with the tool. Supervision is required when inexperienced operators use this tool.
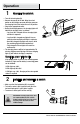
Operation 1 Charging the ratchet □ Turn off the lock button (D). □ Connect charger (G) to the tool. Align the raised portion on the charger connector with the groove on the charging inlet of the tool and insert it in position. □ Plug into an appropriate outlet. □ During the charging process, the charging lights will indicate the charging status as follows: - Less than 30% charged: all three charging lights will blink in sequence.
Operation 3 Using the Lock button □ To lock the paddle switch (C), slide the lock button (D) to the locked position. To unlock the paddle switch (C), slide the lock button (D) to the unlocked position. The paddle switch (C) will not work when the lock button (D) is in the locked position. WARNING: Always lock the paddle D switch before performing maintenance, changing accessories, storing the tool and any time the tool is not in use.
Operation 6 7 Using the LED worklight □ When the tool is switched on, the LED worklight (E) also comes on to ensure better vision and to make working in dark areas safer. 8 Tightening bolts and nuts □ Install the correct socket to match the bolt or nut. □ Apply just enough pressure to keep the socket engaged on the bolt or nut. □ Position the forward/reverse lever (B) in the correct position for forward rotation. □ Initially apply minimal pressure to the paddle switch (C).
Questions, problems, missing parts? Before returning to the store, call Husky Customer Service 8 a.m. – 7 p.m., EST, Monday-Friday, 9 a.m. – 6 p.m., EST, Saturday 1-888-HD-HUSKY HUSKYTOOLS.COM Retain this manual for future use.
Ítem núm.1003 325 401 Modelo núm. H38CPRAT GUÍA DE USO Y CUIDADO TRINQUETE INALÁMBRICO DE IONES DE LITIO DE 12 VOLTIOS ¿Preguntas, problemas, piezas faltantes? Antes de regresar a la tienda, llame al Servicio de Atención al Cliente de Husky 8 a.m. – 7 p.m., hora estándar del este, de lunes a viernes 9 a.m. – 6 p.m., hora estándar del este, los sábados 1-888-HD-HUSKY HUSKYTOOLS.
Índice Índice……………………….……….….…...…2 Información de seguridad…………….…... 2 Garantía..…………………….……..……..…..7 Preoperación…………….…………..….…… 8 Operación………….…..…….…………….. 10 Mantenimiento…………..…………………12 Información de seguridad eléctrica. Las distracciones pueden hacer que pierdas el control. ADVERTENCIAS DE SEGURIDAD GENERALES PARA HERRAMIENTAS ELÉCTRICAS SEGURIDAD ELÉCTRICA □ Los enchufes de cualquier herramienta eléctrica deben coincidir con el tomacorriente.
□ Si está obligado por las circunstancias a utilizar una herramienta eléctrica en un sitio húmedo, utilice un INTERRUPTOR DE CORRIENTE RESIDUAL (RCD, por sus siglas en inglés) de fuente de alimentación protegida. Utilizar este interruptor disminuye el riesgo de descarga eléctrica. SEGURIDAD PERSONAL □ Manténgase alerta, fíjese bien en lo que está haciendo y utilice el sentido común al manipular una herramienta eléctrica. No la utilice cuando esté cansado o bajo el efecto del alcohol, drogas o medicamentos.
□ Nunca trate de reparar BATERÍAS dañadas. El servicio técnico de las BATERÍAS solo debe realizarlo el fabricante o proveedores autorizados para el servicio. □ Los mangos y las superficies de agarre se deben mantener secas, limpias y sin aceite ni grasa. Los mangos y las superficies de agarre resbaladizas no permiten el manejo seguro y dificultan el control de la herramienta en situaciones inesperadas.
REGLAS IMPORTANTES DE SEGURIDAD PARA EL USO DEL CARGADOR □ Para reducir el riesgo de descargas eléctricas o daños a la herramienta y el cargador, utilice solo el cargador (modelo núm. 7106) proporcionado por el fabricante. □ No ponga a cargar la herramienta si la carcasa está cuarteada o dañada. Las descargas eléctricas o incendios pueden causar lesiones. □ No exponga el cargador a la lluvia o nieve. □ Este cargador no fue diseñado para ningún otro uso que no sea cargar el trinquete.
DECLARACIÓN DE FCC Declaración de cumplimiento: Este dispositivo cumple con la parte 15 de las normas de FCC. El funcionamiento está sujeto a las dos condiciones siguientes: (1) Este dispositivo no puede causar interferencias perjudiciales, y (2) este dispositivo debe aceptar cualquier interferencia recibida, incluidas las interferencias que puedan provocar un funcionamiento no deseado. Datos para correspondencia al responsable en EE. UU: HOME DEPOT 2455 PACES FERRY RD., N.W.
Garantía 2 AÑOS DE GARANTÍA LIMITADA Si en el plazo de dos años a partir de la fecha de compra, este producto Husky falla debido a un defecto en los materiales o mano de obra, devuelva el producto a cualquier tienda de Home Depot con el recibo donde conste la prueba de compra para obtener una reparación gratuita (o se le puede cambiar por otra herramienta si no es posible repararla).
Preoperación ESPECIFICACIONES TÉCNICAS Trinquete Cargador Modelo H38CPRAT Motor CC 12 V Modelo 7106 0-230 rotaciones / min Entrada 100-240 V ~ 50/60 Hz Velocidad sin carga Rango de torsión Encastre cuadrado Temperatura de funcionamiento óptima Peso Salida 30 pies por libra (40.5 Nm) 12 V 1.8 A 3/8” (10 mm) Tiempo de carga 70 min 32°F (0°C) a 104°F (40°C) Temperatura de funcionamiento óptima 32°F (0°C) a 104°F (40°C) Peso 2.15 lb (975 g) 0.
USO PREVISTO Esta herramienta está diseñada para fijar y aflojar tornillos, tuercas y diversos elementos de sujeción con rosca dentro de la respectiva gama de dimensiones. Este trinquete inalámbrico tiene un encastre macho cuadrado que acepta solamente dados estándar de 3/8” (10 mm). □ NO LO UTILICE en condiciones húmedas o en presencia de líquidos o gases inflamables. NO PERMITA que los niños entren en contacto con la herramienta.
Operación 1 Carga del trinquete □ Desactive el botón de bloqueo (D). □ Conecte el cargador (G) a la herramienta. Alinee la parte elevada en el conector del cargador con la ranura sobre la entrada para cargar la herramienta e insértelo en su lugar. □ Conecte el aparato a un tomacorriente adecuado. □ Durante el proceso de carga, las luces de carga indicarán el estado de carga de la siguiente manera: - Menos de un 30% de carga: las tres luces de carga parpadearán en secuencia.
Operación 3 Uso del botón de bloqueo □ Para bloquear el interruptor de paleta (C), deslice el botón de bloqueo (D) a la posición de bloqueo. Para desbloquear el interruptor de paleta (C), deslice el botón de bloqueo (D) a la posición de desbloqueo. El interruptor de paleta (C) no funcionará cuando el botón de bloqueo (D) esté en la posición de bloqueo.
Operación 6 Uso de la luz de trabajo LED □ Cuando la herramienta está encendida, la luz de trabajo LED también se enciende para garantizar una mejor visión y para que el trabajo en áreas oscuras se realice con mayor seguridad. 8 7 □ Instale el dado correcto para que coincida con el tornillo o tuerca. □ Aplique suficiente presión para mantener el dado conectado en el tornillo o tuerca. □ Coloque la palanca de avance/retroceso (B) en la posición correcta para la rotación hacia adelante.
¿Preguntas, problemas, piezas faltantes? Antes de regresar a la tienda, llame al Servicio de Atención al Cliente de Husky 8 a.m. – 7 p.m., hora estándar del este, de lunes a viernes, 9 a.m. – 6 p.m., hora estándar del este, los sábados 1-888-HD-HUSKY HUSKYTOOLS.COM Guarde este manual para uso futuro.