SKU # 1002 947 834 THD.com # 1002 488 952 Model # HOLT46XDB12 USE AND CARE GUIDE HUSKY 46 IN. ADJUSTABLE HEIGHT WORK TABLE Questions, problems, missing parts? Before returning to the store, call Husky Customer Service 8 a.m. - 7 p.m., EST, Monday-Friday, 9 a.m. - 6 p.m., EST, Saturday 1-888-HD-HUSKY HUSKYTOOLS.COM THANK YOU ! We appreciate the trust and confidence you have placed in Husky through the purchase of this work table.
Table of Contents Table of Contents ...................................................... 2 Assembly ............................................................... Safety Information........................................................ 2 Warranty ........................................................................ 3 Operation ................................................................ 8 Care and Cleaning ................................................... 4 Service Parts .............
Warranty The manufacturer warrants the product to be free from defects in materials and workmanship for a period of three (3) years from date of purchase. This warranty applies only to the original consumer and only to products used in normal use and service.
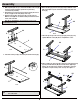
Pre-Assembly TOOLS REQUIRED Phillips screwdriver Safety goggles 10 mm Wrench 13 mm Wrench HARDWARE INCLUDED NOTE: Hardware not shown to actual size. AA Part AA BB CC DD Description Screw M6 x 15L Bolt M8 x 15L Washer M8 5/8 in. Wrench CC BB Quantity 26 4 4 1 SPECIFICATIONS Maximum capacity 300 lbs NOTE: Begin product assembly close to the final intended location of your workbench. This product is heavy and may be difficult to move after assembly.
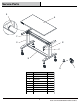
Pre-Assembly (continued) PACKAGE CONTENTS G A F B E C H or Part Description Quantity A Wood top 1 B Leg (Right) 1 C Crank handle 1 D Leveling feet 4 E Leg (Left) 1 F Top rail 1 G Rotating rod 1 H Support rail 1 I Caster 4 5 D I HUSKYTOOLS.COM Please contact 1-888-HD-HUSKY for further assistance.
Assembly 1. While unpacking the unit, you can leave the workbench wood top (A) inside the original packaging to prevent the top from being scratched during assembly. 2. Determine the front and back of the top before starting. The front of the wood top (A) has the Husky badge on the edge. 3. Attach the right leg (B) to the wood top (A) as shown using four M6x15L screws (AA). Be sure that the rotating mechanism faces the inside of the work table. 5.
Assembly (continued) Or 7b. Option 2: Attach the support rail (H) to the bottom of the leg (B) and leg (E) using four M8x15L bolts (BB) and four M8 washers (CC). Finger tighten only. Leveling feet installation BB H D CC B B E E 8. Square the workbench and then securely tighten all fasteners with a 10 mm and 13 mm wrench. 10. Using two or more people, stand the workbench in its upright position. Note: Use caution to not overtighten. 11.
Operation 2 Height Adjustment 1 Leveling Foot Adjustment □ Insert the crank handle (C) into the shaft and align it in the hole until it is engaged. □ To raise the table, turn the crank handle counterclockwise to the desired height. □ To lower the table, turn the crank handle clockwise until it reaches the desired height. □ To avoid damage, do not keep turning the crank handle once it has rested at its highest or lowest position.
Service Parts G A F B E C H or D Part Description I Quantity A Wood top 1 B Leg (Right) 1 C Crank handle 1 D Leveling feet 4 E Leg (Left) 1 F Top rail 1 G Rotating rod 1 H Support rail 1 I Caster 4 9 HUSKYTOOLS.COM Please contact 1-888-HD-HUSKY for further assistance.
Questions, problems, missing parts? Before returning to the store, call Husky Customer Service 8 a.m.-7 p.m., EST, Monday-Friday, 9 a.m. - 6 p.m., EST, Saturday 1-888-HD-HUSKY HUSKYTOOLS.COM Retain this manual for future use.
SKU núm. 1002 947 834 THD.com núm. 1002 488 952 Modelo núm. HOLT46XDB12 GUÍA DE USO Y MANTENIMIENTO MESA DE TRABAJO HUSKY, DE 1.2 M Y ALTURA AJUSTABLE. ¿Preguntas, problemas o piezas faltantes? Antes de devolver a la tienda, llama al servicio al cliente de Husky, de 8 a.m. a 7 p.m, Hora Estándar del Este, de lunes a viernes, y los sábados de 9 a.m. a 6 p.m., Hora Estándar del Este, por el teléfono 1-888-HD-HUSKY HUSKYTOOLS.
Tabla de contenido Tabla de contenido .................................................. 2 Ensamblaje. .......................................................... 6 Información de seguridad ................................ 2 Funcionamiento ................................................ 8 3 Cuidado y mantenimiento ................................ 8 Piezas de repuesto .................................................. 9 Garantía ......................................................................
Garantía El fabricante garantiza que este producto no presentará defectos materiales ni de fabricación durante tres (3) años a partir de la fecha original de compra. Esta garantía es válida solo para el consumidor original y cubre solo productos en uso y servicio normales.
Preensamblaje HERRAMIENTAS NECESARIAS Destornillador Phillips Gafas de seguridad Llave de 10 mm Llave de 13 mm SE INCLUYEN HERRAJES NOTA: Los herrajes no se muestran en tamaño real. AA Pieza AA BB CC DD Descripción Perno M6 x 15L Perno M8 x 15L Arandela M8 Llave de 5/8 plg CC BB Cantidad 26 4 4 1 ESPECIFICACIONES Capacidad máxima 136.1 kg NOTA: Comienza el ensamblaje del producto cerca de la ubicación final deseada de tu banco de trabajo.
Preensamblaje (continuación) CONTENIDO DEL PAQUETE G A F B E C H or D Pieza Descripción I Cantidad A Cubierta de madera 1 B Pata (derecha) 1 C Mango de la manivela 1 D Patas niveladoras 4 E Pata (izquierda) 1 F Riel superior 1 G Varilla giratoria 1 H Riel de soporte 1 I Rueda 4 5 HUSKYTOOLS.COM Para más asistencia, llama al 1-888-HD-HUSKY.
Ensamblaje 1. Al desempaquetar la unidad, puedes dejar la cubierta de madera (A) del banco de trabajo dentro del empaque original para evitar que la superficie se raye durante el ensamblaje. 2. Identifica la parte frontal y la posterior de la cubierta antes de comenzar.La parte frontal de la cubierta de madera (A) tiene una placa de Husky en el borde. 5. Fija la pata izquierda (E) a la cubierta de madera (A) con cuatro to rnillos M6 x 15L (AA). Aprieta sólo con los dedos.
Ensamblaje (continuación) Or Instalación de las patas niveladoras 7b. Fija el riel de soporte (H) a la parte inferior de las patas (B) y (E) con cuatro pernos M8 x 15L (BB) y cuatro arandelas (CC). Aprieta sólo con los dedos. BB H D CC B B E E 8. Ajusta el banco de trabajo a escuadra y enseguida, de forma segura, todos los sujetadores con una llave de 10 mm ad 13 mm. 10. Con la ayuda de dos o más personas, coloca el banco de trabajo en posición vertical. Nota: Ten cuidado de no ajustar demasiado.
Operación 2 Ajuste de la altura 1 Ajuste de la pata niveladora □ Inserta el mango de la manivela (C) en el eje y alinéalo en el orificio hasta que haya engranado completamente. □ Para elevar la mesa, gira el mango de la manivela hacia la izquierda hasta alcanzar la altura deseada. □ Para bajar la mesa, gira el mango de la manivela hacia la derecha hasta alcanzar la altura deseada. □ Para evitar daños, no sigas girando el mango de la manivela una vez alcanzada la posición más elevada o más baja.
Piezas de repuesto G A F B E C H or D Pieza Descripción I Cantidad A Cubierta de madera 1 B Pata (derecha) 1 C Mango de la manivela 1 D Patas niveladoras 4 E Pata (izquierda) 1 F Riel superior 1 G Varilla giratoria 1 H Riel de soporte 1 I Rueda - Polipropileno gris 4 9 HUSKYTOOLS.COM Para más asistencia, llama al 1-888-HD-HUSKY.
¿Preguntas, problemas o piezas faltantes? Antes de devolver a la tienda llama al servicio al cliente de Husky, de 8:00 a.m. a 7:00 p.m. (Hora Estándar del Este) de lunes a viernes, y los sábados de 9:00 a.m. a 6:00 p.m. (Hora Estándar del Este), por el 1-888-HD HUSKY. HUSKYTOOLS.COM Conserva este manual para uso futuro.