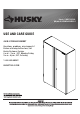
Item # 1005588596 Model # HOMD48XDB21 USE AND CARE GUIDE 48 IN. STORAGE CABINET Questions, problems, missing parts? Before returning to the store, call Husky Customer Service 8 a.m. - 7 p.m., EST, Monday-Friday 9 a.m.- 6 p.m., EST, Saturday 1-888-HD-HUSKY HUSKYTOOLS.
Keep the product on level surfaces. The product can become unstable on uneven surfaces. The cabinet may tip over if stored or moved on an uneven surface. This may cause personal injury, death, or product damage. This warranty excludes incidental/inconsequential damages and failures due to misuse, abuse or normal wear and tear. This full warranty gives you specific rights, and you may also have other rights, which vary from state to state. Contact the customer service team at 1-888-HD-HUSKY or visit www.
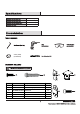
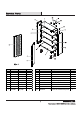
11 lbs / 5 kg 150 lbs / 68 kg 150 lbs / 68 kg 622 lbs / 282 kg Socket (8 mm) (not included) Part Part Code Description AA L03457416 M6 x 16L hex socket head screw 62 BB L03111A15 M6 x 40 hex tapping bolt 2 CC B30150MD36E2485A Shelf bracket 12 DD DMD54009 Adjustable foot 4 EE B27200MD36E2486A Safety bracket 1 FF L03112416 2 M6 x 16L hex socket head cap screw Quantity
Part Description Quantity Part Description Quantity A Top panel 1 F Bottom panel 1 B Shelf 3 G Right side panel 1 C Left side panel 1 H Back panel 5 D Left door 1 I Safety strap 1 E Right door 1
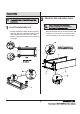
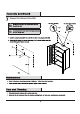
Attach the Side and Bottom Panels Install the Adjustable Feet □ Install the adjustable feet (DD) to the bottom panel (F). Make sure side A of the adjustable feet (DD) are facing either towards the back or the front of the cabinet. □ Tighten securely with sixteen M6 x 16 hex socket head screws (AA). □ Attach the side panels (C & G) to the bottom panel (F) with two M6 x 16 hex socket head cap screws (FF) (security screws) and six M6 x 16 hex socket head screws (AA).
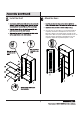
Attach the Back Panels Attach the back panels (H) to the back of the cabinet with thirty M6 x 16 hex socket head screws (AA). Insert the screws by hand. DO NOT tighten. Attach the Top Panel Attach the front top panel (A) to the side panels with ten M6 x 16 hex socket head screws (AA). Insert the screws by hand. DO NOT tighten.
Install the Shelf Attach the Doors Close the doors to see if the doors can touch the magnets completely and left door and right door are even. If not, adjust the cabinet’s top and side panels to make sure the shape of the cabinet is square and flush. Until the doors can catch the magnets and left door and right door are even completely, tighten the top and back panels’ screws.
Connect the Cabinet to the Wall
Quantity Part Part Code Description Top panel 1 J K06120121 Lock 1 DMD54021 Shelf 3 K K06120122 Key 2 C DMD54002 Left side panel 1 L L1315004 Magnet 4 D DMD54019 Left door 1 AA L03457416 M6 x 16L hex socket head screw 62 E DMD54020 Right door 1 BB L0308H440 M6 x 40 hex tapping bolt 2 F DMD54017 Bottom panel 1 CC B30150MD36E2485A Shelf bracket 12 G DMD54003 Right side panel 1 DD DMD54009 Adjustable foot 4 H DMD54018 Back panel 5 EE B27200MD36E2486A
Questions, problems, missing parts? Before returning to the store, call Husky Customer Service 8 a.m.-7 p.m., EST, Monday-Friday, 9 a.m. - 6 p.m. EST Saturday 1-888-HD-HUSKY HUSKYTOOLS.COM Retain this manual for future use.
Artículo # 1005588596 Modelo # HOMD48XDB21 GUÍA DE USO Y CUIDADO GABINETE PARA ALMACENAJE, 48 plg (121.9 cm) ¿Preguntas, problemas, piezas faltantes? Antes de devolver a la tienda, llama al Servicio al cliente de Husky: entre 8:00 a.m. y 7:00 p.m. (hora del Este), de lunes a viernes, y los sábados entre 9:00 a.m. y 6:00 p.m. (hora del Este) 1-888-HD-HUSKY HUSKYTOOLS.COM Debido a mejoras continuas, el producto real pudiera ser ligeramente diferente al producto aquí descrito.
Tabla de Contenido Tabla de Contenido ................................................... 2 Información de Seguridad ...................................... 2 Garantía. ....................................................................... 2 Especificaciones.............................................. 2 Preinstalación .............................................. 3 Ensamblaje ...........................................................5 Mantenimiento......................................................
Especificaciones Carga máxima para cada puerta 11 lb / 5 kg Carga máxima por repisa 150 lb / 68 kg Carga máxima para el panel inferior 150 lb / 68 kg Carga total máxima 622 lb / 282 kg Preinstalación HERRAMIENTAS NECESARIAS Llave hexagonal Taladro (no incluido) Dado (8 mm) (no incluido) Gafas de seguridad (no incluidas) Punta de destornillador hexagonal HERRAJES INCLUIDOS NOTA: Los tornillos y pernos se muestran en su tamaño real.
Preinstalación (continuación) CONTENIDO DEL PAQUETE Pieza Descripción Cantidad Pieza Descripción Cantidad A Panel superior 1 F Panel inferior 1 B Repisa 3 G Panel derecho 1 C Panel izquierdo 1 H Panel posterior 5 D Puerta Izquierda 1 I Correa de seguridad 1 E Puerta derecha 1
Ensamblaje NOTA : Ensamblar sobre una superficie plana. Colocar un cartón para prevenir que el producto se arañe o raye durante el ensamblaje. Fijar los paneles laterales e inferior Dos tornillos hexagonales roscados con cabeza de dado M6 x 16 (FF) —tornillos de seguridad— deben fijarse en la cara interior izquierda del gabinete para más seguridad de la puerta. Instalar la pata ajustable □ Instalar la pata ajustable (DD) a la parte inferior del panel (F).
Ensamblaje (continuación) Fijar los paneles posteriores Asegura que tu piso esté libre de desechos o que el frente del gabinete esté protegido antes de tenderlo horizontalmente sobre su frente. Tender el gabinete sobre su frente. Fijar los paneles posteriores (H) a la parte posterior del gabinete con treinta tornillos hexagonales con cabeza de dado M6 x 16 (AA). Insertar los tornillos con la mano. NO apretar.
Ensamblaje (continuación) Instala la repisa Fijar las puertas Inserta doce soportes de repisa (CC) en las ranuras de los paneles laterales (C y G) a la altura deseada. Asegura que los cuatro soportes (CC) queden a la misma altura. Coloca la repisas (B) sobre los soportes de repisa (CC) y empuja aquella hacia abajo sobre estos. Asegura que la repisas (B) quede bien y firmemente fijada por los ganchos verticales de sus soportes.
Ensamblaje (continuación) Fijar el gabinete a la pared Vista desde la parte superior del gabinete Los pernos hexagonales roscados M6 x 40 (BB) deben introducirse en las vigas de la pared. Vista desde el interior del gabinete El perno hexagonal de seguridad M6 x 40 del soporte de seguridad inferior debe quedar a 70.4 plg (178.8 cm) del piso. Instala el soporte de seguridad (EE) en la pared con dos tornillos hexagonales roscados M6 x 40 (BB).
Piezas de repuesto Pieza Código de pieza Descripción Cantidad Pieza Código de pieza Descripción Cantidad A DMD54010 Panel superior 1 J K06120121 Bloqueo 1 B DMD54015 Repisa 3 K K06120122 Llave 2 C DMD54002 Panel izquierdo 1 L L1315004 IMÁN 4 D DMD54013 Puerta izquierda 1 AA L03457416 E DMD54014 Puerta derecha 1 BB L03111A15 F DMD54011 Panel inferior 1 CC B30150MD36E2485A Soporte para estante 12 G DMD54003 Panel derecho 1 DD DMD54009 4 H DMD54012 Pane
¿ Preguntas, problemas o piezas faltantes? Antes de devolver a la tienda, llama al Servicio al Cliente de Husky, de lunes a viernes, entre 8:00 a.m. y 7:00 p.m. (hora estándar del Este), y los sábados de 9:00 a.m. a 6:00 p.m. (hora estándar del Este). 1-888-HD-HUSKY HUSKYTOOLS.COM Conserva este manual para uso futuro.